 (1)")

Building a wooden swing set frame from scratch is a rewarding weekend project that transforms your backyard into a hub of outdoor joy. Creating your own play structure allows you to take control of the design, ensuring it fits perfectly into your available space while meeting your specific aesthetic preferences.
More importantly, taking the do-it-yourself approach means you oversee every piece of hardware and cut of lumber, guaranteeing the highest safety standards for your family. A sturdy, well-constructed wooden frame provides a reliable foundation for swings, trapeze bars, and climbing ropes.
Let’s dive into how to make a wooden swing set frame.
What are the Benefits?
Choosing to build your own wooden swing set frame comes with numerous advantages over buying a pre-made kit. First, it is often more cost-effective, allowing you to invest your budget into higher-quality lumber and heavy-duty hardware rather than paying for branding and retail markups. Second, you get complete customization. You can choose the exact height, width, and style to match your landscaping and accommodate the specific swings your family wants. Finally, a custom-built frame made from thick, pressure-treated lumber is incredibly durable. It will easily outlast flimsy metal frames and withstand harsh weather conditions, providing a safe play environment for decades.
What Will You Need?
Before you start cutting and drilling, gather all the necessary tools and materials. Having everything on hand makes the building process smooth and efficient.
Materials:
- One 4×6 wooden beam (typically 10 to 12 feet long for the top beam)
- Four 4×4 wooden posts (typically 8 to 10 feet long for the A-frame legs)
- Two steel A-frame swing set brackets
- Heavy-duty swing hangers
- Galvanized carriage bolts, washers, and lock nuts
- Wood screws and lag bolts
- Ground anchors
Tools:
- Power drill with various wood bits
- Circular saw or miter saw
- Socket wrench set
- Tape measure and carpenter’s square
- Bubble level
- Stepladder
- Safety glasses and work gloves
10 Easy Steps on How to Make a Wooden Swing Set Frame
Step 1: Planning and Site Selection
Start by choosing where to build your swing set. A level surface ensures the final frame is sturdy and safe, so walk your yard to find a spot free of sloping ground. An ideal area has at least six feet of open space in front and behind the swings, and at least two to three feet on each side, so children can swing back and forth freely without any risk of hitting walls, fences, or trees. Remove stones, branches, and any potential tripping hazards. Check for overhead obstacles like wires or low branches. It’s wise to mark the corners of your intended frame with stakes and string—this will help you visualize the finished footprint and make certain it’s in the best spot for supervision and play.

Step 2: Gathering Materials and Tools
Preparation is key for a smooth assembly. Begin by sourcing quality, pressure-treated lumber; inspect each beam and post to confirm it’s straight, free from major knots, and does not show signs of splitting. Organize fasteners such as galvanized bolts and screws in a tackle box for easy access—having everything within reach will prevent frustrating delays. Lay your tools out on a tarp by the building site, and double-check you have all specialized items like A-frame brackets and swing hangers. If you’re using power tools, check that all batteries are charged or extension cords can safely and comfortably reach your workspace. Safety should be the top priority: wear sturdy gloves, closed-toe shoes, and safety glasses.
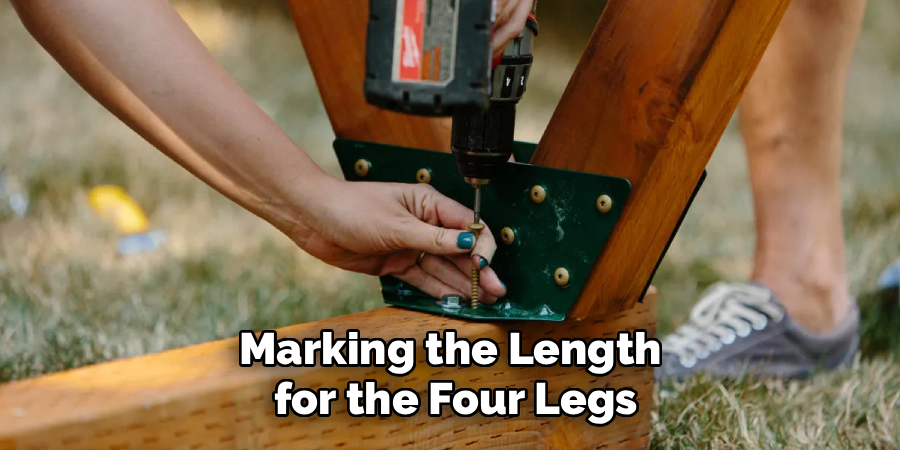
Step 3: Measuring and Cutting the Lumber
Precision in measuring and cutting protects both the integrity of your structure and the safety of its users. Begin by carefully marking the length for the four legs, typically eight feet, using a tape measure and carpenter’s square to ensure clean, 90-degree lines. Make all support posts the same length—uneven legs could introduce instability. If you want your swing set to sit flush with the ground, measure and cut a five to 10-degree angle at the base of each post so they anchor firmly and stand square. Use a circular saw for the main cuts and sand any rough ends or splinters. Before discarding off-cuts, double-check your measurements for accuracy and adjust if necessary.
Step 4: Assembling the A-Frames
Lay two of the 4×4 posts in a “V” shape on a flat surface, ensuring both tops meet at a precise angle. The steel A-frame brackets act as guides and connectors—slide the posts into the bracket fully. Before securing them, use a carpenter’s square to check for evenness. If your bracket is adjustable, ensure the angle matches the intended height and width. The symmetry of your A-frames is important; they must be mirror images so your final assembly is straight and balanced. Do the same for the second pair of legs, ensuring both A-frames are built to identical dimensions.
Step 5: Securing the A-Frame Brackets
With both legs snug in the bracket, use your power drill and the correct bit to pre-drill holes through the bracket’s metal guides into the wood. This minimizes the chance of splitting. Drive lag bolts or carriage bolts through each pre-drilled hole, using washers under each bolt head to spread pressure and safeguard the wood and metal from wear. Tighten each bolt securely with a socket wrench; there should be zero movement when you test the bracket. Thorough fastener installation here is vital to provide long-term stability to the swing set.
Step 6: Attaching the Top Beam
Lay the 4×6 top beam next to the assembled A-frames. With the help of a partner, carefully align and insert one end of the beam into the top channel of an A-frame bracket. Attach it using the provided hardware—typically larger carriage bolts and lock nuts—for maximum strength. Then, fit the second A-frame bracket onto the opposite end of the beam, double-checking the frame is straight before tightening. Securing the beam while the whole assembly is flat on the ground allows better leverage and ensures accuracy. Make sure each bracket is centered and flush with the top beam before final tightening to prevent future shifting.

Step 7: Standing the Frame Upright
As the frame will be heavy and awkward, lifting it into position is safer as a team effort. Communicate clearly with your helpers to lift together, moving the frame slowly into its planned location. Once stood upright, adjust each A-frame leg so they are resting fully on the ground and the top beam sits level (check accuracy using a bubble or laser level). Take time during this stage—ensuring the swing set is square and balanced now will improve safety and extend its life.
Step 8: Installing the Swing Hangers
Plan the placement of your swings, making sure there is adequate space for swinging and that the hangers align with the intended seats. Mark drill points at least 18 inches apart and 12 inches from the end of the beam, never closer than six inches to an edge. Drill pilot holes up into the center of the beam—pilot holes help anchor the hardware and prevent splitting the wood. Install each hanger and use a wrench to tighten firmly, confirming each one spins freely without wobbling. For additional swings, calculate spacing so arms and seats won’t collide during play.
Step 9: Anchoring the Swing Set
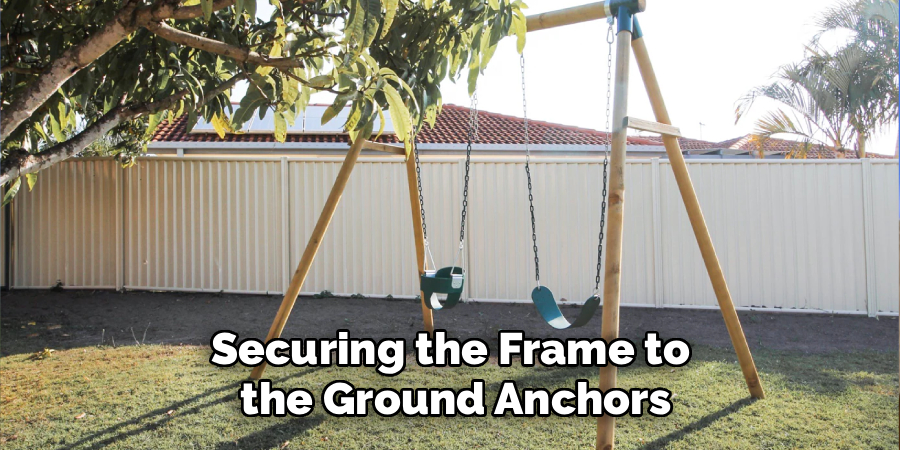
Securing the frame to the ground anchors is critical for longevity and safety. Twist ground anchors by hand or with a steel rod until each is sunk 12–15 inches next to every leg—this provides robust resistance to tipping. Attach each anchor to the leg using galvanized lag screws, making sure each connection is tight. In very loose soil or climates with heavy wind, you may choose to concrete the anchors in place. Take your time with this step: if the ground anchoring is not strong, the whole swing set is at risk of movement.
Step 10: Final Safety Inspection
Conduct a slow walk-around of the finished swing set, scanning every bolt, bracket, screw, and joint for tightness. Shake the structure firmly from multiple angles to test its stability. Ensure all swing seats are suspended at an appropriate height above soft ground—typically 12–18 inches. Install safety surfacing beneath (such as rubber mats or play-grade mulch) to cushion falls. Inspect every surface for splinters or sharp edges, sanding if needed. Lastly, supervise the first swings, watching and listening for any odd noises or unexpected movement, to confirm the frame’s safety and durability for years of use.
5 Things You Should Avoid
- Using Untreated Wood: Never use untreated indoor lumber, as it will quickly rot and weaken when exposed to rain and ground moisture.
- Skipping Ground Anchors: Avoid leaving the frame unanchored, as the momentum of swinging children can easily cause the structure to tip over.
- Building on a Slope: Do not install the swing set on uneven ground; an unlevel top beam puts dangerous stress on the hardware and joints.
- Overcrowding Swings: Avoid placing swings too close together, which leads to mid-air collisions and potential injuries.
- Using Cheap Hardware: Do not compromise by using standard drywall screws or cheap metal brackets; always opt for thick, galvanized steel bolts designed for heavy loads.
Conclusion
How to make a wooden swing set frame is an achievable and highly fulfilling project that brings lasting value to your home.
By gathering the right materials, utilizing heavy-duty brackets, and carefully following these steps, you create a robust structure capable of withstanding years of energetic play. Always prioritize safety by choosing level ground, securing strong anchors, and routinely checking the hardware.
Once the final bolt is tightened and the swings are hung, you can sit back and watch your family enjoy a custom-built playground right in your own backyard.
About
Mike May is a distinguished figure in the world of woodworking and timber design, with a decade of expertise creating innovative and sustainable indoor solutions. His professional focus lies in merging traditional craftsmanship with modern manufacturing techniques, fostering designs that are both practical and environmentally conscious. As the author of Woodimber, Mike delves into the art and science of timber-craft, inspiring artisans and industry professionals alike.
Education
RMIT University (Melbourne, Australia)
-
Associate Degree in Design (Timber): Focus on sustainable design, industry-driven projects, and practical craftsmanship.
-
Gained hands-on experience with traditional and digital manufacturing tools, such as CAD and CNC software.
Nottingham Trent University (United Kingdom)
-
Bachelor’s in Woodworking and Product Design (Honors): Specialized in product design with a focus on blending creativity with production techniques.
-
Participated in industry projects, working with companies like John Lewis and Vitsoe to gain real-world insights.
Publications and Impact
In Woodimber, May shares his insights on timber design processes, materials, and strategies for efficient production. His writing bridges the gap between artisan knowledge and modern industry needs, making it a must-read for both budding designers and seasoned professionals.