 (1)")

Building your own furniture is a uniquely rewarding experience. It connects you to your home in a new way, allowing you to create functional pieces that perfectly fit your needs and style.
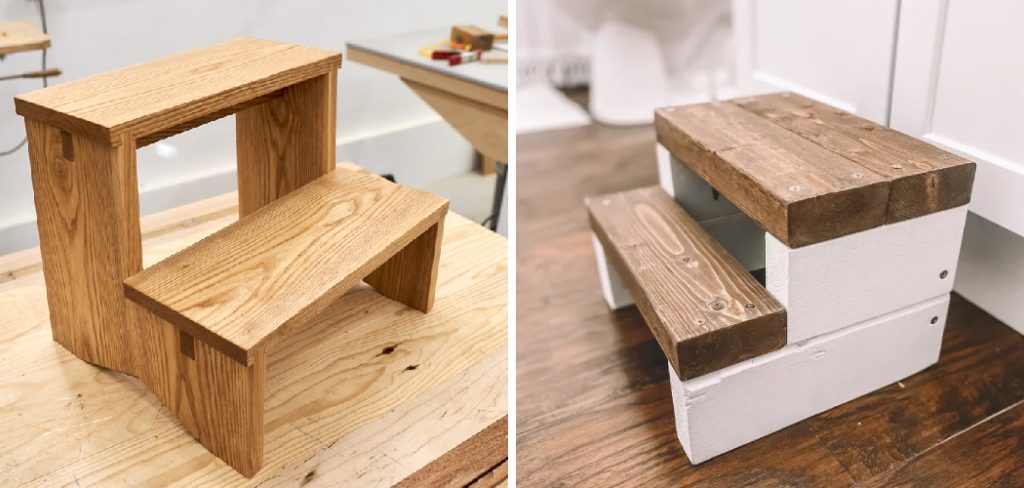
A wooden step stool is an ideal project for anyone looking to get started in woodworking. It’s practical, relatively simple to construct, and the finished product is something you’ll use almost every day.
Whether you need a boost to reach the top shelf in the kitchen, a small seat for gardening, or a helpful step for a child to reach the sink, this guide will walk you through every stage of the process.
Let’s dive into how to make step stool wood.
What Will You Need?
Materials:
- One 1″ x 10″ x 8′ common board (pine is a great, affordable choice for beginners)
- 1 ¼-inch pocket hole screws
- Wood glue
- 120-grit and 220-grit sandpaper
- Wood filler (optional, for covering screw holes)
- Your choice of paint, stain, or clear finish (like polyurethane)
Tools:
- Tape measure
- Pencil
- Safety glasses
- Hearing protection
- Circular saw, or miter saw
- Jigsaw
- Drill/driver
- Pocket hole jig
- Clamps (at least two)
- Speed square or combination square
- Sanding block or random orbit sander
10 Easy Steps on How to Make Step Stool Wood
Step 1: Cut the Top and Sides
First, we will cut the main components from your 1″ x 10″ board. A miter saw will give you the cleanest and most accurate square cuts, but a circular saw with a guide will also work well. Put on your safety glasses. Measure and mark your board for the following pieces:
- One Top Piece: Cut one section to 16 inches long. This will be the main step.
- Two Side Pieces: Cut two identical sections, each 9 inches long. These will serve as the legs.
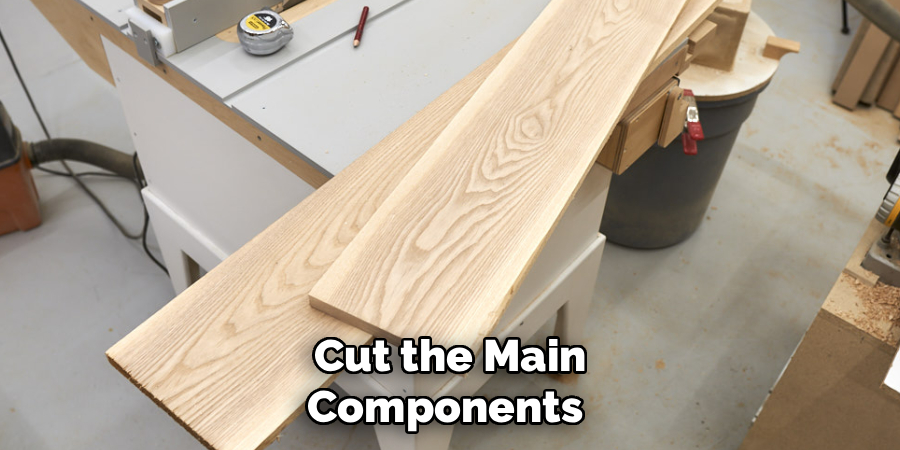
Double-check your measurements before making any cuts. Once you have your three primary pieces, set them aside. The side pieces must be exactly the same length to prevent the stool from wobbling. If they are slightly different, you can clamp them together and sand the longer edge down until they are perfectly even. A clean, square cut is crucial for a stable final product, so take your time with this initial step.
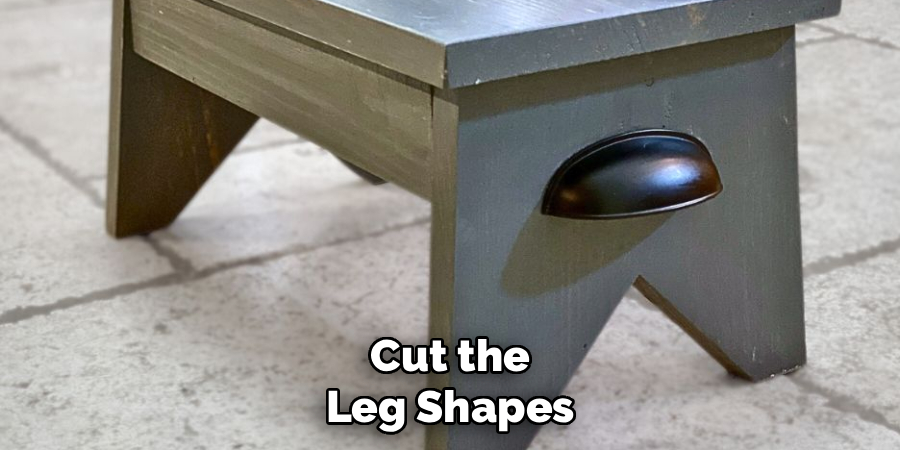
Step 2: Mark the Leg Design
Now we’ll add some shape to the side pieces to create stable feet and a decorative handle. Take one of the 9-inch side pieces. We will mark out the areas to be removed. First, create the feet. Measure 1 inch up from the bottom edge and 1 inch in from each side.
Draw lines to mark a 1-inch square at both bottom corners. Next, draw a gentle arch connecting the inside corners of these two squares. This arch will create two distinct feet and give the stool a more finished look. For the handle, find the center of the top edge of the side piece (at the 4.5-inch mark of its 9-inch height). From the top edge, measure down 1.5 inches. Mark this spot. This will be the center of your handle cutout.
Step 3: Cut the Leg Shapes
With your design marked on one side piece, it’s time to make the cuts. Clamp the board securely to your workbench, ensuring the marked lines are accessible. Use a jigsaw for this step, as it’s designed for cutting curves and shapes. Carefully follow the arched line you drew for the feet. Go slowly to maintain control and achieve a smooth curve.
Next, cut out the handle. If you drew an enclosed shape like an oval, you would first need to drill a starter hole inside the shape that is large enough for your jigsaw blade to fit through. Then, insert the blade and carefully cut along your marked line.
Step 4: Cut the Support Stretcher
A step stool needs reinforcement to prevent the legs from splaying outwards under weight. This is where the support stretcher comes in. The stretcher will connect the two side pieces underneath the top step. To get the right length, lay your 16-inch top piece on your workbench.
Place the two newly cut side pieces on their edges, flush against the ends of the top piece, as if you were assembling it. Now, measure the distance between the two side pieces. Since your 1″ board is actually ¾” thick, this distance should be 14.5 inches (16 inches minus ¾” for each side). To be certain, always measure your specific assembly. Cut one piece from your remaining lumber to this exact length.
Step 5: Drill Pocket Holes
Pocket holes are the secret to creating strong, hidden joints without complex joinery. We will use them to attach the sides to the top and to attach the stretcher to the sides. Set your pocket hole jig and drill bit for ¾-inch thick material, following the manufacturer’s instructions.
First, let’s drill the holes for the top. On the inside face of each side piece, drill three evenly spaced pocket holes along the top edge. These holes will be used to screw upwards into the underside of the top step. Next, take your support stretcher. On each of the shorter ends, drill two pocket holes. These will be used to drive screws sideways into the inside faces of the side pieces.
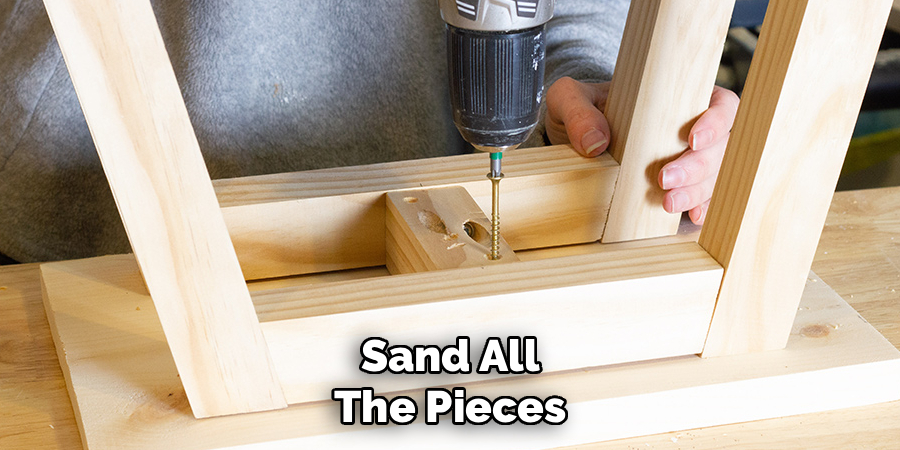
Step 6: Sand All the Pieces
Sanding before assembly is much easier than trying to get into tight corners later. Using a random orbit sander or a sanding block, start with 120-grit sandpaper. Sand all the faces and edges of your four pieces: the top, the two sides, and the stretcher. Pay special attention to the edges you cut with the jigsaw, smoothing out any rough spots or blade marks.
Round over all sharp corners and edges slightly. This process, known as “breaking the edges,” not only feels better to the touch but also helps paint or finish adhere more evenly and prevents splintering. Once everything feels smooth, wipe away all the dust with a clean cloth or a tack cloth.
Step 7: Assemble the Sides and Stretcher
It’s time for the first part of the assembly. This step creates the base of your stool. Grab your two side pieces, the support stretcher, wood glue, and clamps. Apply a thin layer of wood glue to one end of the stretcher. Position it between the two side pieces. A good height for the stretcher is about 3 inches up from the bottom of the feet.
Use your speed square to make sure it is perfectly perpendicular to the sides. Clamp the assembly together firmly. Drive 1 ¼-inch pocket hole screws through the holes in the stretcher into the side pieces. The glue creates a strong bond, and the screws provide the mechanical strength.
Step 8: Attach the Top
Your base is now a solid, H-shaped structure. The final assembly step is to attach the top piece. Flip the base assembly upside down and place it on your workbench. Run a bead of wood glue along the top edges of both side pieces. Carefully place the 16-inch top piece onto the base, ensuring it is centered. There should be a ¾-inch overhang on each end.
Use your tape measure to confirm the overhang is even. Once you are satisfied with the positioning, clamp the top securely to the base. Now, drive 1 ¼-inch pocket hole screws through the pocket holes you drilled in Step 5, going up from the side pieces into the underside of the top.
Step 9: Final Sanding and Preparation
Your step stool is now fully constructed! Before applying a finish, give it one last inspection. If you want a perfectly seamless look, you can use wood filler to cover the pocket holes on the stretcher (the ones attaching the top will be hidden). Apply the filler, let it dry completely, and then sand it smooth.
Now, go over the entire stool one more time with fine-grit sandpaper, such as 220-grit. This final sanding will remove any minor blemishes, glue residue, or roughness, leaving the wood with a silky-smooth surface ready for finishing. After this final sanding, it’s crucial to remove every trace of dust. Use a vacuum with a brush attachment, followed by a wipe-down with a tack cloth or a cloth slightly dampened with mineral spirits for the best results.
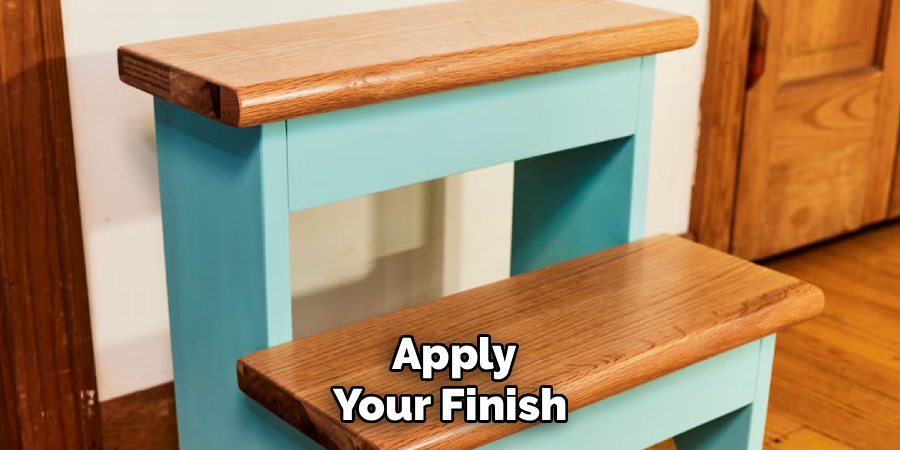
Step 10: Apply Your Finish
The final step is to protect your work and give it the look you want. You have several options. If you love the natural look of the wood, apply two or three coats of a clear finish like polyurethane or lacquer. This will protect it from moisture and wear while highlighting the wood grain. For a different color, you can apply a wood stain. Follow the product’s instructions, applying the stain, letting it penetrate, and wiping off the excess.
Always apply a clear protective topcoat over a stain. If you prefer a solid color, prime the stool first and then apply two coats of high-quality paint. For any finish, be sure to work in a well-ventilated area and allow adequate drying time between coats as recommended by the manufacturer.
5 Things You Should Avoid
Building safely and effectively means knowing what not to do. Keep these points in mind.
- Skipping Safety Gear: Sawdust, tool noise, and flying debris are serious hazards. Always wear safety glasses and hearing protection. Never wear loose clothing, jewelry, or gloves that could get caught in a saw blade.
- Using Dull Blades: A dull saw blade is dangerous. It requires more force to push through wood, increasing the risk of kickback and resulting in rough, burnt cuts. Ensure your saw blades are sharp.
- Ignoring Wood Glue: Screws provide clamping pressure, but wood glue creates the real, lasting bond between wood fibers. Assembling without glue will result in a weak stool that will loosen and wobble over time.
- Inaccurate Measurements: Even a small error in measurement can lead to a wobbly, unstable stool. Double-check every measurement before you cut, and use a square to ensure your lines and assemblies are true.
- Rushing the Finish: The finish is what protects your stool and makes it look professional. Rushing this step by not sanding properly, skipping primer, or applying coats too quickly will result in a poor-quality surface that won’t last.
Conclusion
Congratulations! You have successfully built a sturdy and attractive wooden step stool. This project has not only given you a useful item for your home but has also equipped you with valuable woodworking skills.
You’ve practiced measuring, cutting, assembling, and finishing—the core techniques behind countless other DIY projects. Look at the finished stool not just as a way to reach high shelves, but as a symbol of your creativity and capability.
We hope this guide on how to make step stool wood has inspired you to continue exploring the rewarding world of woodworking.
About
Mike May is a distinguished figure in the world of woodworking and timber design, with a decade of expertise creating innovative and sustainable indoor solutions. His professional focus lies in merging traditional craftsmanship with modern manufacturing techniques, fostering designs that are both practical and environmentally conscious. As the author of Woodimber, Mike delves into the art and science of timber-craft, inspiring artisans and industry professionals alike.
Education
RMIT University (Melbourne, Australia)
-
Associate Degree in Design (Timber): Focus on sustainable design, industry-driven projects, and practical craftsmanship.
-
Gained hands-on experience with traditional and digital manufacturing tools, such as CAD and CNC software.
Nottingham Trent University (United Kingdom)
-
Bachelor’s in Woodworking and Product Design (Honors): Specialized in product design with a focus on blending creativity with production techniques.
-
Participated in industry projects, working with companies like John Lewis and Vitsoe to gain real-world insights.
Publications and Impact
In Woodimber, May shares his insights on timber design processes, materials, and strategies for efficient production. His writing bridges the gap between artisan knowledge and modern industry needs, making it a must-read for both budding designers and seasoned professionals.