 (1)")

A wooden deck can be the heart of a home’s outdoor living space. It’s a place for family barbecues, quiet morning coffees, and relaxing evenings. Over time, however, exposure to sun, rain, and foot traffic can leave it looking faded, splintered, and worn. Restoring your deck not only brings back its original beauty but also protects your investment for years to come.
This guide will walk you through every step of the process, from initial cleaning to the final coat of sealant, ensuring you have all the knowledge needed to achieve a professional-quality finish.
Let’s dive into how to restore a wooden deck.
What Will You Need?
Gathering all your tools and materials before you start will make the process much smoother.
Tools:
- Pressure washer with multiple nozzles (including a low-pressure tip)
- Orbital sander or a pole sander
- Sandpaper (60-grit and 80-grit)
- Paint roller with an extension pole
- Paint tray
- Paintbrushes (various sizes)
- Stiff-bristled scrub brush
- Putty knife or scraper
- Hammer and nail set (or drill/driver)
- Broom and dustpan
- Shop vacuum (optional)
- Safety goggles, gloves, and a dust mask
Materials:
- Deck cleaner
- Wood brightener (optional, for tannin-rich woods like cedar or redwood)
- Wood stain or sealant
- Wood filler or epoxy
- Plastic sheeting and painter’s tape
- Rags
- Buckets
10 Easy Steps on How to Restore a Wooden Deck
Step 1: Clear and Inspect the Deck
Before you can begin any work, you need a blank canvas. Start by removing all furniture, planters, grills, and decorations from the deck. Sweep the surface thoroughly with a stiff broom to get rid of loose leaves, dirt, and other debris. Once the deck is completely clear, conduct a detailed inspection. Walk across every board, paying close attention to how they feel underfoot. Look for any loose or raised nails and screws. Use a hammer and nail set to sink popped nails below the surface, or use a drill to tighten or replace loose screws. Examine the wood for any signs of significant damage. Check for boards that are soft, spongy, or extensively cracked, as these may indicate rot and need to be replaced. Make a note of any areas with deep gouges or cracks that will need to be filled later.

Step 2: Protect Surrounding Areas
The products you will use, particularly deck cleaners and stains, can damage or discolor siding, plants, and concrete patios. Proactive protection is key. Use plastic sheeting and painter’s tape to cover the side of your house that adjoins the deck. Drape the plastic from the bottom of the siding down to the deck boards, securing it firmly with tape to create a barrier. This will shield your siding from splashes during the cleaning and staining phases. Next, turn your attention to the landscaping. Gently cover any shrubs, flowers, or grass that are close to the deck with lightweight plastic sheeting or tarps. Avoid using heavy tarps that can crush delicate plants. It’s also a good idea to lightly water the plants before covering them. This helps them withstand the temporary covering and also dilutes any chemicals that might accidentally seep through.
Step 3: Deep Clean the Surface
With the area prepped, it’s time to give your deck a thorough cleaning. The goal is to remove all ground-in dirt, mold, mildew, and any old, failing stain. The most effective tool for this is a pressure washer. Fill your pressure washer with a quality deck cleaning solution, following the manufacturer’s instructions for dilution. Begin by attaching a low-pressure, wide-angle nozzle (a 25 or 40-degree tip is usually best). High pressure can permanently damage wood fibers, leaving fuzzy, gouged marks, so always start low. Stand a few feet back and apply the cleaner evenly across the entire deck, working in manageable sections. Let the solution sit for 10-15 minutes, as specified by the product label, to allow it to penetrate the grime.

Step 4: Address Stubborn Stains and Old Finishes
Sometimes, a general cleaning isn’t enough to remove everything. You might find that old, peeling stain or deep-set mildew stains remain. For these tough areas, you’ll need a more targeted approach. A deck stain stripper is a stronger chemical designed specifically to dissolve old finishes. Apply it according to the product directions, usually with a brush or roller, and let it sit for the recommended time. You will see the old finish begin to bubble and lift. Use a scraper or a stiff brush to gently remove the softened finish. This can be a messy and laborious process, so work in small sections. Once the old finish is removed, you will need to rinse the deck thoroughly again. If you are dealing with dark stains caused by tannins in woods like cedar or redwood, a wood brightener can work wonders. These products contain oxalic acid, which neutralizes the wood’s pH and restores its natural color.
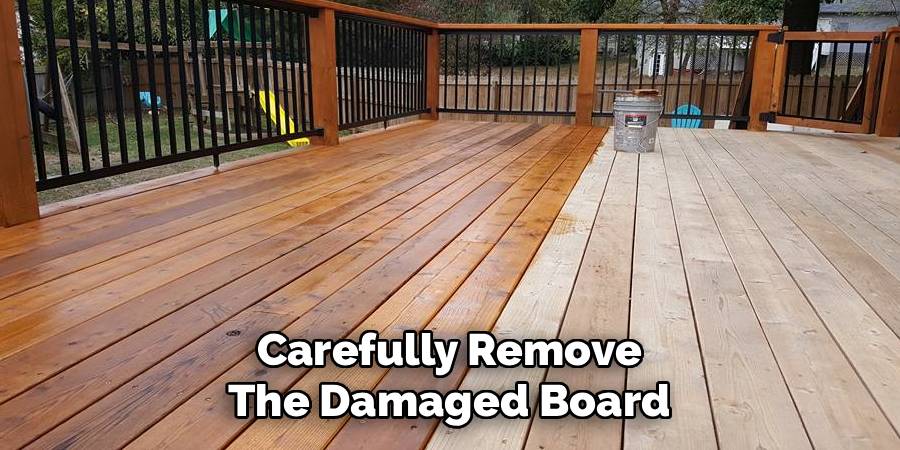
Step 5: Make Necessary Repairs
Now that the deck is clean and you have a clear view of its condition, you can perform any necessary repairs. Refer back to the notes you took during your initial inspection. For minor cracks or gouges, use a high-quality, paintable wood filler or a two-part epoxy. Apply the filler with a putty knife, pressing it firmly into the damaged area. Overfill it slightly, as the filler will shrink a bit as it dries. Allow it to cure completely according to the manufacturer’s instructions. For more severe damage, such as a board that is rotten or split down its entire length, replacement is the only option. Carefully remove the damaged board using a pry bar. You may need to cut it in the middle with a circular saw to make removal easier. Measure and cut a new board to fit the space.
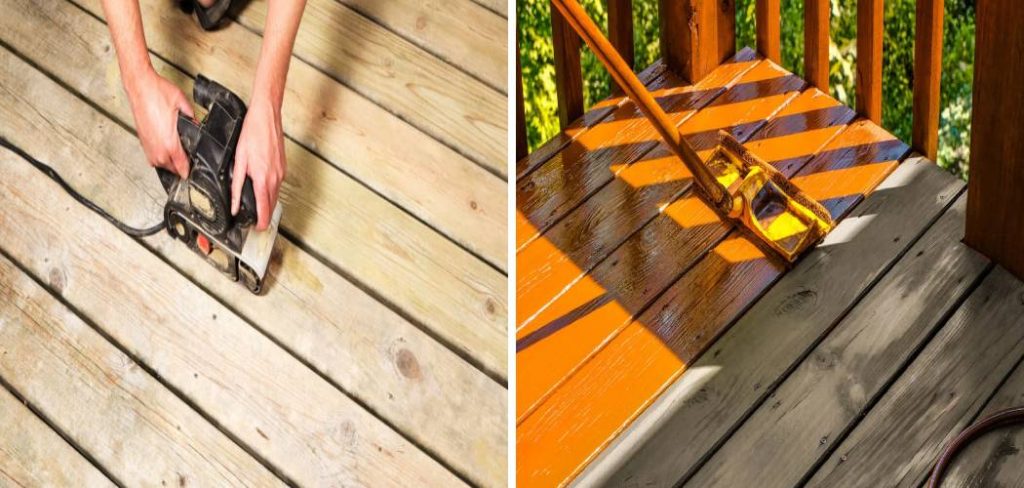
Step 6: Sand the Deck for a Smooth Finish
Sanding is a non-negotiable step for achieving a professional-looking, long-lasting finish. It smooths out any splintered wood, removes the “fuzz” that pressure washing can create, and opens the pores of the wood to allow for better stain penetration. The best tool for this job is a random orbital sander, which is efficient and less likely to leave swirl marks than other types of sanders. For large decks, you can rent a floor-style orbital sander. Start with coarse sandpaper, such as 60-grit, to remove any remaining old finish and to level out uneven areas and repairs. Move the sander consistently with the grain of the wood. After sanding the entire deck with the coarser grit, switch to a finer 80-grit sandpaper. This will create a smoother surface ready for staining.
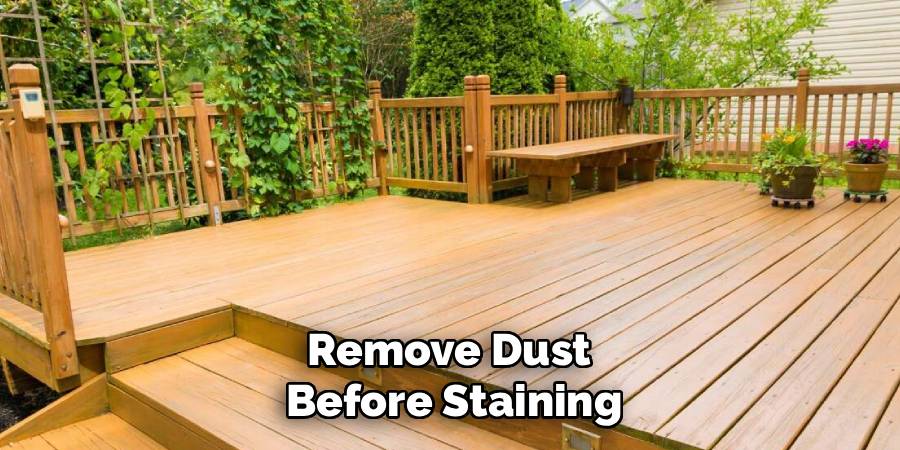
Step 7: Final Cleaning and Preparation
After sanding, your deck will be covered in a fine layer of sawdust. This dust must be completely removed before staining. If left behind, it will mix with the stain and create a gritty, uneven, and poorly adhered finish. Start by sweeping the entire deck thoroughly with a soft-bristle broom. Pay special attention to the gaps between the boards. Next, use a leaf blower or a shop vacuum to remove the remaining fine dust from the surface and from between the cracks. A leaf blower is often faster and more effective for this task. Once you believe the deck is clean, wipe a small section with a clean, damp rag. If the rag comes up dusty, you need to continue cleaning. This final cleanup is a critical step that is often rushed, but its importance cannot be overstated.
Step 8: Choose and Prepare Your Stain
Selecting the right stain is crucial for both the look and protection of your deck. There are several types to choose from. Transparent stains have minimal pigment and allow the natural wood grain to show through, but offer less UV protection. Semi-transparent stains have more pigment, adding color while still showing some wood grain, and provide better UV protection. Solid color stains look like paint, completely covering the wood grain and offering the maximum level of UV protection. The choice depends on the condition of your wood and your personal preference. For older decks with many repairs, a solid stain can hide imperfections. For new or well-maintained wood, a transparent or semi-transparent stain will highlight its natural beauty.
Step 9: Apply the Stain or Sealant
The day you stain should be dry, overcast, and with moderate temperatures—avoid staining in direct sunlight or on a very hot day, as this can cause the stain to dry too quickly and create lap marks. Start with the railings, spindles, and other vertical surfaces. Use a paintbrush for these detailed areas, applying a thin, even coat. For the main deck boards, a paint roller with an extension pole is the most efficient method. Pour the stain into a paint tray and load the roller, being careful not to oversaturate it. Apply the stain in long, even strokes, working on two or three boards at a time from one end of the deck to the other. Always maintain a “wet edge” by overlapping your strokes to prevent lap marks. After applying stain to a section, use a brush to back-brush the stain into the wood.
Step 10: Allow for Proper Curing Time
Your deck may look finished once the stain is applied, but the job isn’t truly done until the finish has fully cured. This is a chemical process that takes longer than simple drying. While the deck may feel dry to the touch within a few hours, it needs more time to harden completely and achieve its full protective properties. Check the product label for specific curing times. Generally, you should wait at least 24 to 48 hours before allowing light foot traffic. Avoid placing furniture back on the deck for at least 72 hours, and wait up to a week before putting down heavy items like large planters or grills. Placing furniture too early can leave permanent indentations in the soft finish or cause it to peel.
5 Things You Should Avoid
- Skipping the Sanding: It’s tempting to skip this dusty, laborious step, but failing to sand will result in poor stain adhesion and a rough, splintery surface.
- Using High Pressure: Blasting your deck with a high-pressure washer nozzle will permanently damage the wood fibers, causing them to become fuzzy and gouged.
- Staining in Direct Sunlight: Applying stain on a hot, sunny day will cause it to dry too quickly, leading to an uneven application with visible lap marks and streaks.
- Applying Stain to Damp Wood: Wood must be completely dry before staining. Staining damp wood traps moisture, which leads to peeling, bubbling, and mildew growth beneath the finish.
- Over-Applying the Stain: More is not better. A thick coat of stain won’t absorb properly. It will sit on the surface, creating a sticky film that will eventually peel and fail.
Conclusion
Restoring a wooden deck is a rewarding project that pays dividends in both beauty and longevity.
By following these steps on how to restore a wooden deck—from thorough preparation and cleaning to careful sanding and staining—you can protect your outdoor space from the elements and bring back its natural charm. While it requires a commitment of time and effort, the result is a safe, beautiful, and durable deck that will serve as the centerpiece of your backyard for many seasons.
Regular maintenance will ensure your hard work lasts, keeping your deck looking its best year after year.