 (1)")

Have you ever looked at a plain, plastic table or a stark metal filing cabinet and wished it had the warmth and character of real timber?
The good news is that you do not need to be a professional carpenter or spend a fortune on new furniture to achieve that rustic look. With a few simple tools and some paint, you can transform almost any surface into a convincing wood grain replica. This technique, known as faux bois (false wood), allows you to add depth, history, and organic beauty to objects that would otherwise look flat and uninspiring.
Learning how to paint wood texture is a surprisingly accessible artistic skill that opens up a world of creative possibilities for your home decor. Whether you want to upgrade a cheap laminate bookshelf or give a metal door a farmhouse makeover, the process is forgiving and fun. This guide is designed specifically for beginners, breaking down the technique into manageable steps. We will walk you through everything from preparing your surface to mastering the graining tool, ensuring you have the confidence to create a stunning, natural-looking finish on your very first try.
Why Learning Faux Wood Graining is Valuable
Mastering the art of faux wood graining is more than just a fun weekend project; it is a powerful tool in your DIY arsenal that saves money and reduces waste. High-quality solid wood furniture is expensive and heavy, while many modern affordable pieces are made of particleboard or metal that lacks visual interest. By applying a faux finish, you can elevate these budget-friendly items, giving them the sophisticated appearance of mahogany, oak, or walnut without the hefty price tag. It allows you to rescue old, mismatched furniture from thrift stores and unify them with a cohesive, warm aesthetic.
Beyond the financial benefits, this technique offers unparalleled creative control. You are not limited by the wood species available at your local lumber yard. You can create the exact tone, grain pattern, and level of distress that fits your interior design vision. It also allows you to add wood accents to surfaces where real wood would be impractical, such as metal doors, plastic trims, or even ceramic tiles. This versatility makes it an essential skill for anyone looking to customize their living space with unique, handcrafted details that truly stand out.
Step-by-Step Guide on How to Paint Wood Texture
Step 1: Prepare and Clean the Surface Thoroughly
The foundation of any successful paint job is a pristine surface. Before you even open a can of paint, you must ensure the object is free of dirt, grease, and loose debris. Wash the item with a mixture of warm water and mild dish soap or a dedicated degreaser like TSP (trisodium phosphate) substitute.

If the surface is glossy or smooth, like laminate or metal, you need to scuff it up with medium-grit sandpaper to give the primer something to grip. Wipe away all sanding dust with a damp cloth or a tack cloth. This preparation prevents the paint from peeling later and ensures a smooth, professional-looking base for your faux wood finish.
Step 2: Apply a High-Quality Base Coat
The base coat will serve as the underlying color of your wood grain, typically representing the lighter tones found in natural timber. Choose a satin or semi-gloss latex paint in a color like warm beige, caramel, or light ochre. Apply this base coat evenly across the entire surface using a high-quality brush or a foam roller for a smooth finish. You want full, opaque coverage, so if the original color shows through after the first layer dries, apply a second coat. Allow this base layer to dry completely, preferably overnight, as a fully cured surface is essential when you start dragging tools over it in the next steps of learning how to paint wood texture convincingly.
Step 3: Mix Your Darker Glaze Mixture
The realistic wood effect comes from a translucent darker layer sitting on top of the lighter base. You will need a glaze mixture, which stays wet longer than regular paint, giving you time to manipulate it. Mix clear acrylic glazing liquid with a darker latex paint or a gel stain in a ratio of roughly four parts glaze to one part paint.
Good color choices for this layer are burnt umber, dark walnut, or espresso. The glaze makes the paint transparent and extends its drying time, which is critical for the graining process. Test the mixture on a scrap piece of cardboard to ensure the color contrast is strong enough to mimic natural wood grain shadows.

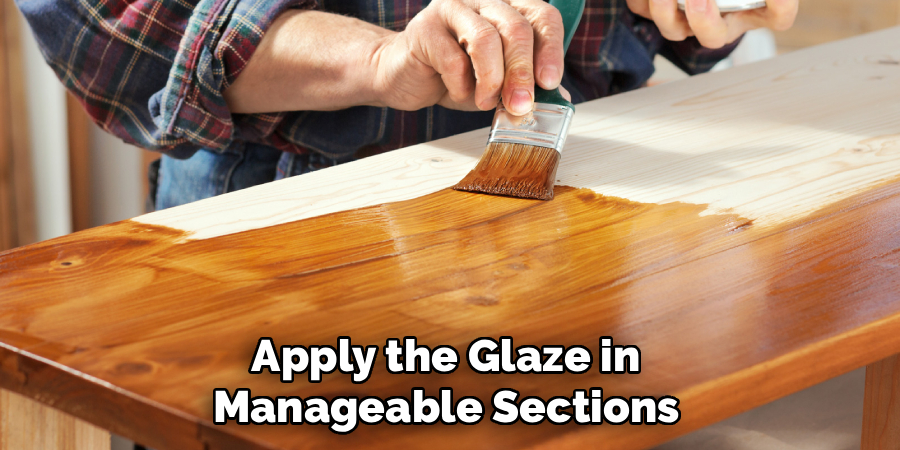
Step 4: Apply the Glaze in Manageable Sections
Do not attempt to coat the entire piece of furniture at once, or the glaze will dry before you can texture it. Work in small, logical sections, such as one drawer front, one side panel, or a two-foot strip of a tabletop. Brush the dark glaze mixture over the base coat using a stiff bristle brush.
You do not need to be perfectly neat here; the goal is simply to get the wet glaze onto the surface. Ensure the coverage is generous enough that it doesn’t dry instantly but not so thick that it drips. The brush strokes themselves will begin to suggest a grain pattern, setting the stage for the graining tool.
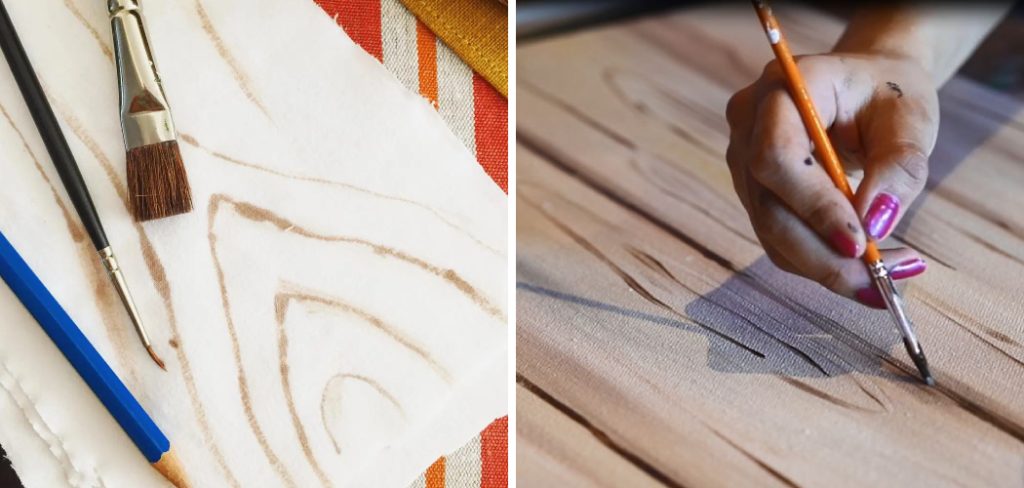
Step 5: Create Grain with a Wood Graining Tool
This is the magic moment where the paint transforms into wood. Take your wood graining rocker tool and place it at the top edge of the wet glazed section. Slowly drag the tool down through the glaze while gently rocking it back and forth. The rocking motion creates the characteristic knots and cathedrals found in real wood.
Vary the speed of your rocking to create different spacing between the knots. If you don’t like the result, simply brush more glaze over the area to erase it and try again. This immediate feedback loop is helpful when figuring out how to paint wood texture that looks organic and random rather than repetitive.
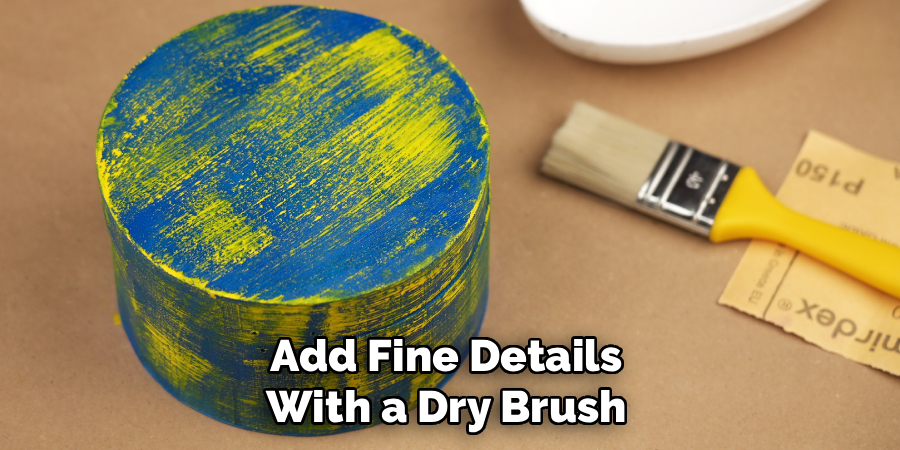
Step 6: Add Fine Details with a Dry Brush
After you have used the rocker tool to create the primary knots, the surface might look a bit too uniform or artificial. To soften the look and add realism, use a dry, clean paintbrush or a specialized dragging brush. Very lightly drag the bristles through the wet glaze in the direction of the grain.
This will create fine, straight lines that mimic the tighter grain patterns found between the knots. It also helps to blend the stark contrast between the base coat and the glaze. Be careful not to press too hard, or you will smudge the beautiful knots you just created. This step adds the subtle complexity found in nature.
Frequently Asked Questions (FAQ)
What Is the Best Color Combination for Faux Wood?
The most realistic results come from high-contrast colors that mimic nature.
- Classic Oak: Use a golden yellow or ochre base coat with a medium brown glaze.
- Walnut: Start with a deep tan or caramel base and use a dark chocolate or espresso glaze.
- Driftwood: Use a light grey base coat with a darker, charcoal grey glaze.
- Tip: Always look at a photo of real wood to pick your palette.
Can I Use This Technique on Metal or Plastic?
Yes, faux wood graining works beautifully on non-porous surfaces.
- Preparation: The key is the primer. For metal, use a rust-inhibitive primer. For plastic, use a bonding primer designed specifically for plastics (like adhesion promoters).
- Sanding: Scuff-sanding the slick surface before priming is absolutely critical to ensure the paint sticks and doesn’t peel off later.
Where Can I Buy a Wood Graining Tool?
You do not need to go to a specialty art store.
- Hardware Stores: Most major home improvement stores carry wood graining tools in the paint aisle.
- Online Retailers: They are widely available online and often sold in sets with different sizes for varying grain patterns.
- Cost: They are inexpensive tools, usually costing between $5 and $15.
How Do I Fix a Mistake While Graining?
The beauty of using a glaze is that it stays wet for a long time.
- Erase and Restart: If you rock the tool and don’t like the knot placement, simply take your glaze brush and stroke over the area again. This “erases” the texture and resets the wet glaze so you can try again immediately.
- Work in Sections: This prevents the glaze from drying before you have a chance to fix errors.
Do I Need Artistic Skills to Do This?
Not at all. The wood graining tool does 90% of the work for you.
- Muscle Memory: It takes a few practice swipes on a piece of cardboard to get the rhythm of the rocking motion, but it is a mechanical process, not a drawing skill.
- Imperfection is Good: Real wood is random and imperfect. Wobbly lines or uneven knots often make the finish look more authentic than perfect geometric patterns.
Conclusion
Transforming a plain surface into a rich, textured wood finish is one of the most satisfying DIY projects you can undertake. It allows you to breathe new life into tired furniture and add a layer of warmth to your home that synthetic materials simply cannot match. The process is forgiving, creative, and accessible to anyone willing to experiment. By preparing your surface well, choosing the right colors, and mastering the simple rocking motion of the graining tool, you can achieve professional-looking results that will fool the eye and delight the senses.
Don’t be afraid to practice on a scrap piece of cardboard before tackling your main project. Once you get the rhythm down, you will find the process meditative and rewarding. Now that you have learned how to paint wood texture, you are ready to look at every flat surface in your home as a potential canvas for natural beauty. Grab your brush, mix your glaze, and start creating your own masterpiece today.
About
Mike May is a distinguished figure in the world of woodworking and timber design, with a decade of expertise creating innovative and sustainable indoor solutions. His professional focus lies in merging traditional craftsmanship with modern manufacturing techniques, fostering designs that are both practical and environmentally conscious. As the author of Woodimber, Mike delves into the art and science of timber-craft, inspiring artisans and industry professionals alike.
Education
RMIT University (Melbourne, Australia)
-
Associate Degree in Design (Timber): Focus on sustainable design, industry-driven projects, and practical craftsmanship.
-
Gained hands-on experience with traditional and digital manufacturing tools, such as CAD and CNC software.
Nottingham Trent University (United Kingdom)
-
Bachelor’s in Woodworking and Product Design (Honors): Specialized in product design with a focus on blending creativity with production techniques.
-
Participated in industry projects, working with companies like John Lewis and Vitsoe to gain real-world insights.
Publications and Impact
In Woodimber, May shares his insights on timber design processes, materials, and strategies for efficient production. His writing bridges the gap between artisan knowledge and modern industry needs, making it a must-read for both budding designers and seasoned professionals.