 (1)")

Creating handmade decor adds a personal and rustic touch to any garden, patio, or potting shed. Among the most timeless and versatile shapes is the simple star. A handcrafted wooden star can serve as a beautiful wall accent, a festive holiday decoration for your porch, or a unique trellis for a small climbing vine. While it may look like a complex woodworking project, it is surprisingly accessible for beginners. You do not need a state-of-the-art workshop to achieve a beautiful result.

This guide is designed to provide clear, easy-to-follow instructions for anyone wondering how to make a wooden star. With just a few basic tools and some affordable lumber, you can create a charming piece of art to enhance your favorite green space.
Why a Wooden Star Is Perfect for Garden Decor
A wooden star is a wonderfully versatile element for garden and outdoor decor. Its simple, geometric shape complements the organic, flowing forms of plants, creating a pleasing visual contrast. You can hang a large star on the side of a shed or fence to serve as a year-round focal point, breaking up a large, plain surface.
Smaller stars can be tucked among potted plants on a porch or hung from the branches of a tree to add a touch of whimsy. During the winter holidays, wrapping the star in twinkling lights creates a festive display that feels both rustic and magical. Whether you leave the wood natural to weather gracefully over time, paint it a vibrant color, or give it a distressed finish, a handmade wooden star brings a unique, handcrafted charm to any outdoor setting.
A Step-by-Step Guide on How to Make a Wooden Star
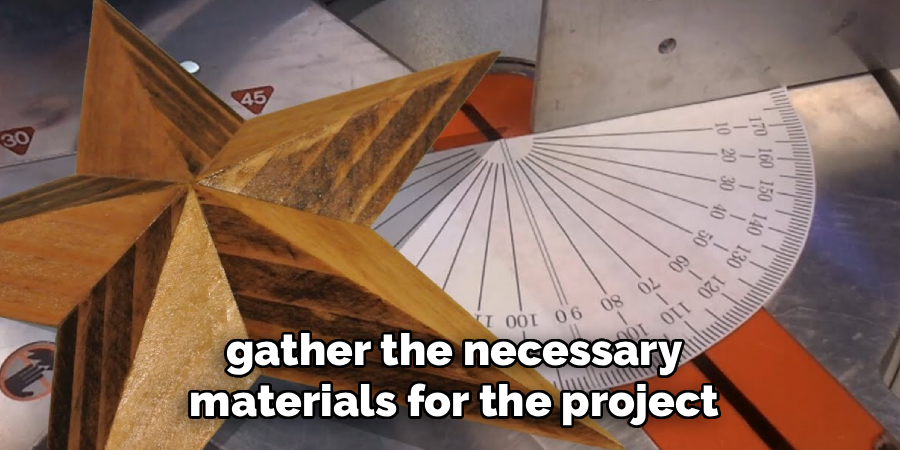
Step 1: Gather Your Lumber and Tools
Your first step is to gather the necessary materials for the project. You will need five pieces of wood of equal length and width. A common and affordable choice is a standard 1×2 or 1×3 pine board, which you can find at any home improvement store. You will also need a miter saw or a miter box with a handsaw, a protractor or angle finder, a tape measure, a pencil, wood glue, and a nail gun or hammer and finishing nails. For safety, always have protective eyewear and gloves. Having all your tools and materials laid out on a workbench or clear floor space before you begin will make the entire process smoother and more enjoyable.
Step 2: Cut the Angles for the Star’s Points
This is the most crucial part of the project, as accurate angles are what create the classic star shape. You will need to cut each end of your five wood pieces at a precise angle. Set your miter saw or miter box to 36 degrees. Take your first piece of wood and make a 36-degree cut at one end. Then, flip the board over and make another 36-degree cut at the other end. These two cuts should be parallel to each other. Repeat this process for all five of your wood pieces. When you are finished, you will have five identical segments, each shaped like a trapezoid with angled ends.
Step 3: Begin Assembling the First Two Points
Now you can start to see the star take shape. Take two of your cut pieces and lay them on your flat work surface. Apply a thin bead of high-quality wood glue to one of the angled ends of the first piece. Press the angled end of the second piece against the glued end of the first piece to form one of the star’s upper points. The two pieces should fit together snugly, creating a sharp peak. Once you are satisfied with the fit, use your nail gun or a hammer and finishing nails to drive one or two nails through the joint to hold it securely while the glue dries.
Step 4: Continue the Assembly Process
Continue building the star by adding the next piece. Apply wood glue to the bottom angled end of the second piece you just attached. Take your third piece of wood and press its top angled end against the glued joint, forming the next part of the star’s interlocking frame. This process can feel a bit like weaving the pieces together. Secure this new joint with a couple of finishing nails, just as you did before. At this stage, you will have three connected pieces that form the top two points and one side of the star.

Step 5: Wooden Star’s Frame
As you add more pieces, the structure can become a bit floppy. Do not worry, as this is a normal part of the process. Take your fourth piece and apply glue to its top angled end. Tuck this piece under the bottom end of the first piece you laid down and connect it to the bottom of the third piece. This is where the overlapping, three-dimensional look of the star begins to form. Secure the joint with nails. Understanding this interlocking method is key to learning how to make a wooden star that is strong and stable.
Step 6: Attaching the Final Piece
You are now ready to add the fifth and final piece to complete the frame. This last piece will connect the remaining two open ends, locking the entire structure together. It may require a bit of gentle flexing of the other pieces to get it into place. Apply wood glue to both angled ends of your final piece. Carefully slide it into position, ensuring it overlaps and underlaps correctly to match the pattern. Once it is fitted snugly, secure both of the new joints with nails. Your star’s basic structure is now complete.
Step 7: Reinforce All the Joints
With the star fully assembled, it is a good idea to go back and reinforce all the connection points for added strength, especially if the star will be displayed outdoors. You can drive an additional nail into each of the five points where the wood pieces meet. If you want an even more secure hold, you can add screws. Simply pre-drill a pilot hole through each joint to prevent the wood from splitting, then drive a wood screw into each of the five intersections. This ensures your star will withstand wind and weather for years to come.
Step 8: Sand and Finish Your Star
The final step is to prepare your star for display. Use medium-grit sandpaper to smooth out any rough edges or splinters, paying special attention to the cut ends and joints. Wipe away all the sanding dust with a clean, dry cloth. Now you can choose how to finish it. You can leave the wood raw for a natural, rustic look that will weather over time. Alternatively, you can apply a wood stain to enrich the color, or paint it to match your garden decor. A coat of outdoor-rated polyurethane will protect it from moisture and sun damage.
Frequently Asked Questions
What Is the Best Type of Wood to Use?
For a simple, indoor decorative star, common pine boards are inexpensive and easy to work with.
- If your star will be displayed outdoors, consider using a more weather-resistant wood like cedar or redwood.
- These woods naturally resist rot and insect damage, helping your creation last much longer in the elements.
- Reclaimed pallet wood can also be used for a more rustic, weathered look.
What If I Do Not Have a Miter Saw?
A miter saw makes cutting angles quick and precise, but it is not essential. You can achieve the same results with a simple and inexpensive miter box and a handsaw. A miter box is a guide that has pre-cut slots for common angles, including the 36-degree angle needed for this project. It may take a bit more time and effort, but it is a perfectly viable alternative.
How Can I Hang My Finished Star?
There are several easy ways to hang your star.
- You can simply loop a piece of rustic twine or wire around one of the top joints.
- For a more secure hold, you can attach a sawtooth picture hanger to the back of one of the upper pieces of wood.
- If hanging it on a fence or shed, you can drive a nail or screw directly through one of the wooden segments into the wall.
My Angles Do Not Seem to Line Up Perfectly. What Did I Do Wrong?
Perfect angles are the key to a clean-looking star. If your joints have gaps, the issue is likely a slight inaccuracy in your cuts. Double-check your miter saw or miter box setting to ensure it is exactly at 36 degrees. Even being off by one or two degrees can throw off the entire shape. If the gaps are small, they can often be filled with wood filler before you paint or stain the star.
How Big Should I Make My Star?
The size is completely up to you and depends on where you plan to display it. The length of your five initial wood pieces will determine the final size of the star. For a small shelf accent, you might use pieces that are 6 inches long. For a large statement piece to hang on a barn or shed, you could use pieces that are 3 or 4 feet long.
Conclusion
Creating your own garden decor is a deeply satisfying project that allows you to infuse your personal style into your outdoor space. A wooden star is a simple, elegant, and versatile piece that you can create in just an afternoon with a few basic tools. The process relies on five identical pieces of wood and a series of precise 36-degree angle cuts. By assembling the pieces in an interlocking pattern, you create a classic five-pointed star that is both beautiful and structurally sound.
Do not be intimidated by the idea of woodworking. This project is the perfect entry point for any beginner. Now that you have a clear guide on how to make a wooden star, you are ready to get started. Embrace the process, and soon you will have a charming, handmade piece of art to proudly display in your garden.
About
Mike May is a distinguished figure in the world of woodworking and timber design, with a decade of expertise creating innovative and sustainable indoor solutions. His professional focus lies in merging traditional craftsmanship with modern manufacturing techniques, fostering designs that are both practical and environmentally conscious. As the author of Woodimber, Mike delves into the art and science of timber-craft, inspiring artisans and industry professionals alike.
Education
RMIT University (Melbourne, Australia)
-
Associate Degree in Design (Timber): Focus on sustainable design, industry-driven projects, and practical craftsmanship.
-
Gained hands-on experience with traditional and digital manufacturing tools, such as CAD and CNC software.
Nottingham Trent University (United Kingdom)
-
Bachelor’s in Woodworking and Product Design (Honors): Specialized in product design with a focus on blending creativity with production techniques.
-
Participated in industry projects, working with companies like John Lewis and Vitsoe to gain real-world insights.
Publications and Impact
In Woodimber, May shares his insights on timber design processes, materials, and strategies for efficient production. His writing bridges the gap between artisan knowledge and modern industry needs, making it a must-read for both budding designers and seasoned professionals.