

On a quiet afternoon, there’s a kind of magic to catching a soft breeze while you lean back, suspended in a hammock that fits just right. Of course, most of us aren’t keen to stake our relaxation on one of those wobbly store-bought hammock stands, which brings up an obvious question: why not build a proper one yourself?
A custom wood frame can be a sturdy, handsome addition to your yard—plus, you’ll have the satisfaction of knowing that particular corner of comfort came from your own efforts. If you’re the sort who likes a book, a nap, or just a change of view in your outdoor routine, investing a bit of time into tailoring the size and shape pays off.

Now, don’t be put off by visions of ornate woodworking or advanced joinery. You won’t need a master craftsman’s hands. Sensible planning—and a willingness to double-check your work—matters more than perfect technique.
Most hardware stores stock exactly the supplies you need, and the tools are basic enough that anyone with a weekend, some patience, and a steady hand can see it through. Odd as it sounds, lying down in a hammock you built yourself might just be the most grounded you’ll feel all summer. In this guide on how to make a wood hammock stand, we’ll take you through the necessary steps to create your very own piece of relaxation heaven.
Tools and Materials You’ll Need
Starting off, gathering your supplies is worth a little care. There’s nothing quite as frustrating as being forced into an extra Saturday run because you miscounted carriage bolts. For this project, you’ll be after sturdy, weather-friendly lumber and a few specific bits of hardware. Here’s a realistic rundown:
Lumber and Hardware:
- Two 8-foot 4x4s for the base
- Two 6-foot 4x4s for the angled arms
- Two 8-foot 2x4s for the diagonal braces
- Four 8-inch carriage bolts (3/8-inch), plus washers and nuts
- Four 6-inch carriage bolts (3/8-inch), plus washers and nuts
- Two durable eye hooks (or hammock hardware)
- Exterior (2.5-inch) wood screws
- A can of exterior stain or sealant
Tools:
- Miter or circular saw (borrow, if needed)
- Drill with a 3/8-inch bit
- Socket set or adjustable wrench
- Tape measure, pencil
- Speed square or angle finder
- Medium and fine-grit sandpaper
- Safety glasses, sturdy work gloves
7 Steps on How to Make a Wood Hammock Stand
Step 1: Measure and Mark Carefully
Accuracy at this stage is less about being a perfectionist and more about not cursing yourself later. Lay your lengths of 4×4 and 2×4 on something flat—a driveway does fine. Mark out every measurement for the base, the angled arms, and the diagonal braces. Pause here and check yourself once, maybe twice. Even a small slip can throw off the whole frame.
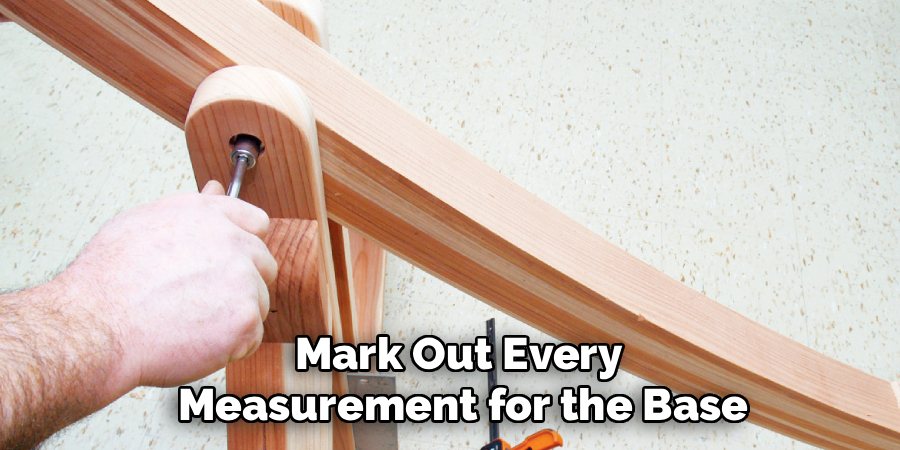
Angles matter. You’ll want precise 45-degree ends on those 2×4 braces, and the feet of the upright arms will each need their own particular angle so they sit properly. A speed square is worth dusting off for this—no shame in labeling every piece once you’ve got your measurements set. “Base,” “left arm,” “right brace”—scribble it on carefully with pencil so you’re not left holding a mystery plank halfway through.
Step 2: Cut the Pieces
Before you start, put on those safety glasses—even if you usually “forget.” Power up your saw and start with the straight cuts for the base. Pressure-treated lumber can be stubborn, so if you’re stuck with just a circular saw, cutting partway and flipping the beam is a workaround, albeit not an elegant one. Rushing helps no one; let the blade work through.
The angled cuts for braces and arms are next. The 2x4s that brace the arms have to take on real weight, so line up the saw blade with your markings and don’t eyeball it. Sand the rough edges lightly—you’ll thank yourself if you ever brush past the frame barefoot.
Step 3: Drill for the Bolts
Lay out the base pieces again, now with the arms in their intended position, so you can pinpoint where your carriage bolts will go. Make a mark for each drilling spot, erring on the side of precision. Steadiness here matters for a clean, straight hole—don’t rush it. Sometimes the bit jams up with sawdust; just back out gently, chuck out the debris, and continue. Clean up the sawdust as you go, or it’ll make assembly unnecessarily awkward.

Step 4: Bolt Together the Base
Time to see something take shape. Line up the base beams parallel and insert the 8-inch bolts through your pre-drilled holes. A tap with a hammer seats them nicely—having the bolt heads flush keeps sweaters (and skin) safe from snagging later on. Washers and nuts on the inside tighten it all together. Use your wrench to snug the nuts down. Test for flatness. If it wobbles, adjust now, before things get heavier.
Step 5: Add the Upright Arms
With the base solid, you face the trickiest maneuver: angling the arms, holding them steady, and getting the 6-inch bolts through—all at once. An extra set of hands is helpful. Get the holes lined up, thread the bolts through, and repeat the washer-and-nut routine. Make sure both arms are tilting outward at just the same angle; that symmetry keeps everything stable. Tighten it down well—these joints do the heavy lifting.
Step 6: Secure the Braces
Even the toughest joints can use backup, which is where your diagonal braces come in. Dry-fit each 2×4 between the base and the arms. If some ends don’t quite nestle flush, don’t panic—a little sanding or a second cut will usually sort things out. Screw in each end of each brace, driving the screws just below the surface. Don’t cut corners here; it’s the braces that really make the frame feel “solid.” Test for wobbles. Firm resistance to a hard shake is what you want—nothing less.

Step 7: Sand, Stain, and Mount the Hardware
Foundational work over, time for details. A pass with medium grit, then fine sandpaper, makes the frame safe to touch. Wipe everything down to remove dust. Apply a weatherproof stain or sealant—this is not the place to be stingy, since sun and rain will destroy unprotected lumber quickly. Once cured, mark and drill holes near the top of each upright for the eye hooks. Work them in deep. Only when the hardware feels unmovable should you hang the hammock and—important—test it for weight before climbing in yourself.
Following these steps on how to make a wood hammock stand can help you create a sturdy and functional addition to your outdoor space.
Mistakes to Watch For
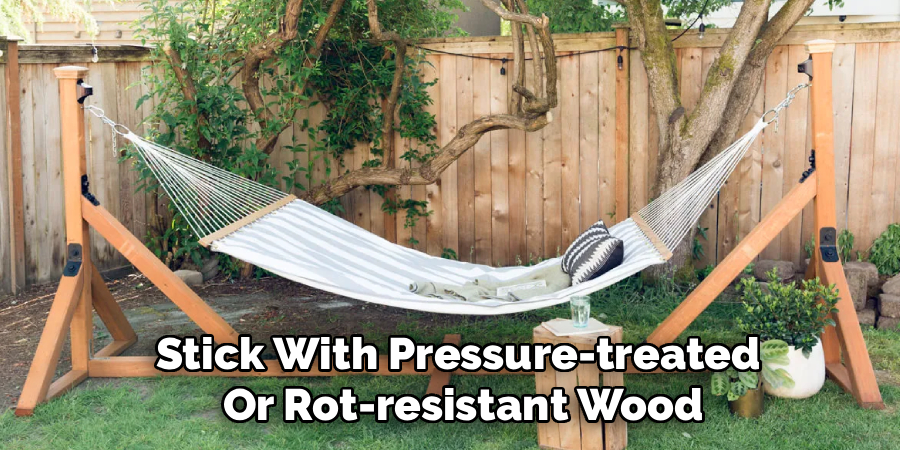
There are no style points for lumber that rots before you finish your first summer. Stick with pressure-treated or rot-resistant wood. Angle cuts—measure first, cut once, or risk a lopsided and unsafe stand. Never skip washers on bolts, or you’ll split your wood under strain. Relying on screws (instead of bolts) for the primary structure is dubious at best.
Applying stain and sealant might seem tedious, but leaving it out pretty much assures a year or less of use before repairs are needed.
Should You Hire a Pro?
Most people with a hand for basic DIY can handle this build, given the right tools and some care. Hiring a carpenter isn’t needed unless you’ve got mobility limitations or are tackling something elaborate beyond the basic design.
Borrowing or renting tools is much more affordable than calling in outside help. If you dream of intricate curves or fine joinery, you could consider a professional—but for the straightforward version, there’s nothing here the average handy person can’t manage.
The Cost—What to Expect
Building your own stand is usually much cheaper than going with a finished model from a boutique store, which can border on the extravagant. Plan to spend $50–$80 on the 4×4 and 2×4 boards, though regional price swings—or supply shortages—could nudge that figure.
Bolts, washers, screws, and eye hooks add $20–$35. A decent outdoor stain won’t run much over $25. If your toolshed’s already stocked, you’re well under $150 all-in.
Frequently Asked Questions
Q1: What’s the Best Wood for This Stand?
Pressure-treated pine makes the most sense for durability and cost. If you’re after aesthetics (and your wallet allows), cedar or redwood each bring their own character and natural resistance, but expect a jump in price. Oak or teak is stronger still, though often overkill for this purpose, and rarely worth the effort unless you crave a particular look or already have stock on hand.
Q2: How Much Weight Is It Good For?
If built to spec—with substantial 4x4s and proper bracing—this style of stand should reliably support a static load in the 350–450 pound range. Do a regular bolt-tightness check at the start of each warm season if you want it to last, and remember: suspending extra bodies or wild swinging increases the risk of stress failure.
Q3: How Do I Guard Against Weather Damage?
Use two coats of a tough, water-repellent wood stain or exterior polyurethane. Recoating every one or two years is wise, not obsessive. Keep the base elevated off saturated soil—resting it on gravel or pavers works well and staves off ground-wicking rot.
Conclusion
There’s a quiet satisfaction in finishing a project and knowing what you built won’t just look good for a season. A well-made stand offers years of use and comfort, secured by your attention to the steps and the sturdiness of your joinery.
Now, sling your hammock, settle in with your book or a nap, and toast yourself—they don’t give awards for these things, but perhaps they should. Thanks for reading this guide on how to make a wood hammock stand.

About
Mike May is a distinguished figure in the world of woodworking and timber design, with a decade of expertise creating innovative and sustainable indoor solutions. His professional focus lies in merging traditional craftsmanship with modern manufacturing techniques, fostering designs that are both practical and environmentally conscious. As the author of Woodimber, Mike delves into the art and science of timber-craft, inspiring artisans and industry professionals alike.
Education
RMIT University (Melbourne, Australia)
-
Associate Degree in Design (Timber): Focus on sustainable design, industry-driven projects, and practical craftsmanship.
-
Gained hands-on experience with traditional and digital manufacturing tools, such as CAD and CNC software.
Nottingham Trent University (United Kingdom)
-
Bachelor’s in Woodworking and Product Design (Honors): Specialized in product design with a focus on blending creativity with production techniques.
-
Participated in industry projects, working with companies like John Lewis and Vitsoe to gain real-world insights.
Publications and Impact
In Woodimber, May shares his insights on timber design processes, materials, and strategies for efficient production. His writing bridges the gap between artisan knowledge and modern industry needs, making it a must-read for both budding designers and seasoned professionals.