 (1)")

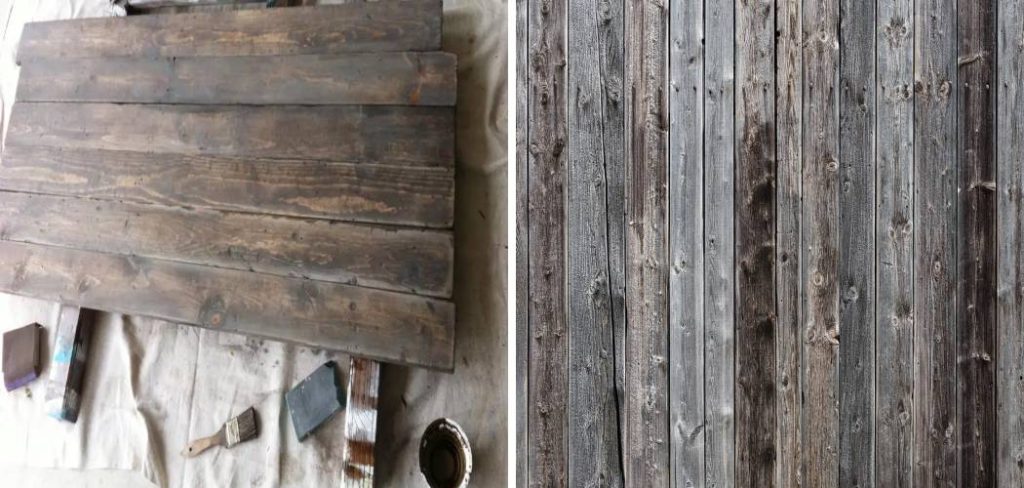
The charm of weathered timber exerts a strange, almost magnetic pull on modern interior design. We consistently seek out the warmth that silvery, textured wood brings to a room. This aesthetic preference might suggest a collective cultural desire to ground our increasingly digital lives in something physical and historically tangible. Authentic barnwood provides this grounding effect beautifully. It carries the visible scars of decades of agricultural use.
Sourcing genuine reclaimed lumber, however, is a frustratingly difficult endeavor. Real barnwood is prohibitively expensive for the average homeowner. It is notoriously hard to find in usable quantities. Furthermore, historical timber occasionally harbors hidden dangers like active insect infestations or toxic lead paint from past agricultural applications.
You do not have to accept these risks to achieve a rustic interior. Learning exactly how to age wood to look like barnwood using inexpensive new lumber and basic household supplies entirely bypasses the architectural salvage market. This process requires a specific combination of physical violence and applied chemistry. By mastering simple mechanical distressing techniques and employing a chemical oxidation process involving black tea and vinegar, you can convincingly force a brand-new pine board to develop that highly sought-after silver-gray patina.
The Authentic Barnwood Look Explained
Before swinging a hammer or mixing a stain, one must carefully analyze the visual components of actual weathered timber. Understanding the natural pathology of decay allows us to replicate it accurately. We are essentially trying to condense fifty years of elemental exposure into a single afternoon.
Decades of relentless sun, driving wind, and seasonal rain naturally break down the softer cellular fibers in exposed wood. This environmental friction leaves behind a raised, remarkably rugged texture. The grain pattern becomes a highly tactile landscape rather than a smooth, two-dimensional surface.
The Magic of the Silver-Gray Patina
The color of old agricultural timber is its most defining characteristic. Ultraviolet radiation heavily degrades the lignin within the wood. This natural oxidation process creates a highly specific grayish-brown tone. Commercial gel stains sitting on hardware store shelves generally fail to replicate this depth because they simply lay a coat of flat pigment over the surface. We will mimic the authentic color by forcing a chemical reaction inside the cellular structure of the wood itself, rather than painting over it.
Deep Textures and Weathering
Physical character provides the second half of the illusion. Old wood displays deep, irregular cracks. It features tiny, meandering wormholes and edges that have been softened by decades of handling and animal friction. The surface is rarely uniform. Replicating this requires an intentional, randomized approach to physical damage that tricks the human eye into perceiving historical weight.
Choosing the Right Lumber for Aging
The foundation of your aging project dictates its ultimate success. Different botanical species react to physical trauma and liquid oxidation in vastly different ways. Selecting the appropriate base material at the lumber yard is perhaps the most consequential decision you will make.
Starting with cheap, raw lumber is the absolute secret to a successful transformation. The wood must be entirely free of factory sealants. Existing varnishes physically block your oxidizing chemicals from penetrating the cellulose fibers, rendering the entire process ineffective.
Why Softwoods Work Best
For artificial aging, softwoods represent the ideal canvas. Inexpensive species like eastern white pine, spruce, and cedar possess a relatively loose cellular matrix. They dent quite easily during the distressing phase. When struck, the wood compresses deeply, recording physical trauma with realistic severity. Additionally, the open grain structure of these softwoods absorbs the preliminary tea wash exceptionally well, providing the necessary tannins for the chemical reaction to follow.
Woods to Avoid
Conversely, attempting to age dense hardwoods frequently leads to frustration. Oak, hard maple, and mahogany evolved specifically to resist structural damage. Striking a piece of kiln-dried maple with a heavy chain often produces nothing more than a superficial, unconvincing scratch. You should also strictly avoid pressure-treated lumber. The chemical preservatives injected into treated wood frequently repel the vinegar solution, resulting in a blotchy, toxic mess.
Essential Tools and Staining Ingredients
Executing a seamless transformation requires a specific inventory of supplies. Attempting to improvise tools midway through the chemical oxidation phase usually leads to uneven results. Organizing your requirements into mechanical and chemical categories helps maintain focus and efficiency during the project.
Mechanical Distressing Tools
Creating realistic wear requires tools capable of inflicting random, varied degrees of blunt force trauma. A standard heavy claw hammer serves as your primary instrument for softening sharp factory edges. A short length of heavy metal chain works exceptionally well for creating irregular, clustered indentations across the flat surfaces. To simulate historical insect damage, you will need a sharp metal awl or a small handful of heavy-duty roofing nails. Finally, a stiff wire brush is absolutely mandatory for tearing away the softer wood fibers and raising the grain.
Chemical Oxidation Ingredients
The coloring process relies entirely on basic household chemistry. You must purchase a large jug of standard white vinegar. To react with this acid, acquire several pads of fine steel wool, specifically noting that grade #0000 produces the fastest dissolution. You will also need a box of standard black tea bags. The brand does not matter, as long as the tea contains high levels of natural tannins. To apply these liquids to the wood, pick up a few cheap, disposable synthetic paintbrushes.

Preparing Your Workspace for Safety
Distressing timber is a remarkably chaotic and noisy endeavor. The process generates flying splinters, microscopic dust particles, and highly pungent acidic fumes. Establishing a tightly controlled physical environment protects both your respiratory health and your surrounding property.
Conducting this work outdoors is generally the safest approach. If inclement weather forces you inside, a highly ventilated garage with the doors wide open serves as an acceptable alternative. The iron-vinegar solution you will create is highly reactive. If a stray drop lands on a concrete floor, it leaves a permanent, dark rust stain almost instantly.
Ventilation and Protection
Physical safety must remain a priority when swinging heavy metal objects at wood. Protective safety glasses are non-negotiable. Wood chips fracture and fly unpredictably during the aggressive chain-striking phase. Thick leather work gloves are highly recommended to protect your hands from the wire brush. Wearing a basic particulate dust mask during the sanding phase prevents you from inhaling sharp cellulose fibers.
Securing the Wood
Attempting to distress a loose board is both frustrating and dangerous. You should use heavy-duty clamps to hold the lumber securely against a stable workbench. If working on the ground, lay down heavy canvas drop cloths to protect the floor from aggressive chain strikes and dripping stains. The stability of your workpiece directly influences the quality of the distressing.
Step-by-Step Guide: How to Age Wood to Look Like Barnwood
This sequence merges physical violence with rapid chemical oxidation. You cannot simply apply a stain and expect an authentic result if the board retains its perfectly square, machine-milled edges. The mechanical damage must always precede the liquid application. Work through these stages deliberately.
Step 1: Sanding the Factory Edges
Modern sawmills produce lumber with precise, razor-sharp right angles. Nature rarely produces a straight line. Decades of human handling and elemental exposure naturally round off the corners of historical timber. Using a medium-grit sanding block, aggressively rub down every sharp edge and corner. The goal is to create an uneven, slightly undulating profile. Rounding over the corners immediately makes the board appear naturally worn.
Step 2: Creating Mechanical Damage and Dents
With the edges sufficiently softened, the blunt force application begins. Grip one end of your heavy chain and strike the flat surface of the board. Vary your angle of attack constantly, as authentic damage is inherently chaotic. Tap the freshly sanded edges lightly with the head of your hammer to create shallow compressions. Concentrating the heaviest damage near the corners and outer edges typically looks the most natural, as the center of a plank suffers less direct impact.
Step 3: Wire Brushing the Wood Grain
This specific action profoundly alters the tactile feel of the lumber. Natural weathering degrades the soft spring wood fibers first, leaving the denser summer wood ridges standing proud. To accelerate this phenomenon, press your stiff wire brush firmly into the board. Pull it forcefully along the direction of the grain. This action physically rips the softer fibers out of the matrix. The surface quickly becomes deeply grooved, mimicking wind-blown barnwood perfectly.
Step 4: Brewing the Steel Wool and Vinegar Solution
You must prepare the chemical oxidizer well before you plan to stain. Tear apart a single pad of the fine steel wool to increase its surface area. Place the shredded steel into a clean glass jar and pour white vinegar over it until the metal is completely submerged. Leave the lid resting loosely on top to allow the resulting hydrogen gas to escape. This mixture needs to steep for at least twenty-four to forty-eight hours to create a potent iron acetate solution.
Step 5: Applying a Black Tea Wash
The oxidation method relies heavily on the presence of tannic acid within the wood. Because pine is severely deficient in natural tannins, we must introduce them artificially. Brew a concentrated batch of black tea, using perhaps four bags for a single cup of boiling water. Allow it to cool. Brush this dark liquid generously over the raw board. The tea infuses the pine with the tannins necessary for the impending chemical reaction. Allow this moisture to dry completely.

Step 6: Painting on the Vinegar Oxidizer
This stage produces a sudden, dramatic visual shift. Strain a portion of your steeped vinegar solution into a separate container to remove any remaining steel fibers. Using a synthetic brush, paint the iron acetate liquid directly over the dried tea layer. The chemical collision happens rapidly. The iron acetate bonds violently with the tea tannins. This reaction turns the pale wood a deep, striking silver-gray right before your eyes.
Step 7: Drying and Final Touch-Ups
The chemical reaction continues to evolve over several hours. Advise yourself to step away and let the wood dry completely. The color will frequently lighten and shift as the moisture evaporates. If certain areas turn out entirely black or appear too dark for your aesthetic preference, gently rub those specific spots with a fine-grit sanding sponge. This light abrasion removes the heaviest oxidation from the high ridges, exposing the lighter wood beneath while leaving the deep shadow in the recessed grain.
Alternative Methods for a Sun-Bleached Finish
While the iron oxidation method produces a classic, dark agricultural effect, specific interior designs require a lighter aesthetic. Simulating wood that has been painted and subsequently faded by decades of intense coastal sun exposure requires a slightly different approach. These alternative finishes focus on pigment manipulation rather than reactive chemistry.
The Whitewash Technique
Whitewashing produces a soft, chalky appearance. Heavily dilute standard white latex paint with water until it reaches the consistency of skim milk. Brush this watery mixture over your mechanically distressed, raw wood. Before the paint can dry, wipe the surface firmly with a clean cotton rag. The white pigment remains trapped in the deep wire-brushed grain lines and the physical dents, creating a highly convincing sun-bleached coastal effect.
Dry Brushing for Chalky Texture
Dry brushing highlights existing texture without covering the entire board in pigment. Dip the very tip of a stiff paintbrush into white or light gray chalk paint. Wipe almost all of the wet paint off onto a paper towel until the bristles feel practically dry. Very lightly drag this dry brush over the surface of your wood. The minimal paint left on the bristles will only catch on the highest ridges of the grain, simulating years of accumulated, faded paint.
Sealing Your Wood to Protect the Patina
Leaving oxidized wood entirely unsealed is generally unwise. Ambient environmental moisture might inadvertently reactivate the iron acetate, causing the color to shift further. Raw wood also readily absorbs oils from human hands, creating ugly, localized stains over time. Applying a protective topcoat is necessary. The specific choice of product, however, dictates whether the illusion succeeds or fails.
Choosing a Dead-Flat Topcoat
Applying a high-gloss varnish over your carefully distressed board instantly destroys the vintage illusion. Glossy finishes reflect light sharply. They signal to the human brain that the surface is modern and encased in synthetic plastic. You must seek out a dead-flat or ultra-matte water-based polyurethane. These specific formulas protect against moisture while allowing the surface to maintain the raw, dry appearance characteristic of ancient timber.
When to Use Furniture Wax
If the aged wood will be used for decorative indoor pieces that do not face heavy daily wear, finishing wax presents an excellent alternative to liquid topcoats. Applying a high-quality, clear or dark furniture wax provides a very soft, hand-rubbed texture. It nourishes the dry cellulose fibers without creating a hard plastic barrier. Wax requires occasional reapplication, but it maintains the organic integrity of the finish beautifully.
Creative Ways to Use Your Faux Barnwood
Once you master this aging technique, the architectural applications within your home are virtually limitless. You have effectively unlocked a method for producing high-end building materials at a remarkably low cost. Brainstorming practical applications for your freshly aged lumber allows you to introduce serious rustic charm into otherwise sterile environments.
Accent Walls and Headboards
A solid expanse of weathered wood creates a massive visual impact. You might use your aged planks to construct a stunning, texture-rich focal wall in a primary bedroom or a stark modern living room. The varying shades of silver and gray provide a deep, complex backdrop for simple furniture. Alternatively, cutting the boards to length and securing them to a simple plywood backing creates a custom farmhouse headboard that would cost hundreds of dollars in a retail boutique.
Custom Floating Shelves
Thick, distressed pine boards make incredible, budget-friendly shelving. A heavily oxidized plank mounted on raw iron brackets introduces an industrial element to a modern kitchen. Because you control the exact dimensions and the specific depth of the stain, you can tailor the shelves to fit perfectly into awkward architectural niches. This application turns a basic storage necessity into a compelling aesthetic feature.
Conclusion
The pursuit of historical textures does not have to involve endless searching through expensive architectural salvage yards. By deliberately damaging the cellular structure of cheap pine and manipulating basic chemical reactions with household ingredients, you can conjure the weight of history inside your own workspace.
The dramatic visual transformation achieved by combining physical distressing with the tea and vinegar oxidation method is deeply satisfying. Knowing how to age wood to look like barnwood empowers you to create custom, high-end rustic decor on a fractional budget. Grab a piece of scrap pine, test out the technique, and completely transform your living space.