 (1)")

Many homes are filled with furniture made from laminate, veneer, or melamine—materials often referred to as “fake wood.” While practical and affordable, these pieces can look dated or cheap over time. The good news is you don’t have to throw them out. A fresh coat of paint can completely transform that old laminate bookcase or dated kitchen cabinet, giving it a modern, high-end look for a fraction of the cost of replacement.

The process, however, is different from painting solid wood, as these non-porous surfaces require special preparation to ensure the paint adheres properly. Learning how to paint fake wood is a simple and rewarding DIY project that can breathe new life into your furniture. This guide will show you exactly how to do it right, ensuring a durable, beautiful finish.
Why Painting Fake Wood is a Smart DIY Project
Opting to paint your fake wood furniture instead of replacing it is one of the smartest decisions a budget-conscious decorator can make. It is an incredibly cost-effective way to update your home’s style. That 1980s wood-grain laminate dresser can become a chic, modern centerpiece with just a few dollars’ worth of primer and paint. It is also an environmentally friendly choice, as it keeps bulky furniture out of landfills. Beyond the savings, painting allows for complete customization. You are no longer limited by the original finish; you can choose any color imaginable to perfectly match your decor. This project empowers you to upcycle and personalize pieces, turning generic, mass-produced items into unique furniture that reflects your style.
Step-by-Step Guide on How to Paint Fake Wood
Step 1: Clean and Degrease the Surface Thoroughly
The most critical step for a lasting finish on a slick surface is cleaning. Laminate and veneer collect years of dust, grease, and grime from furniture polish, all of which will prevent your primer from adhering. Start by scrubbing the entire piece with a solution of warm water and a good degreasing cleaner, like trisodium phosphate (TSP) or a simple dish soap mixture. Use a sponge or rag to get into every corner and crevice. After scrubbing, rinse the surface thoroughly with a clean, damp cloth to remove any soap residue. Allow the furniture to dry completely before proceeding to the next step.

Step 2: Wood by Scuff Sanding
Fake wood surfaces are non-porous and slick, which means paint has nothing to grip onto. To solve this, you must create a “tooth” for the primer to grab. Using a medium-grit sandpaper, around 120- to 150-grit, lightly scuff up every surface you plan to paint. Your goal is not to remove the top layer, but simply to dull the sheen and create microscopic scratches. You will know you are done when the entire piece has a matte, hazy appearance instead of a shiny one. Once finished, it is crucial to remove all the sanding dust with a vacuum followed by a wipe-down with a tack cloth.
Step 3: Apply a High-Adhesion Bonding Primer
This is the non-negotiable secret to a successful paint job on fake wood. A standard latex primer will not stick to a laminate surface and will easily peel or scratch off. You must use a high-adhesion bonding primer specifically designed for slick surfaces. Look for products labeled as “bonding,” “adhesion,” or “shellac-based.” These primers are formulated to grip tenaciously to difficult materials. Apply a thin, even coat of primer using a high-quality brush or a small foam roller. A foam roller is excellent for achieving a smooth, texture-free base on flat surfaces like cabinet doors or tabletops.

Step 4: Allow the Primer to Cure Properly
Patience is a virtue when working with bonding primers. While the primer may feel dry to the touch within an hour, it has not yet fully cured or achieved its maximum adhesion. Forcing the process can compromise the durability of your entire project. Check the instructions on the primer can for the recommended cure time before applying a topcoat. This can range from four hours to a full day. Allowing the primer to cure completely ensures it forms a strong, unbreakable bond with the slick surface, creating the perfect foundation for your paint. This crucial waiting period is central to learning how to paint fake wood correctly.
Step 5: Lightly Sand the Primed Surface
Once the primer is fully cured, you may notice it feels slightly gritty or has a few tiny imperfections. For an ultra-smooth final finish, it is a good idea to lightly sand the primed surface before painting. Use a very fine-grit sandpaper, such as 220-grit, and gently go over the entire piece. You are not trying to remove the primer, only to knock down any dust nibs or high spots. This step creates a silky-smooth canvas, which will make your final paint coat look much more professional. After sanding, wipe away all the fine dust with a clean tack cloth.
Step 6: Apply the First Coat of Paint
Now for the fun part—adding color. Choose a high-quality latex or acrylic paint for your topcoat. A satin or semi-gloss finish is often recommended for furniture as it is more durable and easier to clean than a flat or matte finish. Using a high-quality brush or a foam roller, apply a thin, even coat of paint. Avoid overloading your brush or roller, as this can lead to drips and an uneven texture. Work in long, smooth strokes and maintain a wet edge to minimize brush marks. Don’t worry if the first coat looks a bit streaky; its purpose is to provide the initial layer of color.

Step 7: Apply the Second Coat for Full Coverage
Allow the first coat of paint to dry completely according to the manufacturer’s instructions, typically for at least four hours. Once dry, apply a second thin coat of paint in the same manner as the first. This second coat will cover any remaining streaks and provide the deep, rich color you are looking for. Two thin coats are always superior to one thick coat, as they result in a harder, more durable, and more professional-looking finish. For high-traffic pieces like tabletops or kitchen cabinets, a third coat may be a good idea for added durability.
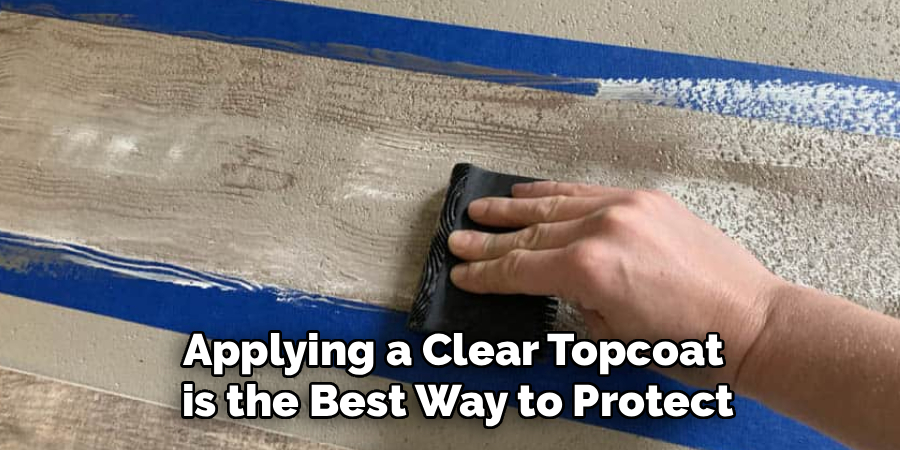
Step 8: Protect Your Finish with a Topcoat
While many modern paints are quite durable on their own, applying a clear topcoat is the best way to protect your hard work, especially on surfaces that will see a lot of wear and tear. Choose a water-based polyurethane or polycrylic in a matte, satin, or semi-gloss finish that matches your paint’s sheen. A water-based topcoat is recommended as it will not yellow over time like oil-based products can. Apply one to two thin, even coats with a high-quality synthetic brush, allowing for adequate drying time between coats. This final layer provides a durable, scrubbable shield against scratches and scuffs.
Frequently Asked Questions
What Is the Best Paint to Use on Fake Wood?
The primer is more important than the paint. You must use a high-adhesion bonding primer. For the topcoat, a high-quality acrylic latex paint is an excellent choice.
- Primer: Look for shellac-based or other “bonding” primers designed for slick surfaces.
- Paint: Use a durable acrylic paint in a satin or semi-gloss finish for easy cleaning.
- Topcoat: For high-traffic pieces, a water-based polycrylic topcoat adds crucial durability.
Do I Really Have to Sand Fake Wood Before Painting?
Yes, sanding is a non-negotiable step. Fake wood surfaces like laminate are non-porous and slick. Paint has nothing to adhere to. Scuff sanding with 120- or 150-grit sandpaper dulls the glossy finish and creates microscopic scratches. This “tooth” gives the bonding primer a surface to grip onto, preventing the paint from peeling or scratching off easily later on.
Can I Use Chalk Paint on Laminate Furniture?
Chalk paint is often advertised as a “no-prep” paint, but for laminate, some prep is still highly recommended. While it may stick without sanding or priming better than regular latex paint, the finish will not be very durable and can be easily scratched off. For a long-lasting finish, you should still follow the standard process: clean, scuff sand, and use a quality bonding primer before applying chalk paint.
How Do I Fix Paint Peeling Off Fake Wood?
If your paint is peeling, it almost certainly means the surface was not prepared correctly.
- The Cause: Either the piece was not cleaned and degreased properly, or a bonding primer was not used.
- The Fix: You must scrape and sand off all the peeling paint. Then, start the process over correctly: clean thoroughly, scuff sand the entire surface, apply a high-adhesion bonding primer, and then repaint.
What Is the Difference Between Laminate and Veneer?
These terms are often confused, but they are different materials.
- Laminate: This is a plastic or vinyl material with a printed wood-grain pattern that is fused to a particleboard or MDF core. It is essentially a picture of wood.
- Veneer: This is a very thin slice of real wood that is glued onto a less expensive wood composite core. Because it is real wood, it can sometimes be stained, but it is often thin enough that painting is a safer option.
Conclusion
Painting fake wood furniture is a transformative project that allows you to modernize your home on a dime. The dated laminate pieces that once seemed destined for the curb can become stylish, custom furniture with just a little effort. The success of this project hinges on proper preparation. Thorough cleaning, scuff sanding, and the use of a high-adhesion bonding primer are the three pillars that ensure your paint job will be durable and long-lasting. Rushing these steps will only lead to a finish that peels and scratches with the slightest touch.
Now that you have a complete guide on how to paint fake wood, you can look at that old bookcase or dated end table with new eyes. You have the knowledge to turn it into a beautiful, personalized piece that fits your style perfectly. Grab your sandpaper and primer, and get ready to give your old furniture a stunning new life.
About
Mike May is a distinguished figure in the world of woodworking and timber design, with a decade of expertise creating innovative and sustainable indoor solutions. His professional focus lies in merging traditional craftsmanship with modern manufacturing techniques, fostering designs that are both practical and environmentally conscious. As the author of Woodimber, Mike delves into the art and science of timber-craft, inspiring artisans and industry professionals alike.
Education
RMIT University (Melbourne, Australia)
-
Associate Degree in Design (Timber): Focus on sustainable design, industry-driven projects, and practical craftsmanship.
-
Gained hands-on experience with traditional and digital manufacturing tools, such as CAD and CNC software.
Nottingham Trent University (United Kingdom)
-
Bachelor’s in Woodworking and Product Design (Honors): Specialized in product design with a focus on blending creativity with production techniques.
-
Participated in industry projects, working with companies like John Lewis and Vitsoe to gain real-world insights.
Publications and Impact
In Woodimber, May shares his insights on timber design processes, materials, and strategies for efficient production. His writing bridges the gap between artisan knowledge and modern industry needs, making it a must-read for both budding designers and seasoned professionals.