 (1)")

Wood furniture and flooring add warmth and character to any home, but they’re not immune to the occasional bump or scratch. Whether it’s a dropped toy on your hardwood floor or a misplaced coffee mug on your dining table, dents in wood can be frustrating. The good news? You don’t need to be a professional carpenter to fix them.
Most wood dents can be repaired at home using simple household items and a bit of patience. This guide on how to get dents out of wood will walk you through proven methods to restore your wood surfaces to their former glory, saving you the cost of professional repairs or replacement. By the end of this article, you’ll have the knowledge and confidence to tackle those unsightly dents yourself.
Materials You’ll Need
- A clean cloth or sponge
- Water
- An iron (optional)
- White vinegar or olive oil
- Baking soda
- Fine-grit sandpaper
- Wood filler (if necessary)
7 Simple Step-By-Step Guidelines on How to Get Dents Out of Wood
Step 1: Assess the Damage
Start by examining the dent carefully under good lighting. Run your fingers over the surface to determine the depth and size of the indentation. This initial assessment is crucial because it helps you understand whether the wood fibers are compressed or if the wood is actually damaged beyond simple compression.
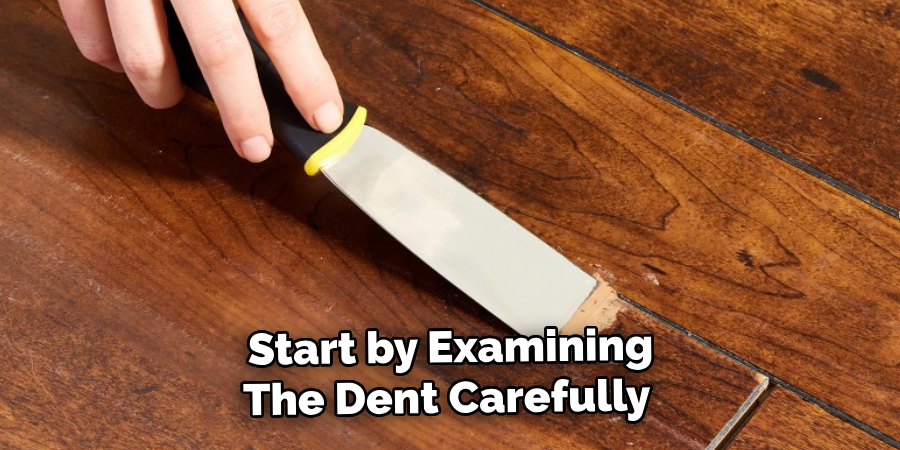
Minor dents typically involve compressed wood fibers that haven’t been torn or broken. These respond well to moisture and heat treatment. Deeper gouges or scratches where wood material has been removed require different repair methods, such as wood filler. If you’re dealing with the latter, the steam method described in this guide won’t be as effective, and you may need to consider alternative approaches.
Step 2: Clean the Area
Before applying any treatment, thoroughly clean the dented area and the surrounding wood surface. Use a soft, dry cloth to remove any dust, dirt, or debris. If the surface is particularly dirty, you can use a slightly damp cloth with a mild wood cleaner, but make sure to dry the area completely afterward.
Cleaning is essential because dirt and grime can interfere with the moisture absorption process and prevent the wood fibers from expanding properly. Additionally, any particles left on the surface might get pressed into the wood during the steaming process, creating more problems. Take your time with this step—it sets the foundation for successful dent removal.
Step 3: Apply Water to the Dent
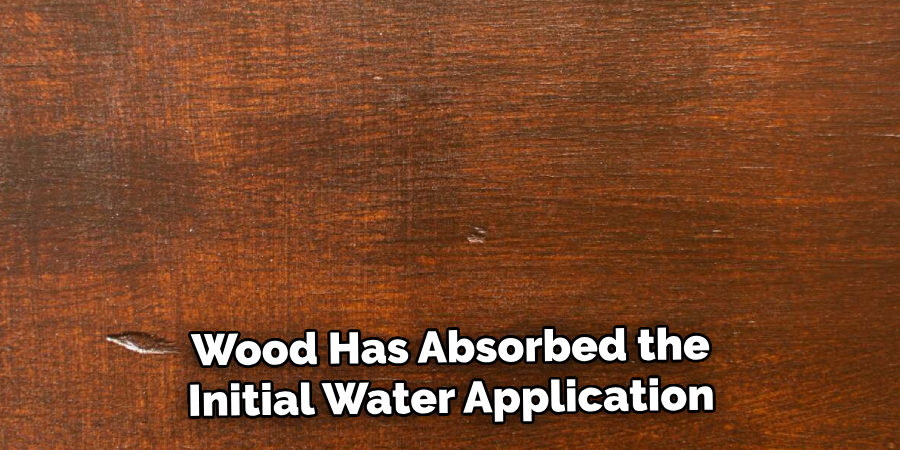
Once the area is clean and dry, it’s time to apply water directly to the dent. Use distilled water if possible, as it contains fewer minerals that could leave deposits on your wood. Apply several drops of water directly into the dent using a dropper, syringe, or simply your finger. The goal is to saturate the compressed wood fibers without flooding the entire surface.
Allow the water to sit and penetrate the wood for about 10-15 minutes. You’ll notice the wood beginning to darken as it absorbs the moisture. This hydration is what allows the compressed fibers to swell and return to their original position. Be patient during this stage—rushing can compromise the effectiveness of the repair. If the dent is particularly deep, you may need to reapply water once or twice to ensure thorough saturation.
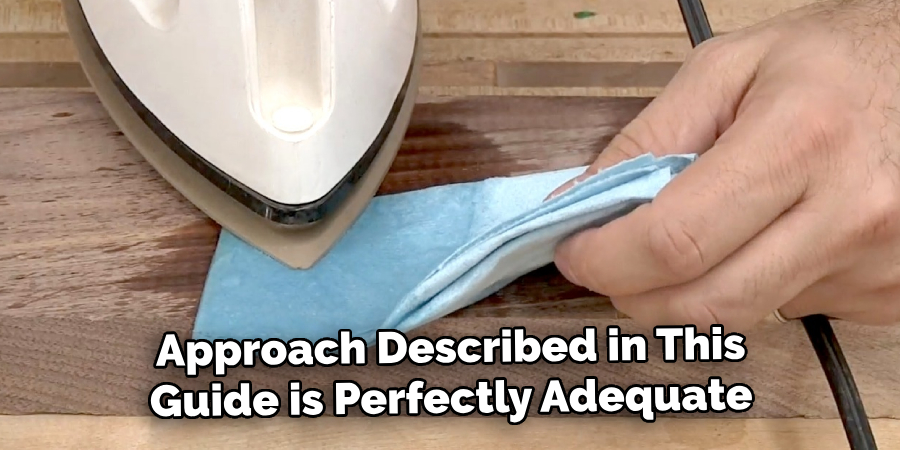
Step 4: Place a Damp Cloth Over the Dent
After the wood has absorbed the initial water application, place a damp cotton cloth or towel directly over the dented area. The cloth should be moist but not dripping wet—wring out excess water before placing it on the wood. This cloth serves as a protective barrier between the heat source and your wood surface, preventing scorching or burn marks.
Make sure the cloth completely covers the dent and extends slightly beyond its edges. This ensures even heat distribution and prevents any accidental damage to the surrounding wood. The moisture in the cloth will create steam when heat is applied, which is the key to raising the dent. Using a cotton cloth is preferable because synthetic materials may melt or damage the wood surface when exposed to high heat.
Step 5: Apply Heat
Now comes the crucial step—applying heat to create steam. Set your iron to a medium-high heat setting without steam (the cloth provides the moisture). Place the iron on top of the damp cloth directly over the dent. Move the iron in small circular motions, applying gentle pressure for 15-20 seconds at a time.
Lift the iron and cloth periodically to check your progress. You should see the dent gradually rising as the steam penetrates the wood and causes the compressed fibers to expand. If you’re using a hair dryer instead of an iron, hold it about 2-3 inches from the damp cloth and move it continuously over the area for 2-3 minutes. The hair dryer method takes longer but offers more control and less risk of scorching. Repeat this heating process several times, reapplying water to the cloth as needed, until the dent is level with the surrounding wood surface.
Step 6: Sand and Smooth the Surface
Once the dent has risen and the wood is completely dry (this may take several hours or overnight), you’ll likely notice that the grain has raised slightly, creating a rough texture. This is normal and easily corrected. Take your fine-grit sandpaper (220-grit is ideal) and gently sand the repaired area in the direction of the wood grain.
Use light, even strokes and avoid applying too much pressure. The goal is to smooth the surface without removing too much material or creating an uneven spot. Sand in a circular area slightly larger than the original dent to blend the repair seamlessly with the surrounding wood. Wipe away the sanding dust with a clean, dry cloth. If the area still feels rough, you can repeat the sanding process with an even finer grit sandpaper (320-grit) for an ultra-smooth finish.
Step 7: Refinish the Area
The final step is to restore the wood’s protective finish and luster. Apply a wood finish, polish, or wax that matches your existing surface. If you’re unsure what finish was originally used, test your product on an inconspicuous area first. For clear-coated or varnished wood, you may need to apply a thin layer of polyurethane or lacquer with a small brush.
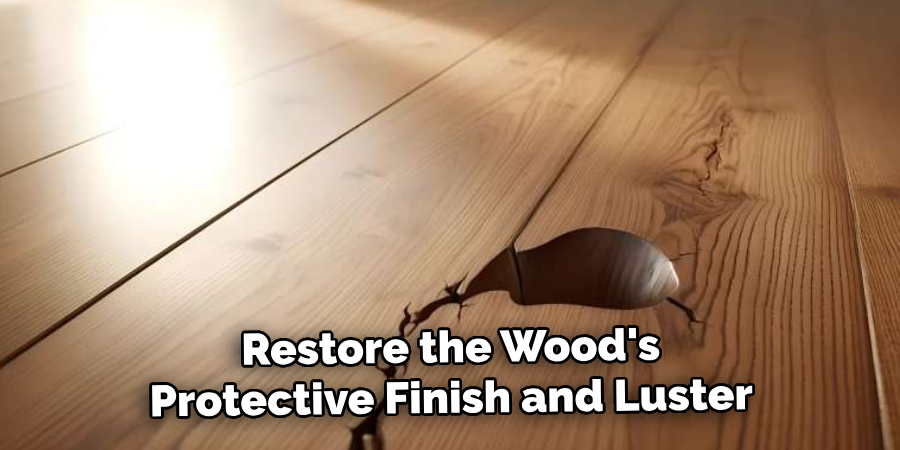
Apply the finish in thin, even coats, following the manufacturer’s instructions. Allow adequate drying time between coats if multiple applications are needed. For oiled or waxed finishes, rub the product into the wood using a soft cloth, following the grain direction. Buff the area gently to blend the new finish with the existing surface. Once dry, the repaired area should be virtually invisible, with the dent completely removed and the wood’s natural beauty restored.
Following these steps on how to get dents out of wood furniture can help prolong its lifespan and maintain its aesthetic appeal. However, prevention is always better than a cure. To avoid dents on your wood furniture, it’s important to practice proper care and maintenance.
Common Mistakes to Avoid
When removing dents from wood, several common errors can compromise your results. Avoid using tap water instead of distilled water, as minerals can leave white spots on dark wood. Never apply the iron directly to the wood surface without a protective cloth, as this will cause irreversible burn marks.
Don’t rush the drying process by applying heat for too long in one session—multiple shorter applications are more effective and safer. Skipping the sanding step often leaves a rough, raised area that’s obvious to the touch. Finally, using the wrong type of finish or applying too much can create a blotchy appearance that draws attention to the repair rather than concealing it.
Do You Need To Use Professionals?
For most minor to moderate dents, the DIY approach described in this guide is perfectly adequate and cost-effective. However, certain situations warrant professional intervention. If your wood piece is an antique or has significant monetary or sentimental value, consulting a professional furniture restorer ensures the repair won’t compromise the piece’s integrity or value. Similarly, if the dent is accompanied by deep scratches, gouges, or splintering, a professional can use specialized techniques like wood grafting or invisible filling.
Extensive damage across large areas or multiple dents may also be more efficiently handled by professionals who have industrial-grade equipment. Finally, if you’re uncomfortable working with heat and moisture on expensive wood surfaces, the peace of mind that comes with professional service may be worth the investment. That said, most homeowners find that with patience and care, they can successfully remove dents and restore their wood surfaces to excellent condition.
Frequently Asked Questions
Q: How Long Does It Take For the Wood To Dry After Steaming?
A: Drying time varies depending on the wood type, the amount of moisture applied, and environmental conditions like humidity and temperature. Generally, you should allow the wood to dry completely for at least 4-6 hours, though overnight drying is ideal for the best results. Hardwoods like oak and maple may take longer to dry than softer woods like pine. You can test if the wood is dry by touching it—it should feel room temperature and show no signs of moisture or darkening. Attempting to sand or refinish before the wood is completely dry can damage the surface and undo your repair work, so patience during this stage is essential.
Q: Will This Method Work On All Types Of Wood Finishes?
A: The steam method works effectively on most wood finishes, including varnish, polyurethane, lacquer, shellac, and oil finishes. However, you should exercise extra caution with delicate finishes or antique pieces that may have fragile surface treatments. Painted wood requires a different approach, as moisture and heat can damage paint. If your wood has a very thick finish coat, the steam may not penetrate as effectively, and you might need to lightly sand the finish before applying moisture. When in doubt, always test the method on an inconspicuous area first to ensure it won’t damage your specific finish. For valuable or antique pieces with original finishes, consulting a professional before attempting any repair is the safest approach.
Conclusion
Removing dents from wood doesn’t have to be a daunting task or an expensive professional service. With the simple steam method outlined in this guide on how to get dents out of wood, you can restore your wood furniture and flooring using items you already have at home. The key is patience—allowing proper time for moisture absorption, carefully applying heat, and letting the wood dry completely before finishing.
Remember that practice makes perfect, and your first attempt might not be flawless. Start with less visible areas to build confidence before tackling prominent dents. Your wood surfaces have served you well, and with this newfound knowledge, you can keep them looking beautiful for years to come. Ready to restore that dented table or floor? Gather your materials and start bringing your wood back to life today.
About
Mike May is a distinguished figure in the world of woodworking and timber design, with a decade of expertise creating innovative and sustainable indoor solutions. His professional focus lies in merging traditional craftsmanship with modern manufacturing techniques, fostering designs that are both practical and environmentally conscious. As the author of Woodimber, Mike delves into the art and science of timber-craft, inspiring artisans and industry professionals alike.
Education
RMIT University (Melbourne, Australia)
-
Associate Degree in Design (Timber): Focus on sustainable design, industry-driven projects, and practical craftsmanship.
-
Gained hands-on experience with traditional and digital manufacturing tools, such as CAD and CNC software.
Nottingham Trent University (United Kingdom)
-
Bachelor’s in Woodworking and Product Design (Honors): Specialized in product design with a focus on blending creativity with production techniques.
-
Participated in industry projects, working with companies like John Lewis and Vitsoe to gain real-world insights.
Publications and Impact
In Woodimber, May shares his insights on timber design processes, materials, and strategies for efficient production. His writing bridges the gap between artisan knowledge and modern industry needs, making it a must-read for both budding designers and seasoned professionals.