 (1)")

A wooden Christmas tree offers a unique and modern alternative to the traditional pine or fir. Its clean lines and natural material provide a beautiful canvas for your holiday creativity.
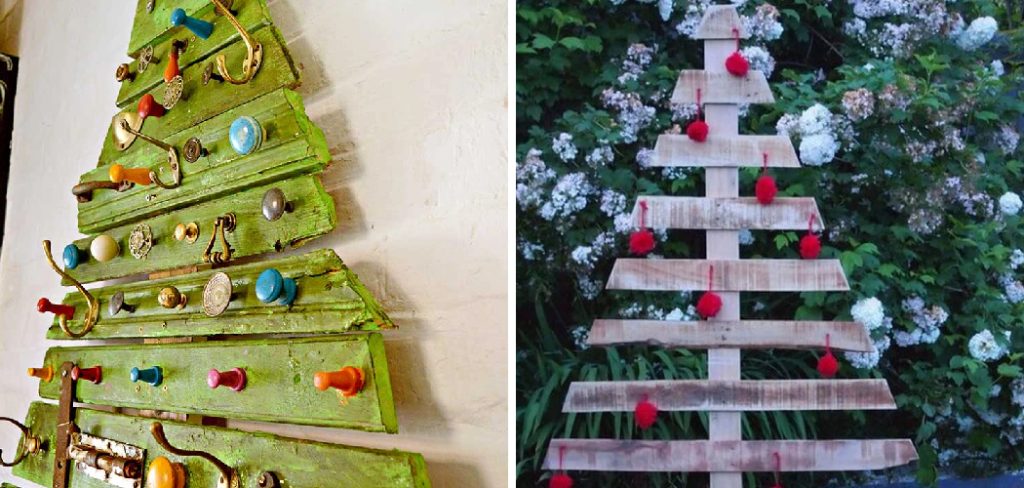
Whether you’re drawn to its minimalist charm, its eco-friendly nature, or its reusability, a wooden tree is a fantastic choice for any home. Decorating one, however, is a bit different from draping tinsel on a classic evergreen.
This guide on how to decorate a wood christmas tree will walk you through everything you need to know to transform your wooden tree into a stunning holiday centerpiece. We’ll explore the benefits, gather the right supplies, and provide a detailed step-by-step process to make your tree shine.
What Will You Need?
Essential Supplies:
- Your wooden Christmas tree
- Lights (LED fairy lights or string lights work best)
- Ornaments (a mix of sizes, shapes, and materials)
- A tree topper
- Hooks or twine for hanging ornaments
- Small zip ties or clear tape for securing lights
Optional Supplies for Customization:
- Sandpaper (fine-grit)
- Wood stain or paint
- Paintbrushes or foam applicators
- Primer (if you plan to paint a light color)
- Varnish or sealant for protection
- Garland (beaded, felt, or popcorn)
- A tree skirt or collar to hide the base
10 Easy Steps on How to Decorate a Wood Christmas Tree
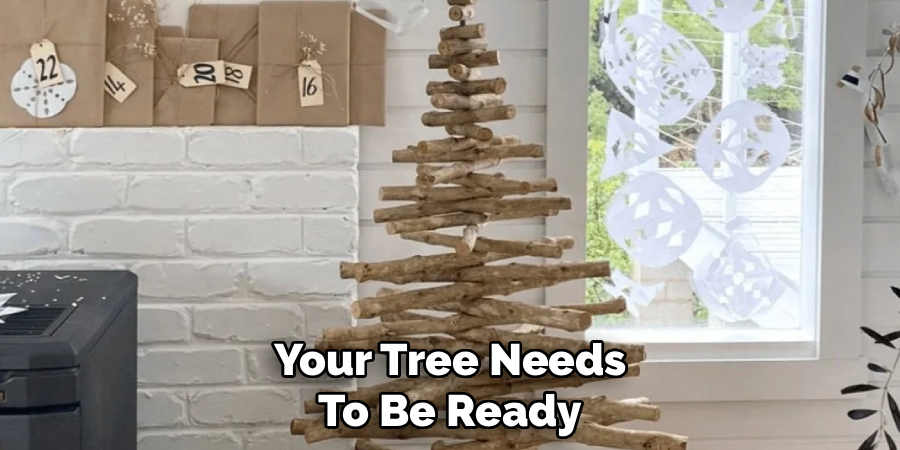
Step 1: Prepare Your Tree and Workspace
Before you even think about hanging an ornament, your tree needs to be ready. If your tree is brand new, simply assemble it according to the manufacturer’s instructions. Ensure it is stable and placed in its final location for the holiday season. If you’ve used it before, give it a quick wipe-down with a dry or slightly damp cloth to remove any dust that may have accumulated in storage.
For those planning to customize the tree’s finish, this is the time to do it. If you want to paint or stain your tree, it’s best to do so before assembly. Lay the individual pieces on a drop cloth in a well-ventilated area. If you plan on painting, lightly sand the wood with fine-grit sandpaper to help the primer and paint adhere better. Apply a coat of primer, let it dry completely, and then apply one or two coats of your chosen paint color. For staining, apply the stain with a cloth or brush, wiping away the excess to achieve your desired shade.
Step 2: Plan Your Decor Theme
A cohesive theme can elevate your tree from a simple collection of ornaments to a designer-level display. Take a moment to decide on the look you want to achieve. Are you aiming for a rustic, farmhouse feel with natural elements like burlap, pinecones, and wood-slice ornaments? Or do you prefer a glamorous, modern look with metallics like gold, silver, and rose gold, paired with glass and crystal decorations? Perhaps a classic red and green theme or a whimsical, colorful arrangement is more your style.
Consider your existing home decor. Your tree should complement the room it’s in, not clash with it. Once you have a color palette and theme in mind, gather your ornaments and decorations. Lay them out to see how they work together. This is also a good time to identify any gaps in your collection.
Step 3: Add the Lights First
Just like with a traditional tree, lights should always be your first decorative layer. They create the foundational glow that makes everything else sparkle. For wooden trees, LED fairy lights on a thin, flexible wire are an excellent choice. They are lightweight, energy-efficient, and the wire can be easily bent and wrapped around the “branches” or dowels of your tree.
Start at the top of the tree and work your way down. Weave the lights in and out, wrapping them securely around each level or branch. The goal is to distribute the light evenly. To secure the light string, you can use small, clear zip ties or pieces of clear tape on the back or underside of the branches where they won’t be visible. Make sure to step back frequently to check for dark spots and adjust the placement as needed. Once you reach the bottom, neatly tuck away any excess wire. Plug in the lights to ensure they are all working and that you are happy with the overall distribution before moving on.
Step 4: Hang Your Largest Ornaments
With your tree beautifully lit, it’s time to add the main ornaments. Begin with your largest and heaviest pieces. These are your “statement” ornaments that will serve as the focal points of your design. Distributing these first helps to create balance and ensures they have adequate space.

Place them evenly around the tree, both vertically and horizontally. On a wooden tree, you have distinct levels or “branches” to work with. Try to place one or two large ornaments on each main tier, staggering their positions so they aren’t directly above one another. This creates a more dynamic and visually interesting arrangement.
Step 5: Fill in with Medium-Sized Ornaments
Now that your largest ornaments are in place, you can start filling in the gaps with your medium-sized decorations. These ornaments are the workhorses of your tree; they add color, texture, and personality. Continue to distribute them evenly around the tree, placing them further out on the “branches” than your larger ornaments to create a sense of depth.
Mix up the shapes and textures. If you have a lot of round baubles, incorporate some teardrop shapes, stars, or unique figurines to add variety. Pay attention to your color scheme, spreading the different colors throughout the tree to maintain a balanced look. This is where you can really start to see your theme come to life. Step back often to assess your progress.
Step 6: Add Small Filler Ornaments
Small ornaments are the secret to a professional-looking tree. They fill in the final empty spaces, add intricate detail, and make the tree look lush and complete. These can be tiny baubles, small bells, miniature pinecones, or any other small decorative items that fit your theme.
Tuck these smaller pieces into any remaining gaps, especially near the center of the tree and between the larger ornaments. They are perfect for adding a final splash of color or a touch of sparkle in just the right spot. On a wooden tree, they can be particularly effective when hung near the tips of the dowels or along the edges of the flat “branches,” adding a delicate finishing touch.
Step 7: Drape the Garland
Garland adds another layer of texture and movement to your tree. Unlike a fluffy pine tree where garland can be nestled deep within the branches, on a wooden tree, the garland will be a prominent feature. Therefore, it’s important to choose one that complements your theme and to drape it thoughtfully.
Beaded garlands, thin felt garlands, or even a classic popcorn and cranberry string work beautifully. Start at the top and gently swag the garland from one level to the next. You can either wrap it around the entire tree in a spiral or drape it in graceful scallops from branch to branch.

Step 8: Incorporate Natural Elements
To add warmth and texture, especially for rustic or Scandinavian themes, consider incorporating natural elements. Small bundles of cinnamon sticks tied with twine, dried orange slices, or small pinecones can be hung just like ornaments. You can also tuck sprigs of faux eucalyptus, holly berries, or frosted branches into the structure of the tree. These elements bridge the gap between the natural wood of the tree and the more polished ornaments, creating a harmonious and organic feel.
Step 9: Add the Tree Topper
The tree topper is the crowning glory of your Christmas tree. For a wooden tree, you have many beautiful options. A classic star or angel works wonderfully, but you can also think outside the box. A large, intricate snowflake, a rustic wooden star, or a modern geometric topper can look stunning.
When choosing a topper, consider its weight and how it will attach to your tree. Many wooden trees have a specific slot or hole at the top designed for this purpose. Ensure your chosen topper is secure and sits straight. It should be proportional to the size of your tree—not so large that it overwhelms it, but significant enough to make a statement.
Step 10: Finish with the Tree Skirt or Collar
The final step is to address the base of the tree. A tree skirt or collar serves a practical purpose by hiding the stand, but it also completes the overall look. Choose a skirt or collar that matches your theme. A faux fur skirt can add a touch of cozy luxury, a burlap or linen skirt complements a rustic theme, and a metal or wicker collar provides a clean, modern finish. Arrange the skirt neatly around the base, ensuring it lays flat. Now you can place your beautifully wrapped presents around the bottom, completing your festive holiday display.
5 Things You Should Avoid
Decorating a wooden tree is fun, but a few common missteps can detract from the final look. Keep these points in mind:

- Overloading the Branches: Wooden tree “branches” or dowels are not as flexible or dense as those on a traditional tree. Avoid hanging too many heavy ornaments on a single point, which can strain the wood or create an unbalanced appearance.
- Using Bulky Garland: Thick, bushy garlands are designed for full pine trees and can easily overwhelm the minimalist frame of a wooden tree. Stick to thinner, more delicate garlands like beads, felt balls, or simple ribbons.
- Forgetting to Secure Lights: Unlike traditional trees where you can tuck wires into needles, wires on a wooden tree are more exposed. Failing to secure them with clear tape or small zip ties can result in a messy, tangled look that distracts from your decorations.
- Ignoring the Back of the Tree: If your tree is visible from multiple angles, don’t neglect the back. A sparsely decorated back will be obvious. Ensure you distribute lights and ornaments evenly all the way around for a complete, 360-degree design.
- Using Clashing Colors and Styles: The simplicity of a wooden tree calls for a thoughtful, cohesive theme. Throwing a random assortment of clashing ornaments on it can look chaotic. Take the time to plan a color palette and style that complements the tree and your home.
Conclusion
How to decorate a wood christmas tree is a wonderful opportunity to embrace a modern, sustainable, and personalized approach to holiday decor.
By preparing your tree, planning a cohesive theme, and layering your decorations thoughtfully—from the foundational glow of the lights to the final placement of the tree topper—you can create a display that is both beautiful and uniquely yours. The clean lines and natural material of the wood provide the perfect backdrop for your creativity to shine.
This holiday season, enjoy the process of bringing your wooden tree to life and creating a festive centerpiece that you can be proud of for years to come.
About
Mike May is a distinguished figure in the world of woodworking and timber design, with a decade of expertise creating innovative and sustainable indoor solutions. His professional focus lies in merging traditional craftsmanship with modern manufacturing techniques, fostering designs that are both practical and environmentally conscious. As the author of Woodimber, Mike delves into the art and science of timber-craft, inspiring artisans and industry professionals alike.
Education
RMIT University (Melbourne, Australia)
-
Associate Degree in Design (Timber): Focus on sustainable design, industry-driven projects, and practical craftsmanship.
-
Gained hands-on experience with traditional and digital manufacturing tools, such as CAD and CNC software.
Nottingham Trent University (United Kingdom)
-
Bachelor’s in Woodworking and Product Design (Honors): Specialized in product design with a focus on blending creativity with production techniques.
-
Participated in industry projects, working with companies like John Lewis and Vitsoe to gain real-world insights.
Publications and Impact
In Woodimber, May shares his insights on timber design processes, materials, and strategies for efficient production. His writing bridges the gap between artisan knowledge and modern industry needs, making it a must-read for both budding designers and seasoned professionals.