 (1)")

There’s something deeply satisfying about creating your own picture frame from wood. Not only does it add a personal touch to your favorite photographs and artwork, but it also allows you to customize the size, style, and finish to perfectly match your home décor.

Whether you’re a seasoned woodworker or a complete beginner, making a wooden picture frame is an accessible and rewarding project that can be completed in just a few hours.
Wooden picture frames have a timeless appeal that mass-produced alternatives simply can’t match. By crafting your own frame, you’re not just creating a border for your memories—you’re building something with character, quality, and individuality.
This guide on how to make a picture frame from wood will walk you through every step of the process, from selecting your materials to applying the finishing touches, ensuring you have all the knowledge and confidence needed to create a beautiful wooden frame that will last for years to come.
Tools and Materials You’ll Need
Before diving into your project, gather all the necessary tools and materials. Having everything prepared in advance will make the construction process smoother and more enjoyable.
Essential Tools:
- Miter saw or miter box with a hand saw
- Measuring tape or ruler
- Pencil for marking
- Wood glue
- Corner clamps or band clamps
- Sandpaper (120-grit and 220-grit)
- Safety glasses
- Brad nailer or hammer with small finishing nails
Materials Required:
- Wood molding or lumber (pine, oak, or your preferred hardwood)
- Glass cut to size (optional but recommended)
- Backing board (hardboard or cardboard)
- Hanging hardware (sawtooth hangers or D-rings)
- Wood stain or paint (optional)
- Clear finish or polyurethane (optional)
Choose wood that’s straight and free from major defects. Pine is an excellent choice for beginners due to its affordability and workability, while hardwoods like oak or walnut offer a more premium look with beautiful grain patterns.
7 Simple Step-By-Step Guidelines on How to Make a Picture Frame From Wood
Step 1: Measure and Calculate Your Frame Dimensions
Accurate measurements are the foundation of a well-fitting picture frame. Start by measuring the artwork or photograph you want to frame, noting both the height and width. These measurements will determine your frame’s opening size, also known as the rabbet.
To calculate the length of wood you’ll need for each side, add the dimensions of your artwork to twice the width of your molding. For example, if you’re framing an 8×10-inch photo and your molding is 1 inch wide, you’ll need two pieces at 10 inches (8 + 1 + 1) and two pieces at 12 inches (10 + 1 + 1) for the outer edges.
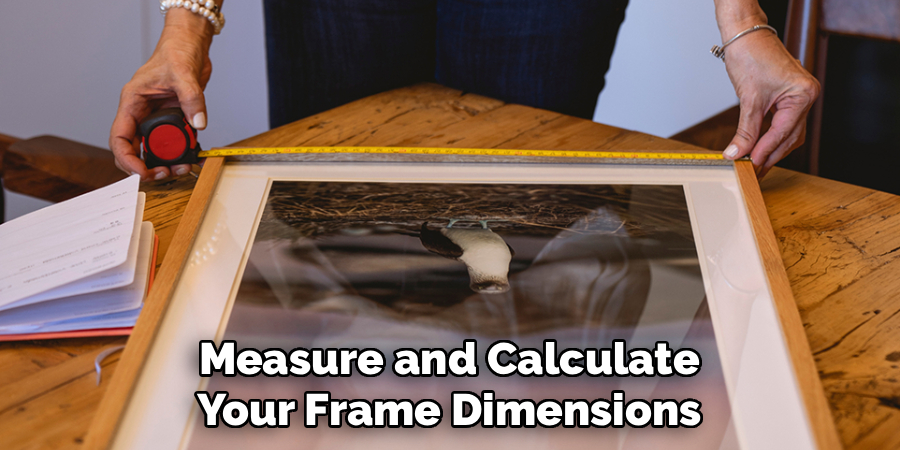
Don’t forget to account for the 45-degree miter cuts at each corner, which will add approximately the width of your molding to each side. It’s always wise to purchase slightly more wood than you think you’ll need to accommodate any mistakes during cutting.
Step 2: Cut the Wood at 45-Degree Angles
Using your miter saw, cut four pieces of wood molding at precise 45-degree angles. This is the most critical step in ensuring your frame corners meet perfectly. Set your saw to exactly 45 degrees and make a test cut on a scrap piece first to verify the angle is accurate.
When cutting, position the molding flat against the saw fence with the decorative face up. Cut one end at 45 degrees, then measure from the short point of that angle to mark where you’ll make the second cut. The “short point” is the inside corner of your frame.
Make sure all opposite sides are exactly the same length—even a difference of 1/16 inch will be noticeable in the finished frame. Work slowly and deliberately, as rushing this step often leads to mistakes that can’t be easily corrected.
Step 3: Create the Rabbet (Recess for Glass and Artwork)
If your molding doesn’t already have a rabbet cut into it, you’ll need to create one. A rabbet is a rectangular groove cut along the inside back edge of each frame piece that holds the glass, artwork, and backing board in place. This recess typically needs to be about 3/8 inch deep and 1/4 inch wide.
You can cut a rabbet using a table saw with a dado blade, a router with a rabbeting bit, or even multiple passes with a regular table saw blade. Whichever method you choose, make test cuts on scrap wood first to ensure the depth and width are correct for your materials.
The glass, artwork, and backing should fit snugly within the rabbet without protruding beyond the back of the frame. If you’re uncomfortable making this cut, many hardware stores and lumber yards sell pre-rabbeted molding specifically designed for picture frames.
Step 4: Sand All the Pieces Smooth
Before assembly, thoroughly sand each piece of your frame. Start with 120-grit sandpaper to remove any rough spots, saw marks, or imperfections in the wood. Pay particular attention to the cut ends and edges, as these areas tend to be rougher after cutting.

After the initial sanding, progress to 220-grit sandpaper for a smooth finish. Sand with the grain of the wood to avoid creating scratches that will be visible under stain or finish.
Don’t skip sanding the rabbet area—even though it won’t be visible in the finished frame, rough edges here can damage your artwork. Wipe away all dust with a clean, dry cloth or tack cloth before moving on to assembly. Proper sanding at this stage will make staining or painting much easier and result in a more professional-looking final product.
Step 5: Assemble the Frame with Glue and Clamps
Now comes the exciting part—assembling your frame. Apply a thin, even layer of wood glue to the mitered ends of two adjoining pieces. Press them together firmly, ensuring the corners align perfectly and the faces are flush. The joint should form a crisp 90-degree corner with no gaps.
Use corner clamps or a band clamp to hold the pieces in position while the glue dries. Corner clamps are particularly helpful for picture frames as they apply even pressure to both sides of the joint simultaneously. If you don’t have specialized clamps, you can create a clamping jig using scrap wood and standard bar clamps.
Work your way around the frame, gluing and clamping one corner at a time or all four corners at once if you have enough clamps. Allow the glue to dry completely according to the manufacturer’s instructions—typically 30 minutes to an hour for initial set, though full strength may take 24 hours.
Step 6: Reinforce the Corners with Nails or Hardware
Once the glue has dried, reinforce each corner joint for added strength and durability. Using a brad nailer or hammer and small finishing nails, carefully drive nails through the edge of one frame piece into the adjoining piece. Position nails about 1/2 inch from both the inside and outside edges of the frame.
Pre-drilling small pilot holes slightly smaller than your nails will prevent the wood from splitting, especially if you’re working with hardwood or narrow molding. Angle the nails slightly for maximum holding power.
Two nails per corner is typically sufficient for frames up to 16×20 inches; larger frames may benefit from three nails per corner. If nails protrude slightly from the surface, use a nail set to countersink them just below the wood surface, then fill the holes with wood filler that matches your frame’s finish.
Step 7: Apply Your Chosen Finish
The final step is applying a finish to protect and beautify your wooden frame. You have several options depending on the look you want to achieve. For a natural wood appearance, apply a clear polyurethane or lacquer finish. If you prefer to enhance the wood grain, use a wood stain in your desired color before applying a clear topcoat.
For painted frames, apply a primer first, then two coats of your chosen paint color, allowing adequate drying time between coats. Lightly sand between coats with 220-grit sandpaper for a smooth, professional finish. If you used wood filler in the nail holes, make sure it’s completely dry and sanded flush before applying your finish.

Apply the finish in a well-ventilated area and allow it to cure fully before inserting your glass and artwork—this typically takes 24-48 hours, depending on the product used.
Following these steps on how to make a picture frame from wood will ensure a strong and durable frame for your artwork. However, there are a few more tips to keep in mind to take your picture frame to the next level.
Common Mistakes to Avoid
Even experienced woodworkers can make mistakes when building picture frames. One of the most common errors is cutting inaccurate miter angles, which results in gaps at the corners. Always double-check your saw’s angle setting and make test cuts before cutting your actual frame pieces. Another frequent mistake is measuring from the wrong point on the mitered cut—always measure from the short point (inside corner) to ensure opposite sides are identical lengths.
Using too much glue can cause messy squeeze-out that’s difficult to remove and may interfere with stain absorption. Apply glue sparingly and wipe away any excess immediately with a damp cloth. Finally, don’t rush the drying process—assembling or finishing before glue and finishes have fully cured will compromise the strength and appearance of your frame.
Frequently Asked Questions
Q: What Type of Wood Is Best for Making Picture Frames?
A: The best wood for picture frames depends on your budget, skill level, and desired aesthetic. Pine is an excellent choice for beginners because it’s affordable, readily available, and easy to work with using basic tools. It accepts stains and paints well, making it versatile for different looks.
For a more premium appearance, hardwoods like oak, maple, walnut, or cherry offer beautiful grain patterns and superior durability, though they’re more expensive and require sharper tools for clean cuts.
If you’re going for a rustic or reclaimed look, consider using barn wood or pallet wood, which adds character and history to your frame. Whatever wood you choose, make sure it’s straight, dry, and free from major knots or defects that could weaken the frame or interfere with joinery.
Q: Do I Need Special Tools to Make a Picture Frame?
A: While specialized tools make the job easier, you can create a beautiful picture frame with relatively basic equipment. The most important tool is something to cut accurate 45-degree angles—a miter saw is ideal, but a simple miter box with a hand saw will work for beginners and costs much less.
You’ll also need some method of clamping the corners while the glue dries; corner clamps are specifically designed for this purpose, but you can improvise with band clamps, bar clamps, or even rubber bands and wooden blocks for small frames.
A tape measure, pencil, wood glue, and sandpaper are essential and inexpensive. For reinforcing corners, a brad nailer speeds up the process significantly, but a hammer and small finishing nails will accomplish the same result with more manual effort. As you gain experience and take on more ambitious projects, you may want to invest in a router for cutting rabbets or a table saw for more precise cuts, but these aren’t necessary for basic frame construction.

Conclusion
Creating your own wooden picture frame is more than just a woodworking project—it’s an opportunity to add a personal, handcrafted touch to your home while developing valuable skills. By following these detailed steps, from careful measurement and precise cutting to thoughtful finishing, you can produce frames that rival those found in stores, but with the added satisfaction of knowing you made them yourself.
The beauty of this project lies in its versatility. Once you’ve mastered the basic technique, you can experiment with different wood species, molding profiles, and finishes to create frames that perfectly complement any artwork or photograph. You might start with simple, small frames and gradually work your way up to larger, more complex designs with decorative details.
Ready to get started? Gather your materials, set up your workspace, and begin crafting frames that will showcase your memories for generations to come. Your first frame might not be perfect, but each one you make will improve your technique and boost your confidence. Before long, you’ll find yourself creating custom frames not just for yourself, but as thoughtful, personalized gifts for friends and family who will treasure both the frame and the care you put into making it. Thanks for reading this guide on how to make a picture frame from wood.
About
Mike May is a distinguished figure in the world of woodworking and timber design, with a decade of expertise creating innovative and sustainable indoor solutions. His professional focus lies in merging traditional craftsmanship with modern manufacturing techniques, fostering designs that are both practical and environmentally conscious. As the author of Woodimber, Mike delves into the art and science of timber-craft, inspiring artisans and industry professionals alike.
Education
RMIT University (Melbourne, Australia)
-
Associate Degree in Design (Timber): Focus on sustainable design, industry-driven projects, and practical craftsmanship.
-
Gained hands-on experience with traditional and digital manufacturing tools, such as CAD and CNC software.
Nottingham Trent University (United Kingdom)
-
Bachelor’s in Woodworking and Product Design (Honors): Specialized in product design with a focus on blending creativity with production techniques.
-
Participated in industry projects, working with companies like John Lewis and Vitsoe to gain real-world insights.
Publications and Impact
In Woodimber, May shares his insights on timber design processes, materials, and strategies for efficient production. His writing bridges the gap between artisan knowledge and modern industry needs, making it a must-read for both budding designers and seasoned professionals.