 (1)")

Whitewashing pine wood offers a simple way to refresh your furniture and interior spaces, giving them a bright, rustic charm.
This technique beautifully highlights the natural grain of the wood while adding a soft, weathered look that complements styles from coastal to modern farmhouse. Unlike a solid coat of paint, whitewashing allows the wood’s texture to remain visible, creating a piece with unique character and a light, airy feel.
This guide on how to whitewash pine wood will walk you through everything you need to know to achieve a professional-looking whitewash finish, transforming your pine pieces with ease.
What Will You Need?
Before you begin, gather the following tools and materials to ensure a smooth and successful project.
Tools:
- Sandpaper (120-grit and 220-grit)
- Sanding block or orbital sander
- Clean, lint-free cloths or rags
- Paintbrushes (synthetic bristle)
- Paint tray
- Stir stick
- Mixing container
- Drop cloths or plastic sheeting
- Tack cloth
- Protective gloves
- Safety glasses
- Dust mask
Materials:
- White latex paint (flat or satin finish)
- Water
- Wood cleaner or a mixture of soap and water
- Water-based polyurethane or clear wax (for sealing)
10 Easy Steps on How to Whitewash Pine Wood
Follow this detailed, step-by-step process to achieve a beautiful, professional-quality whitewash finish on your pine wood projects.
Step 1: Prepare Your Workspace
The first and most crucial step in any DIY project is proper preparation of your work area. This ensures that your surroundings are protected and that you can work safely and efficiently. Start by laying down drop cloths or large sheets of plastic to cover the floor and any nearby furniture.
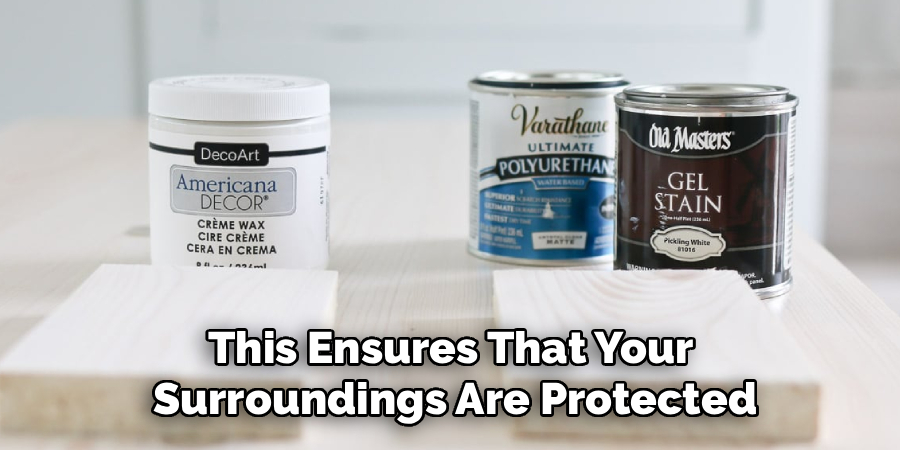
Whitewashing can be a bit messy, with drips and splatters being common, so a well-protected area will save you significant cleanup time later. Choose a space that is well-ventilated, such as a garage with the door open, an outdoor patio, or a room with several open windows. The fumes from paint and sealants can be strong, and good airflow is essential for your health and for helping the finish dry properly.
Step 2: Clean the Wood Surface
For the whitewash finish to adhere properly, the pine surface must be completely clean and free of any dirt, grease, or grime. Any residue left on the wood can prevent the paint from soaking in evenly, resulting in a blotchy and uneven finish.
Begin by wiping down the entire piece with a dry, clean cloth to remove any loose dust and debris. Next, use a dedicated wood cleaner or create a simple solution of mild dish soap and warm water. Dampen a clean cloth with the cleaning solution, wring it out so it is not dripping wet, and thoroughly wipe down every surface of the pine piece. Pay special attention to any grooves or detailed areas where dust tends to accumulate.
Step 3: Sand the Pine Wood
Sanding is essential for opening up the pores of the wood, which allows the whitewash solution to penetrate deeply and evenly. This step also smooths out any imperfections, removes any existing light finishes, and creates a uniform surface ready for treatment. Start with a medium-grit sandpaper, such as 120-grit. If you are working on a large, flat surface like a tabletop or floor, an orbital sander will make the job much faster and easier. For smaller or more intricate pieces, a sanding block or simply wrapping the sandpaper around your hand will work just fine. Always sand in the direction of the wood grain. Sanding against the grain can create visible scratches that will be highlighted by the whitewash finish.
Step 4: Final Sanding and Cleaning
After the initial sanding with 120-grit sandpaper, you will want to perform a second, finer sanding to create an even smoother surface. Switch to a fine-grit sandpaper, such as 220-grit. This step refines the surface, removing any minor scratches left by the medium-grit paper and resulting in a silky-smooth finish. Again, sand with the grain over the entire piece, applying light pressure. The goal here is not to remove more wood, but to polish the surface you have already prepared.
Step 5: Mix Your Whitewash Solution
Creating the whitewash solution is where you get to control the final look of your project. The ratio of paint to water determines the opacity of the finish. A more transparent, subtle look requires more water, while a more opaque, paint-like finish uses less water.
A good starting point for a classic whitewash effect is a 1:1 ratio, meaning one part white latex paint to one part water. For a more transparent stain-like effect, try a 1:2 ratio (one part paint to two parts water). It is always best to start with a more diluted mixture, as you can easily apply more coats to increase opacity, but you cannot make a thick coat more transparent once it is applied. Use a separate mixing container and pour in your desired amount of paint.

Step 6: Apply the First Coat of Whitewash
With your surface prepared and your solution mixed, it is time to apply the whitewash. Before you begin on your main piece, it is highly recommended to test your mixture on a scrap piece of pine or an inconspicuous area of your furniture, like the underside of a shelf or the back of a leg.
This allows you to see exactly how the finish will look and make any adjustments to your paint-to-water ratio if needed. Once you are happy with the consistency, dip your synthetic bristle brush into the whitewash solution. Apply a thin, even coat to the wood, always brushing in the direction of the grain. Work in small, manageable sections.
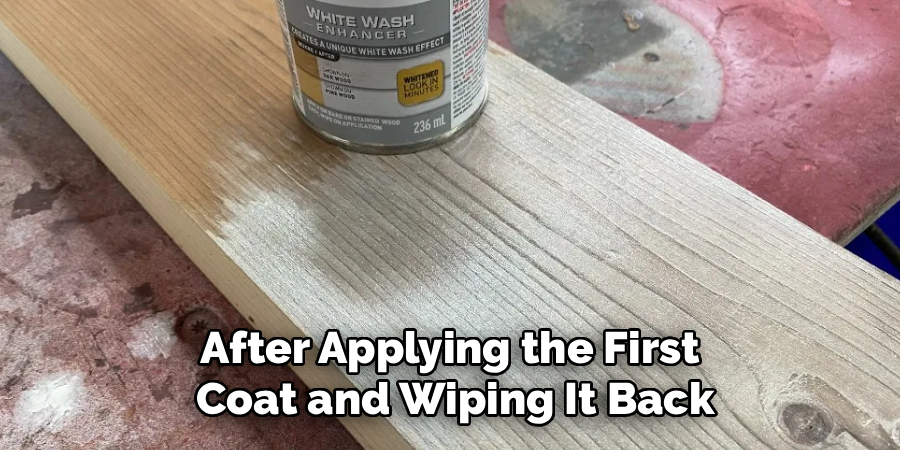
Step 7: Wipe Back the Excess
This step is what truly defines the whitewash look and separates it from a simple coat of thinned paint. Immediately after applying the solution to a section, take a clean, dry, lint-free cloth and gently wipe away the excess. The amount of pressure you use and how much you wipe off will determine the final appearance. For a more transparent look that heavily features the wood grain, wipe away more of the solution. For a more opaque, frosted appearance, wipe more lightly, leaving a thicker layer of paint behind. Always wipe in the direction of the wood grain to enhance its natural lines.
Step 8: Apply Additional Coats
After applying the first coat and wiping it back, step back and evaluate the finish. Let the first coat dry for at least 2-4 hours before making a decision. If you are satisfied with the level of opacity and the overall look, you can proceed directly to sealing. However, if you desire a whiter, more opaque finish, you can apply a second or even a third coat.
The process for additional coats is identical to the first: apply a thin layer of the whitewash solution with a brush, working in sections, and then wipe back the excess with a clean cloth.
Step 9: Seal the Wood
Once your final coat of whitewash has dried completely—it is best to wait at least 24 hours—you must apply a protective topcoat. This step is crucial for protecting the finish from dirt, moisture, and daily wear and tear.
A sealant will make the surface durable and easy to clean. For whitewashed pine, a water-based polyurethane is an excellent choice. It dries clear and, unlike oil-based sealants, will not yellow over time, which would otherwise ruin the crisp white finish. You can choose a matte, satin, or semi-gloss sheen depending on your preference. Apply the polyurethane with a clean paintbrush in long, even strokes, following the direction of the wood grain.
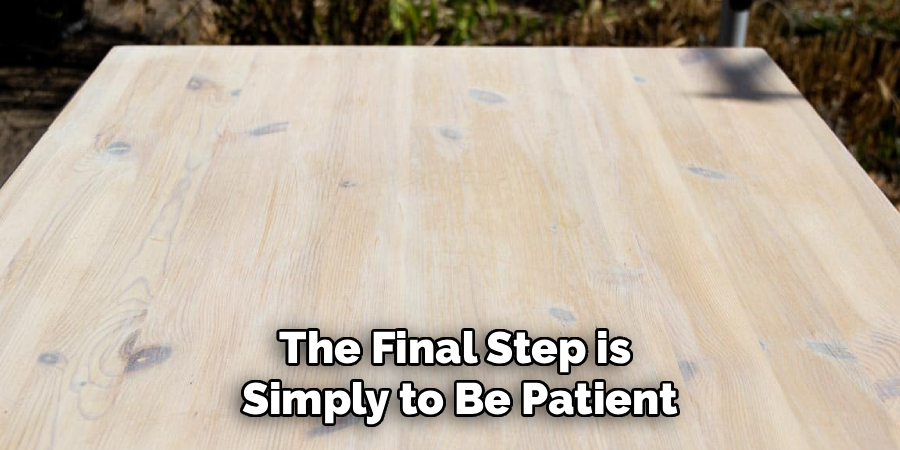
Step 10: Allow for Curing Time
The final step is simply to be patient. While the sealant may feel dry to the touch within a few hours, it takes much longer to fully cure. Curing is the chemical process where the sealant hardens completely and reaches its maximum durability. This process can take anywhere from several days to a full month, depending on the product used, temperature, and humidity. Check the manufacturer’s instructions for the specific curing time.
During this period, be gentle with the piece. Avoid placing heavy objects on it, and protect it from scratches and spills. While you can typically start using the item lightly after a day or two, waiting for the full cure time ensures your beautiful whitewash finish will last for years to come.
Conclusion
How to whitewash pine wood is a rewarding project that can dramatically alter the look and feel of your home. The key to a beautiful finish lies in careful preparation and a bit of patience.
By cleaning and sanding the wood properly, mixing your solution to the right consistency, and applying a protective topcoat, you can create a durable and stylish piece that looks professionally done. As a final tip, remember that you can always add another coat of whitewash to make the finish more opaque, so it is always best to start with a more diluted mixture.
Now you have the knowledge to transform any piece of pine with confidence.
About
Mike May is a distinguished figure in the world of woodworking and timber design, with a decade of expertise creating innovative and sustainable indoor solutions. His professional focus lies in merging traditional craftsmanship with modern manufacturing techniques, fostering designs that are both practical and environmentally conscious. As the author of Woodimber, Mike delves into the art and science of timber-craft, inspiring artisans and industry professionals alike.
Education
RMIT University (Melbourne, Australia)
-
Associate Degree in Design (Timber): Focus on sustainable design, industry-driven projects, and practical craftsmanship.
-
Gained hands-on experience with traditional and digital manufacturing tools, such as CAD and CNC software.
Nottingham Trent University (United Kingdom)
-
Bachelor’s in Woodworking and Product Design (Honors): Specialized in product design with a focus on blending creativity with production techniques.
-
Participated in industry projects, working with companies like John Lewis and Vitsoe to gain real-world insights.
Publications and Impact
In Woodimber, May shares his insights on timber design processes, materials, and strategies for efficient production. His writing bridges the gap between artisan knowledge and modern industry needs, making it a must-read for both budding designers and seasoned professionals.