 (1)")

Have you ever walked past that old oak dresser in the hallway and wished it wasn’t so… orange? Or perhaps you’ve found a sturdy, well-built coffee table at a thrift store that has the perfect shape but the wrong finish for your living room.
The good news is that you don’t need to replace high-quality furniture just because the color doesn’t match your current aesthetic. Wood is remarkably forgiving and adaptable, allowing you to transform its appearance completely with a bit of effort and the right technique.
Changing the color of wood is one of the most rewarding DIY projects you can undertake. It allows you to breathe new life into tired pieces, customize cheap finds to look high-end, and unify mismatched furniture sets. This guide on how to change wood color is designed to take you from a novice with a sanding block to a confident refinisher.
What Will You Need?
Before you begin, gather these supplies to ensure a smooth workflow. Having everything within reach prevents frustrating interruptions.
Tools:
- Orbital Sander: Essential for removing old finish efficiently on flat surfaces.
- Detail Sander or Sanding Block: For corners, legs, and intricate details.
- Paint Scraper or Putty Knife: Helpful for removing thick layers of old varnish or paint stripper.
- Natural Bristle Brush: For applying oil-based stains.
- Foam Brush: For applying water-based stains or conditioners.
- Lint-Free Rags: Old cotton t-shirts work perfectly for wiping away excess stain.
- Safety Gear: Dust mask (N95 recommended), safety goggles, and chemical-resistant gloves.
Materials:
- Sandpaper: Various grits are crucial: 80-grit (coarse), 120-grit (medium), and 220-grit (fine).
- Chemical Stripper (Optional): If the old finish is very thick or intricate.
- Wood Conditioner: Vital for softwoods like pine to prevent blotchy staining.
- Wood Stain: Your chosen color (oil-based, water-based, or gel stain).
- Topcoat/Sealer: Polyurethane (oil or water-based), lacquer, or wax to protect the finish.
- Mineral Spirits: For cleanup if using oil-based products.
- Tack Cloth: To remove fine dust particles before staining.
10 Easy Steps on How to Change Wood Color
Changing wood color is a process that rewards patience. Rushing through these steps often leads to a finish that looks amateurish or fails prematurely. Here is your detailed roadmap to success.
Step 1: Prepare Your Workspace and Assess the Piece
Before you touch the wood, you must prepare your environment. Refinishing is messy. It produces sawdust and fumes, so ventilation is key. Set up your workspace in a garage or a well-ventilated room with windows open. Lay down drop cloths or old newspapers to protect your floor from spills and dust.

Once your space is ready, examine the piece of furniture. Remove all hardware—knobs, handles, hinges, and drawer pulls. Keeping hardware on while sanding or staining makes it impossible to get a clean finish around the edges and risks ruining the metal. Store these small parts in labeled ziplock bags so you don’t lose screws. If the wood has any structural damage, like loose legs or deep gouges, now is the time to glue and clamp them.
Step 2: Strip the Old Finish (If Necessary)
If your wood piece has a very thick layer of paint or a heavy, glossy varnish, sanding alone might take hours and clog up dozens of sanding discs. In this case, a chemical stripper is your best friend. Apply a generous layer of stripper using an old paintbrush you don’t mind throwing away. Let it sit for the time recommended on the can—usually between 15 and 30 minutes—until the finish bubbles up.
Use a plastic scraper or a putty knife with rounded corners to gently scrape away the goo. Be careful not to gouge the wood underneath. Work in small sections so the stripper doesn’t dry out before you can scrape it. Once the bulk of the finish is removed, use steel wool dipped in mineral spirits or a dedicated after-wash to clean off the residue. If the existing finish is thin or just worn out, you can skip this chemical step and move straight to sanding.
Step 3: Begin with Coarse Sanding
This is where the transformation truly begins. Start with 80-grit sandpaper on your orbital sander. The goal here is to remove the remaining finish and open up the wood grain. Do not press down hard on the sander; let the weight of the tool do the work. Move slowly in the direction of the wood grain. Going across the grain will leave unsightly scratches that will highlight later.
Focus on removing all the old color. You want to see raw, bare wood. Be meticulous around edges and corners, but be careful not to round them over unless that is the look you want. If you are sanding veneer, be extremely cautious, as the wood layer is very thin and you can easily sand right through it to the plywood underneath.
Step 4: Progress to Medium Sanding
Once the old finish is completely gone, switch to 120-grit sandpaper. The coarse 80-grit paper removed the finish, but it also left behind small scratches on the wood surface. The 120-grit pass is designed to smooth out those scratches. This step is crucial for preparing the surface to accept the stain evenly.

Wipe the piece down with a dry cloth between sanding stages to inspect your work. You are looking for a uniform surface. If you see any shiny spots, that means the old finish is still there and needs more attention. Ensure you sand every inch of the piece; if you miss a spot now, the stain will not penetrate that area, leaving a light, blotchy patch in your final finish.
Step 5: Finish with Fine Sanding
The final sanding stage uses 220-grit sandpaper. This polishes the wood and makes it incredibly smooth to the touch. This step is essential for a professional-grade finish. If you stop at 120-grit, the wood pores may be too open, leading to the stain absorbing too darkly or unevenly.
After you finish with the orbital sander, grab a sheet of 220-grit paper and hand-sand the entire piece with the grain. This removes any tiny swirl marks left by the power tool. Run your hand over the wood; it should feel as smooth as glass. This tactile check is the best way to ensure you are ready for the next steps.
Step 6: Clean and De-dust Thoroughly
Dust is the enemy of a smooth finish. You cannot simply blow the dust off and start staining. First, use a vacuum with a brush attachment to suck up dust from the surface and from inside any crevices or corners. Next, wipe the entire piece down with a clean, dry cloth.
Finally, use a tack cloth. A tack cloth is a sticky cheesecloth designed to pick up microscopic dust particles that vacuums miss. Unfold it and lightly drag it over the surface. Do not press hard, or you might transfer sticky resin onto the wood. Ensure the piece is completely dust-free before opening your can of stain.
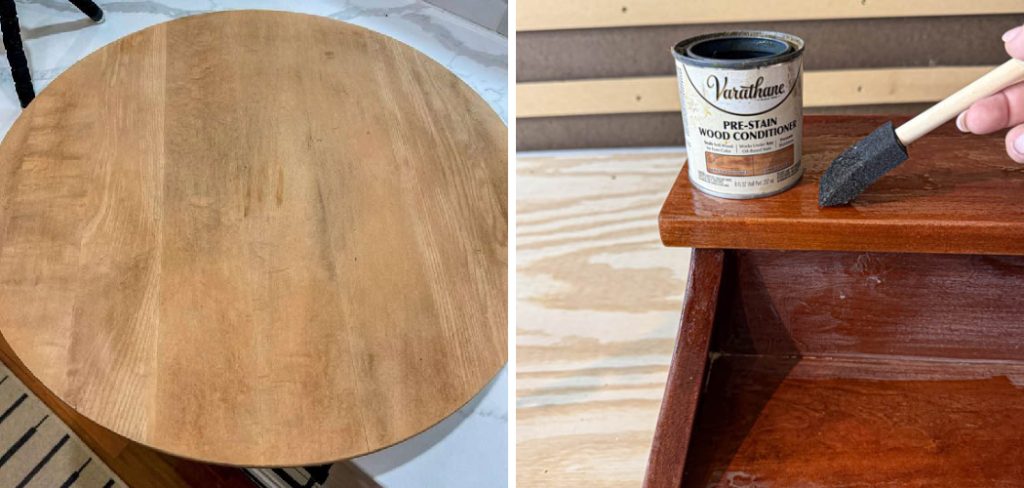
Step 7: Apply Pre-Stain Wood Conditioner
This step is often skipped by beginners, but it is the secret to a uniform color, especially on softwoods like pine, fir, spruce, or maple. These woods have varying densities, meaning some parts absorb stain like a sponge while others resist it, leading to a blotchy, amateurish look.
Apply the conditioner generously with a foam brush or rag. Let it penetrate the wood for about 5 to 15 minutes (check the label instructions). Wipe off any excess that hasn’t soaked in. You typically have a window of about 2 hours to apply your stain after the conditioner, so don’t take a break now. The conditioner creates a uniform base that helps the stain absorb evenly.
Step 8: Apply the Stain
Now for the fun part: adding color. Stir your stain thoroughly to mix the pigments that settle at the bottom of the can. Do not shake it, as this creates bubbles. Dip your rag or brush into the stain and apply it to the wood in long, even strokes, following the grain.

Work in manageable sections. You want to keep a “wet edge” so you don’t get lap marks where dry stain meets wet stain. Ensure the wood is fully saturated. Don’t worry if it looks messy or too dark at first; you aren’t painting it on, you are letting it soak in.
Step 9: Wipe Off Excess Stain
Timing is everything here. Let the stain sit on the wood for a few minutes. The longer you leave it, the darker the color will be, but don’t let it dry completely. Usually, 5 to 10 minutes is sufficient.
Take a clean, lint-free rag and wipe off all the excess stain, wiping in the direction of the grain. You are wiping it “dry.” If you leave puddles of stain on the surface, it will become tacky and never cure properly, and it will eventually peel off. If the color is too light after wiping, let it dry completely according to the manufacturer’s instructions, and then repeat steps 8 and 9 for a second coat.
Step 10: Seal and Protect
Once you are happy with the color and the stain is 100% dry (this usually takes 24 hours), you must protect it. Stain provides color, not protection. Apply a topcoat like polyurethane.
Stir the polyurethane gently. Apply a thin, even coat using a high-quality natural bristle brush (for oil-based) or synthetic brush (for water-based). Long, slow strokes reduce bubbles. Let the first coat dry, then lightly sand it with very fine 320-grit sandpaper to remove any dust nibs. Wipe away the dust, then apply a second coat. For high-traffic surfaces like table tops, three coats are recommended for maximum durability. Let the final coat cure for several days before placing heavy objects on it.

Conclusion
Changing the color of wood is a transformative process that blends creativity with craftsmanship.
By following these steps on how to change wood color—preparing meticulously, sanding progressively, and finishing patiently—you can achieve professional-quality results right in your own garage. Whether you are aiming for a rich, dark mahogany look on a pine table or a light, weathered oak finish on a dresser, the power to customize your home is in your hands.
Remember that the secret to a great finish lies not just in the stain you choose, but in the preparation you do before the can is even opened.
About
Mike May is a distinguished figure in the world of woodworking and timber design, with a decade of expertise creating innovative and sustainable indoor solutions. His professional focus lies in merging traditional craftsmanship with modern manufacturing techniques, fostering designs that are both practical and environmentally conscious. As the author of Woodimber, Mike delves into the art and science of timber-craft, inspiring artisans and industry professionals alike.
Education
RMIT University (Melbourne, Australia)
-
Associate Degree in Design (Timber): Focus on sustainable design, industry-driven projects, and practical craftsmanship.
-
Gained hands-on experience with traditional and digital manufacturing tools, such as CAD and CNC software.
Nottingham Trent University (United Kingdom)
-
Bachelor’s in Woodworking and Product Design (Honors): Specialized in product design with a focus on blending creativity with production techniques.
-
Participated in industry projects, working with companies like John Lewis and Vitsoe to gain real-world insights.
Publications and Impact
In Woodimber, May shares his insights on timber design processes, materials, and strategies for efficient production. His writing bridges the gap between artisan knowledge and modern industry needs, making it a must-read for both budding designers and seasoned professionals.