 (1)")

Building a backyard shed can be a rewarding project that adds valuable storage space and functionality to your property. While traditional sheds can be expensive and complex to construct, there is a creative, sustainable, and budget-friendly alternative: building a shed from wooden pallets.
This project transforms discarded shipping materials into a sturdy and practical structure. With some planning, basic tools, and a bit of effort, you can create a custom shed that meets your specific needs without breaking the bank.
This guide on how to build a shed out of wooden pallets will walk you through every stage of the process, from sourcing the right pallets to putting the final touches on your new structure.
What Will You Need?
Gathering all your materials and tools before you begin will make the construction process much smoother.
Materials:
- Wooden Pallets: Approximately 30-40, depending on shed size. Ensure they are heat-treated (marked with “HT”) and not chemically treated (marked with “MB”). All pallets for the walls should be the same size.
- Foundation Blocks: Concrete deck blocks, cinder blocks, or treated timber for a skid foundation.
- Lumber:
- 2×4 or 2×6 boards for the roof frame, headers above doors/windows, and internal bracing.
- Plywood or OSB sheathing (at least 1/2-inch thick) for the roof, floor (optional), and exterior walls.
- Fasteners:
- 3-inch and 4-inch wood screws or galvanized nails.
- Carriage bolts, washers, and nuts for connecting pallets.
- Joist hangers and hurricane ties for the roof structure.
- Roofing:
- Roofing felt or tar paper.
- Asphalt shingles, corrugated metal panels, or polycarbonate sheets.
- Roofing nails or screws with rubber washers.
- Drip edge flashing.
- Siding/Cladding: Exterior-grade siding (e.g., vinyl, wood planks, or T1-11) to weatherproof the exterior.
- Moisture Barrier: House wrap (like Tyvek) to wrap the frame before installing siding.
- Door and Windows: A pre-hung exterior door or materials to build one; small windows (new or reclaimed).
- Finishing:
- Exterior paint or wood sealant.
- Caulk for sealing gaps.
- Door hardware (hinges, handle, lock).
Tools:
- Safety Gear: Safety glasses, work gloves, hearing protection, dust mask.
- Power Tools:
- Circular saw or miter saw.
- Power drill/driver with various bits.
- Reciprocating saw (useful for modifying pallets).
- Jigsaw for cutting curves or window openings.
- Palm sander or belt sander.
- Hand Tools:
- Tape measure.
- Carpenter’s square and speed square.
- Level (4-foot recommended).
- Hammer and pry bar.
- Wrench set or socket set for bolts.
- Utility knife.
- Caulking gun.
- Staple gun for house wrap and roofing felt.
- Ladders: A sturdy step ladder and possibly an extension ladder.
10 Easy Steps on How to Build a Shed Out of Wooden Pallets
This section provides a detailed walkthrough of the construction process. Precision and patience are key to building a structure that will last.
Step 1: Design, Planning, and Foundation
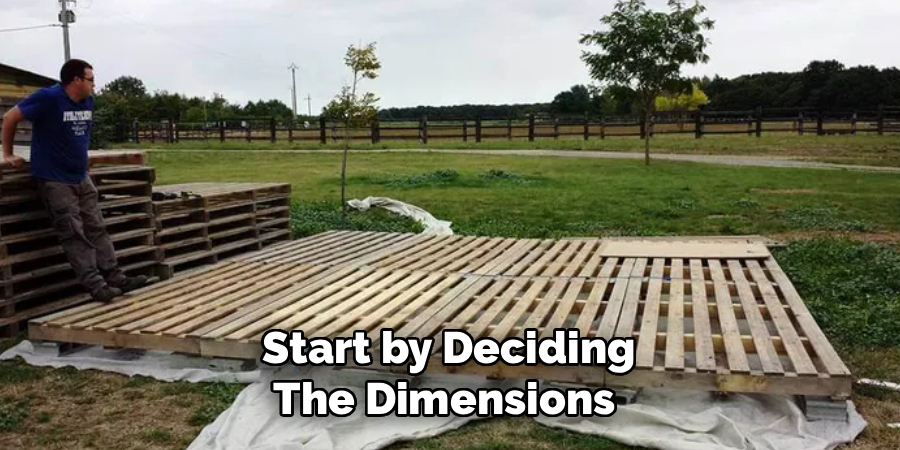
Before you lift a single pallet, you need a solid plan. Start by deciding the dimensions of your shed. A common size for a simple shed is 8×8 feet or 8×12 feet, which works well with standard 40×48-inch pallets. Sketch out your design, marking the placement of the door and any windows. Next, prepare the site.
The ground must be firm and level. Clear all vegetation and debris, and compact the soil if necessary. For the foundation, a simple and effective method is using concrete deck blocks. Arrange them in a grid pattern corresponding to the corners and mid-points of your shed’s footprint. Use a long level and string lines to ensure all the blocks are perfectly level with one another.
Step 2: Selecting and Preparing the Pallets
The quality of your shed depends entirely on the quality of your pallets. Your goal is to find pallets that are in good condition, free from rot, major cracks, or chemical spills. Most importantly, only use pallets stamped with “HT,” which indicates they have been heat-treated, not chemically treated with methyl bromide (“MB”). Heat-treated pallets are safe for handling and use in building projects.
Try to source pallets that are all the same size and construction style to make assembly much easier. Once you have your pallets, the preparation begins. Inspect each one and discard any that are too damaged. Use a pry bar and hammer to remove any unnecessary or broken boards.
Step 3: Assembling the Floor Frame
If you want a wooden floor for your shed, this is the time to build it. If you plan to use a gravel or paver floor, you can skip this step. To build a floor, lay out several of your best pallets flat within the perimeter of your foundation blocks. Arrange them tightly together to form the base. For added strength, you can add extra wood blocks or “sleepers” between the pallets to fill any gaps and provide a continuous surface for the subfloor.
Secure the pallets to each other using 3-inch wood screws. Once the pallet base is a single, solid unit, cover it with a large sheet of thick plastic to act as a vapor barrier, preventing ground moisture from rising into your shed. Finally, install a subfloor by screwing down sheets of 3/4-inch pressure-treated plywood or OSB over the entire pallet base.
Step 4: Constructing the Walls
The walls are formed by standing the pallets up vertically and joining them together. Start at one corner. Place two pallets upright to form an “L” shape. Use a level to ensure both are perfectly plumb (vertically level). Clamp them together and secure them using 4-inch screws or, for maximum strength, drill holes and use carriage bolts with washers and nuts. This corner will provide the stability for the rest of the wall sections.

Continue adding pallets one by one along your foundation line, checking for level and plumb with each addition. Screw each pallet to the one beside it at the top, middle, and bottom. It’s also essential to screw the bottom of each pallet securely into your wooden floor frame or foundation skids.
Step 5: Framing for Doors and Windows
A simple pallet wall is not strong enough to support itself over a large opening for a door or window. You need to build a header to transfer the load from above down to the sides of the opening. For your door opening, use two 2x4s or 2x6s nailed together with a piece of 1/2-inch plywood sandwiched between them to create a strong beam.
This header should span the width of the opening and rest on “jack studs” made of 2x4s on either side of the rough opening. This creates a solid frame that prevents the wall from sagging. Follow the same principle for any window openings, building smaller headers to fit the window size.
Step 6: Installing the Top Plate and Bracing
Once all the walls are erected and joined, you need to tie them all together at the top. This is done by installing a “top plate,” which is a continuous layer of 2×4 lumber running along the entire top perimeter of the pallet walls. This top plate locks the walls together, adds significant rigidity to the structure, and provides a level surface on which to build the roof.
Lay the 2x4s flat on top of the pallets and secure them with long screws, driving them down into the solid blocks of the pallet structure. Where the 2x4s meet at the corners, overlap them for a stronger connection. At this stage, you should also add diagonal bracing. Install 2x4s diagonally inside the shed, running from a top corner to a bottom corner of each wall section.
Step 7: Building and Installing the Roof Frame
The roof is the most complex part of the build. A simple shed or lean-to roof is the easiest style for a beginner. This involves creating a single slope to allow water to run off. To do this, you’ll need to make one wall taller than the other, or build up one wall with additional framing. For a gable roof (a classic triangular shape), you will build a series of identical roof trusses.

Each truss is typically a triangle made from 2x4s. You can build a jig on the floor to ensure all your trusses are exactly the same size and angle. The trusses are then lifted onto the top plate and spaced 16 or 24 inches apart. Secure them to the top plate using hurricane ties or by toe-nailing them in place.
Step 8: Adding Sheathing, Siding, and Roofing
With the frame complete, it’s time to enclose your shed. First, wrap the entire exterior pallet frame with a house wrap moisture barrier, stapling it in place. This prevents water from getting in but allows water vapor to escape. Next, install your exterior sheathing or siding.
You can use plywood, OSB, or a dedicated siding product like T1-11. Nail or screw it directly to the pallet frames. On the roof, install 1/2-inch or 5/8-inch plywood or OSB sheathing over the roof trusses. Cover the sheathing with roofing felt or tar paper, starting from the bottom and overlapping each layer. Install a metal drip edge along all the roof edges.
Step 9: Installing the Door and Windows
Carefully measure the rough openings you framed for your door and windows. If you bought pre-hung units, they can be installed directly into these openings. Use shims to get them perfectly level and plumb before securing them in place with screws through the frame. If you are building your own door, you can construct a simple one from 2x4s and plywood.
Once the door and windows are installed, apply caulk around the exterior trim to seal any gaps and prevent drafts and leaks. Install the door handle, hinges, and a lock for security.
Step 10: Finishing Touches and Weatherproofing
The final step is to protect your shed from the elements and give it a finished look. Apply a high-quality exterior paint or a wood sealant to all exposed wood surfaces, including the siding and any trim. Pay close attention to the bottom of the shed, ensuring the area where the walls meet the foundation is well-sealed.

Add trim boards around the corners, windows, and door to give the shed a clean, polished appearance and cover the raw edges of the siding. Inside, you can add shelving, hooks, or a workbench to customize the storage. A simple ramp can be built to make it easier to move wheeled equipment like lawnmowers in and out.
Conclusion
How to build a shed out of wooden pallets is more than just a construction project; it’s an exercise in creativity, resourcefulness, and practical skill-building.
By following the steps outlined in this guide, you can transform a stack of humble shipping pallets into a durable, functional, and personalized structure. The process demands careful planning and attention to detail, especially regarding the foundation, structural reinforcements, and weatherproofing.
However, the satisfaction of creating a useful building with your own hands—and for a fraction of the typical cost—is immense. Your finished pallet shed will stand as a testament to sustainable building practices and your own DIY capability.
About
Mike May is a distinguished figure in the world of woodworking and timber design, with a decade of expertise creating innovative and sustainable indoor solutions. His professional focus lies in merging traditional craftsmanship with modern manufacturing techniques, fostering designs that are both practical and environmentally conscious. As the author of Woodimber, Mike delves into the art and science of timber-craft, inspiring artisans and industry professionals alike.
Education
RMIT University (Melbourne, Australia)
-
Associate Degree in Design (Timber): Focus on sustainable design, industry-driven projects, and practical craftsmanship.
-
Gained hands-on experience with traditional and digital manufacturing tools, such as CAD and CNC software.
Nottingham Trent University (United Kingdom)
-
Bachelor’s in Woodworking and Product Design (Honors): Specialized in product design with a focus on blending creativity with production techniques.
-
Participated in industry projects, working with companies like John Lewis and Vitsoe to gain real-world insights.
Publications and Impact
In Woodimber, May shares his insights on timber design processes, materials, and strategies for efficient production. His writing bridges the gap between artisan knowledge and modern industry needs, making it a must-read for both budding designers and seasoned professionals.