 (1)")

There are few sights in nature as striking as the colorful plumage of a male wood duck gliding across a quiet pond.

These beautiful birds, once threatened with extinction due to habitat loss and overhunting, have made a remarkable recovery thanks largely to conservation efforts by everyday nature enthusiasts. Unlike most waterfowl that nest on the ground, wood ducks are cavity nesters, relying on hollow trees to raise their young. In many areas, however, suitable natural cavities are scarce. This is where you can make a tangible difference.
By learning how to build wood duck boxes, you provide a safe, secure environment for these birds to breed and thrive. This project is a fantastic introduction to wildlife conservation for beginners and offers a rewarding woodworking challenge that doesn’t require a shop full of expensive tools. Whether you have a large wetland property or just permission to place a box at a local park, your efforts directly contribute to the local ecosystem. In this guide, we will walk you through the materials, dimensions, and assembly techniques needed to construct a durable nesting box that will host generations of ducklings.
Why Wood Duck Conservation Matters
Wood ducks are a conservation success story, but their continued prosperity depends on the availability of nesting sites. Historically, mature forests provided ample hollow trees for these birds. As land was cleared for agriculture and development, those natural cavities disappeared. Artificial nesting boxes have become a critical substitute, bridging the gap between the birds’ needs and the available habitat.
Beyond just providing shelter, a well-built box protects hens and eggs from predators like raccoons and snakes. The design features—specifically the depth of the box and the predator guards—are engineered to maximize survival rates. When you install a box, you aren’t just building a birdhouse; you are actively participating in wildlife management. Observing a hen return to the box you built, or watching ducklings jump from the entrance hole to the water below, offers a profound connection to the natural world that few other DIY projects can match.
Step-by-Step Guide on How to Build Wood Duck Boxes
Step 1: Select the Proper Lumber and Hardware
The longevity of your nesting box depends entirely on the materials you choose to construct it with. Rough-cut cedar or cypress are the gold standards for this project because they are naturally rot-resistant and withstand weather without needing chemical treatments, which could be harmful to the birds.
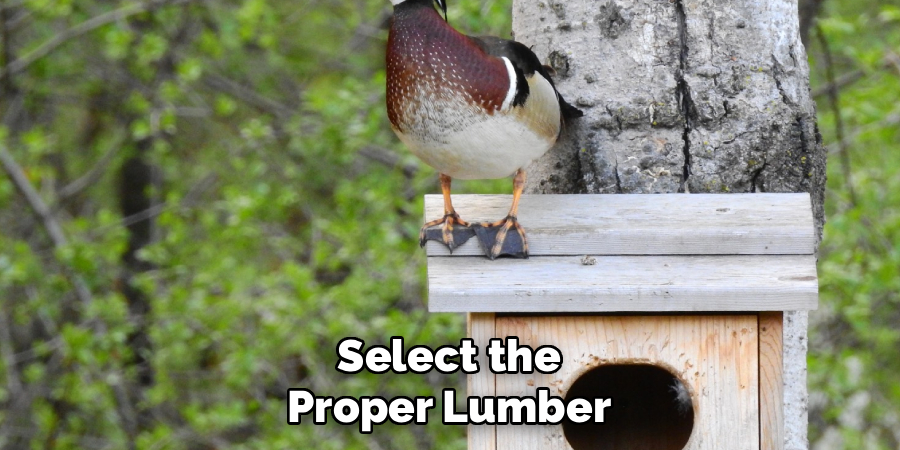
You should purchase a single board that is roughly one inch thick, ten to twelve inches wide, and ten to twelve feet long. Avoid pressure-treated wood whenever possible, as the chemicals can be toxic to the hatchlings. For hardware, select galvanized or stainless steel deck screws to prevent rust. Having these durable materials ready ensures your box will last for many seasons in the elements.
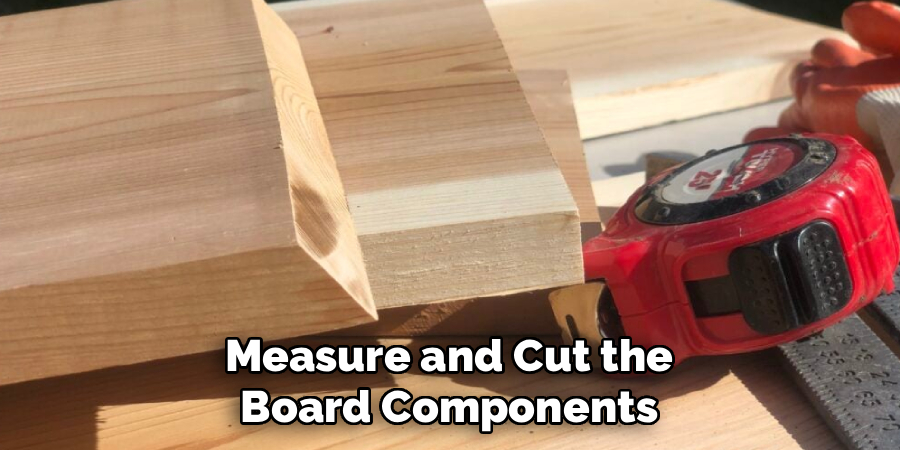
Step 2: Measure and Cut the Board Components
Efficiency is key when working with a single board, so measure your cuts carefully before sawing. You will need to cut six specific pieces: a backboard, a front panel, two side panels, a roof, and a floor. The backboard should be the longest piece, usually around thirty-two inches, to allow space for mounting lags at the top and bottom. The sides should be angled at the top to allow rain to run off the roof effectively. Use a speed square to mark your angles clearly. Cutting these pieces accurately is the foundation of learning how to build wood duck boxes that are weather-tight and secure for the nesting hens.
Step 3: Cut the Entrance Hole and Drainage
The entrance hole is the most critical feature and must be precise to admit wood ducks while excluding larger predators. On the front panel, measure down about four inches from the top and center your mark. Use a hole saw or a jigsaw to cut an oval opening that is exactly three inches high and four inches wide.
While you have the drill out, flip the floor piece over and drill five small quarter-inch holes in the corners and center. These drainage holes are vital for allowing moisture from wet feathers or condensation to escape, keeping the nesting material dry and preventing mold growth that could endanger the eggs.
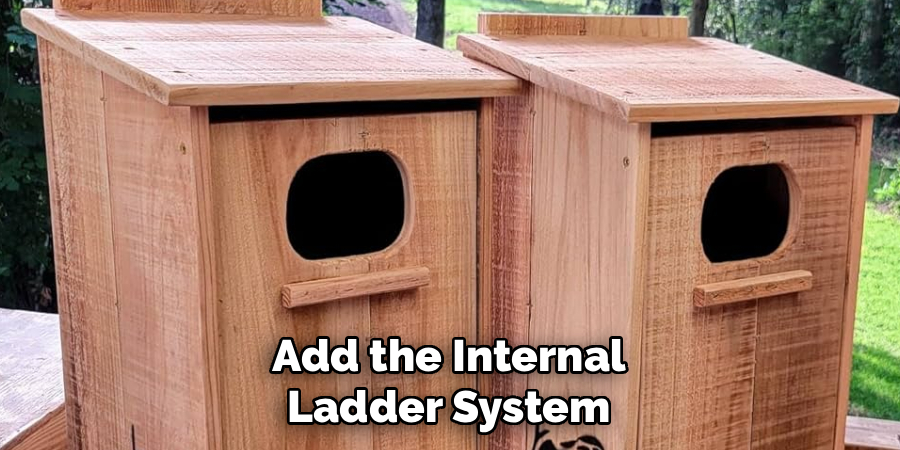
Step 4: Add the Internal Ladder System
Wood ducklings must leave the nest within twenty-four hours of hatching, but they cannot fly yet. To exit, they must climb up the inside of the front panel to reach the entrance hole. Since dressed lumber is often too smooth for their tiny claws to grip, you must create a ladder.
On the inside face of the front panel, below the entrance hole, use a utility knife or a chisel to score horizontal grooves roughly every half-inch. Alternatively, you can tack on a strip of hardware cloth mesh. This texture provides the necessary traction for the ducklings to scramble up and jump out into the world.
Step 5: Assemble the Sides to the Backboard
Begin the assembly process by attaching the side panels to the long backboard. Align the bottom edges of the sides roughly four to five inches up from the bottom of the backboard. This overhang at the bottom, along with the extension at the top, provides sturdy mounting points later. Apply a bead of waterproof wood glue along the joints for extra strength, then secure the sides using your galvanized screws. Pre-drill your screw holes to prevent the cedar from splitting, especially near the edges. Ensure the angled tops of the side panels are perfectly aligned so the roof will sit flat and seal out rain.
Step 6: Install the Floor and Front Panel
Slide the floor piece between the two side panels. It should be recessed upward about a quarter-inch from the bottom edge of the sides to prevent rain from wicking into the nesting material. Secure it with screws from the sides and the back. Next, attach the front panel. It is smart to mount the front panel with a pivot point or a latch mechanism rather than screwing it permanently shut. This allows you to open the box easily for annual cleaning and inspection. If you understand how to build wood duck boxes with maintenance in mind, you ensure the habitat remains healthy year after year.
Frequently Asked Questions
What Is the Best Time of Year to Install Duck Boxes?
The ideal time to install nesting boxes is in the late winter, specifically before the breeding season begins.
- Timing: Aim for late February or early March in most northern climates, and slightly earlier in the south.
- Scouting: Hens often scout for nesting sites weeks before they actually lay eggs.
- Availability: Having the box ready early ensures it is available when the first scouts arrive, maximizing your chances of occupancy in the first year.
How High Should the Box Be Mounted?
Height is a balance between safety for the ducks and accessibility for you.
- Standard Height: A height of 6 to 10 feet is generally sufficient.
- Over Land: If mounting over land, aim for 10 feet to deter predators.
- Over Water: If mounting over water, 4 to 6 feet above the high-water mark is acceptable.
- Maintenance: Remember that you will need to reach the box with a ladder for annual cleaning, so do not place it impossibly high.
Does the Direction the Box Faces Matter?
Yes, the orientation can impact the internal temperature and comfort of the nest.
- Preferred Direction: Ideally, face the entrance hole toward the south or southeast.
- Sunlight: This orientation captures the morning sun to warm the box after cold nights but avoids the scorching heat of the direct afternoon sun.
- Wind: It also typically faces away from prevailing winds and rain in many regions, keeping the interior drier.
How Far Apart Should Wood Duck Boxes Be Placed?
While wood ducks are somewhat tolerant of neighbors, crowding can lead to “dump nesting.”
- Spacing: Ideally, boxes should be spaced at least 50 to 100 yards apart.
- Visual Barrier: Try to position boxes so that the entrance of one is not directly visible from the entrance of another.
- Dump Nesting: If boxes are too close, multiple hens may lay eggs in a single box (dumping), resulting in clutches too large to incubate successfully.
Do I Need to Clean the Box Every Year?
Annual maintenance is crucial for the long-term success of the nesting site.
- Schedule: Clean the box in late winter, just before the new breeding season (January or February).
- Remove Debris: Remove old eggshells, membranes, and soiled nesting material.
- Inspect: Check for damage, loose screws, or insect infestations like wasps or ants.
- Refill: Add fresh wood shavings to ensure the box is ready and inviting for a new clutch of eggs.

Conclusion
Constructing artificial nesting sites is a direct and impactful way to support local wildlife populations. It bridges the gap between the vanishing natural habitats of mature forests and the resilience of waterfowl species. By following these steps, you create a sanctuary that offers protection from predators and the elements, giving hatchlings the best possible start in life. The process requires attention to detail—from selecting rot-resistant lumber to properly installing predator guards—but the skills involved are accessible to anyone with basic tools.
Once your box is mounted, the real reward begins. Monitoring the activity, checking for eggshells in the spring, and maintaining the box year after year creates a lasting legacy of conservation. You are not just building a wooden box; you are building a nursery for the next generation of waterfowl. Now that you understand how to build wood duck boxes, you can head to the lumber yard with confidence, ready to contribute to the recovery and flourishing of these magnificent birds.
About
Mike May is a distinguished figure in the world of woodworking and timber design, with a decade of expertise creating innovative and sustainable indoor solutions. His professional focus lies in merging traditional craftsmanship with modern manufacturing techniques, fostering designs that are both practical and environmentally conscious. As the author of Woodimber, Mike delves into the art and science of timber-craft, inspiring artisans and industry professionals alike.
Education
RMIT University (Melbourne, Australia)
-
Associate Degree in Design (Timber): Focus on sustainable design, industry-driven projects, and practical craftsmanship.
-
Gained hands-on experience with traditional and digital manufacturing tools, such as CAD and CNC software.
Nottingham Trent University (United Kingdom)
-
Bachelor’s in Woodworking and Product Design (Honors): Specialized in product design with a focus on blending creativity with production techniques.
-
Participated in industry projects, working with companies like John Lewis and Vitsoe to gain real-world insights.
Publications and Impact
In Woodimber, May shares his insights on timber design processes, materials, and strategies for efficient production. His writing bridges the gap between artisan knowledge and modern industry needs, making it a must-read for both budding designers and seasoned professionals.