 (1)")

Finding the perfect storage solution for your bedroom can often feel like an impossible task. Store-bought furniture might not fit your specific dimensions, or the price tag for a custom unit could break the bank. Fortunately, building your own furniture is a rewarding alternative that allows for complete customization. Working with plywood is accessible even for beginners, as it is stable, strong, and readily available at any local hardware store.

By learning how to make a wardrobe with plywood, you gain the freedom to design a closet that perfectly suits your space and your style. You can decide exactly how many shelves you need, where the hanging rods go, and what finish matches your decor. This project transforms a few sheets of lumber into a functional, durable piece of furniture that you can be proud of for years to come. Whether you need extra storage for a guest room or a primary closet organizer, this guide will walk you through the process from start to finish.
Why Plywood is the Best Choice for DIY Wardrobes
Plywood is the unsung hero of the DIY world, offering a balance of strength and affordability that solid wood often cannot match. Unlike solid timber, which can warp, twist, or crack with changes in humidity, plywood is engineered to remain stable. Its cross-grain construction provides immense structural integrity, making it ideal for the large, flat panels required for wardrobe sides and doors. This stability ensures your doors will hang straight and your shelves won’t sag over time.
Additionally, plywood comes in large 4×8 sheets, which minimizes the amount of joinery you need to do. You don’t have to glue narrow boards together to make a wide panel; you simply cut the sheet to size. High-quality plywood, such as Baltic birch or cabinet-grade maple, also features beautiful veneers that stain or paint exceptionally well. This means you can achieve a high-end, professional look without the premium price of solid hardwood. It is the practical, efficient choice for building substantial furniture pieces.
Step-by-Step Guide on How to Make a Wardrobe With Plywood
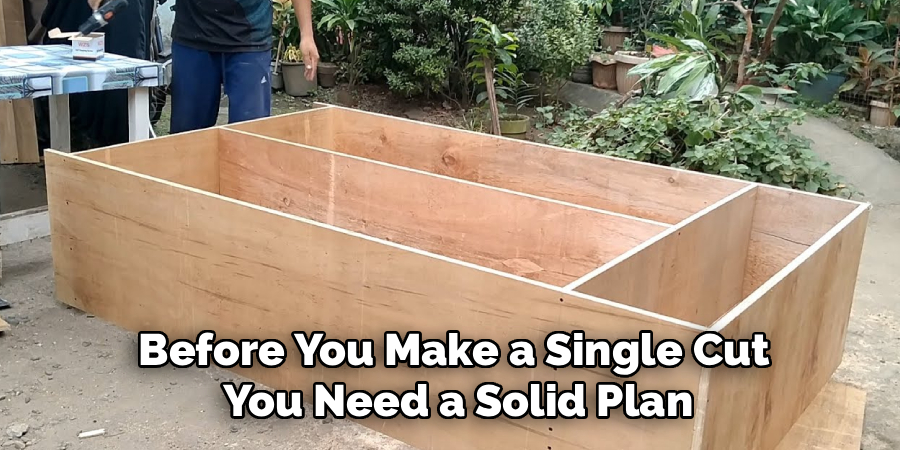
Step 1: Design Your Wardrobe and Create a Cut List
Before you make a single cut, you need a solid plan. Start by measuring the space where your wardrobe will stand, accounting for baseboards and uneven floors. Sketch out your design on graph paper, determining the height, width, and depth of the unit. Standard wardrobes are usually about 24 inches deep to accommodate hangers comfortably. Decide on the internal layout, such as where you want shelves versus hanging space. Once your design is finalized, break it down into individual components to create a cut list. This list will tell you exactly how many sheets of plywood you need to buy. Planning thoroughly here prevents costly mistakes and wasted lumber later in the project.
Step 2: Cut the Plywood Sheets to Size
Handling full sheets of plywood can be challenging, so safety is paramount. You can ask your local lumber yard to break the sheets down into manageable strips based on your cut list, which makes transport much easier. If you are cutting at home, set up a stable workspace with sawhorses. A circular saw with a straight-edge guide is perfect for making long, straight cuts for the side panels and doors. For smaller cuts like shelves, a table saw offers more precision. Always measure twice before cutting, and remember to account for the width of the saw blade, known as the kerf. Label each piece with masking tape as you cut it to keep your assembly organized.
Step 3: Drill Pocket Holes for Joinery
Joinery is how you connect the pieces of wood together, and for plywood projects, pocket holes are a fantastic method. They are strong, hidden from view, and easy to create with a simple jig. Set up your pocket hole jig according to the thickness of your plywood, which is typically 3/4 inch for wardrobe carcasses. Drill holes along the edges of the top, bottom, and fixed shelf panels. These holes will allow you to drive screws into the side panels, pulling the joints tight. Make sure to drill the holes on the faces of the plywood that will be less visible, such as the top of the upper panel or the bottom of the lower panel.

Step 4: Assemble the Wardrobe Carcass
Now it is time to assemble the main box, or carcass, of the wardrobe. This is often easier with a helper to hold the large panels in place. Lay one side panel flat on your work surface and position the top and bottom panels against it. Apply a bead of wood glue along the edge before securing the joint with pocket hole screws. The glue creates a bond stronger than the wood itself, while the screws act as clamps to hold it while it dries. Once one side is attached, flip the assembly over or stand it up to attach the second side panel. Check constantly with a square to ensure your box is perfectly 90 degrees at every corner.
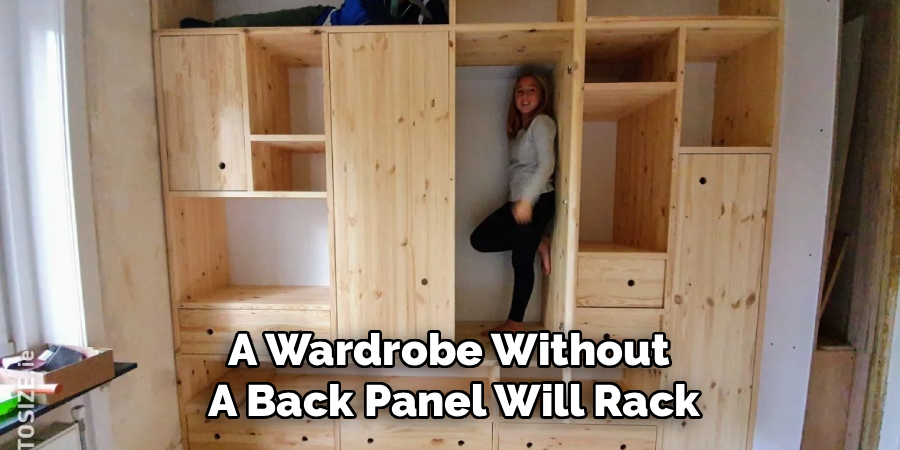
Step 5: Install the Back Panel for Stability
A wardrobe without a back panel will rack and wobble side-to-side. The back panel provides crucial structural rigidity to the entire unit. You can use a thinner material for this, such as 1/4 inch plywood, to save weight and cost. Lay your assembled carcass face down on the floor. Measure the diagonals of the box to ensure it is perfectly square; the measurements should be identical. Cut your back panel to size and attach it to the back edges of the carcass using wood glue and small nails or staples spaced every few inches. This step locks the shape of the wardrobe in place and ensures it will stand sturdy for years.
Step 6: Add Shelves and Internal Dividers
With the main structure complete, you can now install your internal organization. If you designed fixed shelves for structural support, install them using the same pocket hole method as the top and bottom panels. For adjustable shelves, which offer more flexibility, you can use a shelf pin jig to drill rows of holes along the inside of the side panels. Insert metal shelf pins into these holes and rest your plywood shelves on top. If your design includes a vertical divider to separate hanging space from shelving, install this piece now using pocket holes at the top and bottom. Ensure everything is level and plumb before moving on.
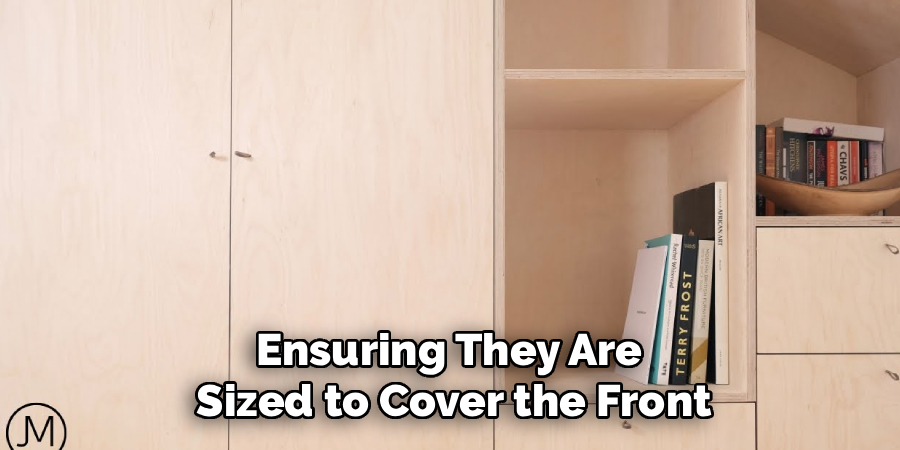
Step 7: Mastering With Plywood Doors
The doors are the face of your project and require careful attention. Cut your door panels from 3/4 inch plywood, ensuring they are sized to cover the front opening with the appropriate overlay or inset gap you desire. To give the plywood edges a finished look, apply iron-on edge banding. This thin strip of wood veneer covers the rough plywood layers and can be trimmed flush with a utility knife. Sand the doors smooth, paying attention to the edges. Install concealed hinges, also known as Euro hinges, by drilling a large cup hole in the back of the door using a Forstner bit. These hinges are adjustable, allowing you to align the doors perfectly after they are mounted.
Frequently Asked Questions
What is the best thickness of plywood for a wardrobe?
For the main structure (sides, top, bottom, and doors), 3/4-inch (19mm) plywood is the standard choice.
- Strength: It is thick enough to hold screws securely and support the weight of clothes without bowing.
- Stability: It resists warping better than thinner sheets.
- Backing: For the back panel, you can use thinner 1/4-inch (6mm) plywood since it doesn’t bear vertical weight but provides racking resistance.
Do I need to edge band the plywood?
While not structurally necessary, edge banding is highly recommended for aesthetics and safety.
- Appearance: It covers the raw, layered edges of the plywood, making it look like solid wood.
- Protection: It protects the edges from chipping and snagging on clothes.
- Paint: If you are painting, you can fill the edges with wood filler and sand them smooth instead of banding, but banding usually provides a cleaner, more durable finish.
Can I build this without power tools?
Building a large wardrobe without power tools is extremely difficult and physically demanding.
- Essential Tools: At a minimum, you will need a circular saw (or have the lumber yard cut it for you) and a cordless drill.
- Hand Tools: While you can use a hand saw, getting perfectly straight, square cuts on large panels is very hard.
- Recommendation: Renting or borrowing power tools will make the project significantly faster and the results much better.
How do I prevent the shelves from sagging?
Plywood shelves can sag over time if they are too wide or heavily loaded.
- Span Limit: For 3/4-inch plywood, try to keep shelf spans under 36 inches.
- Reinforcement: If you need wider shelves, you can attach a solid wood strip (called a nosing) to the front edge. This acts like a beam and adds significant stiffness.
- Doubling Up: You can also glue two layers of plywood together to make a 1.5-inch thick shelf for heavy loads.
Is MDF better than plywood for a wardrobe?
MDF (Medium Density Fiberboard) is a common alternative, but plywood is generally superior for this application.
- Weight: Plywood is significantly lighter than MDF, making the wardrobe easier to move and assemble.
- Screw Holding: Plywood holds screws much better than MDF, which can crumble.
- Moisture: Plywood is more resistant to moisture damage. MDF acts like a sponge and swells if it gets wet.
- Finish: MDF paints very smoothly, but plywood is better if you want a wood-grain stain look.
Conclusion
Building your own wardrobe is a journey that moves from a simple sketch to a tangible, functional piece of furniture that organizes your life. It allows you to bypass the limitations of mass-produced furniture and create something that fits your home perfectly. By utilizing the strength and versatility of plywood, you ensure that your creation is not only cost-effective but also durable enough to withstand daily use.
Don’t be intimidated by the scale of the project. By breaking it down into manageable steps—cutting, drilling, assembling, and finishing—you can tackle it over a weekend or two. The skills you gain from this build, from pocket-hole joinery to installing Euro hinges, will serve you well in future DIY endeavors. Now that you have mastered how to make a wardrobe with plywood, you have the confidence to customize every corner of your home with bespoke storage solutions. Gather your tools, buy your sheets, and get ready to build something amazing.
About
Mike May is a distinguished figure in the world of woodworking and timber design, with a decade of expertise creating innovative and sustainable indoor solutions. His professional focus lies in merging traditional craftsmanship with modern manufacturing techniques, fostering designs that are both practical and environmentally conscious. As the author of Woodimber, Mike delves into the art and science of timber-craft, inspiring artisans and industry professionals alike.
Education
RMIT University (Melbourne, Australia)
-
Associate Degree in Design (Timber): Focus on sustainable design, industry-driven projects, and practical craftsmanship.
-
Gained hands-on experience with traditional and digital manufacturing tools, such as CAD and CNC software.
Nottingham Trent University (United Kingdom)
-
Bachelor’s in Woodworking and Product Design (Honors): Specialized in product design with a focus on blending creativity with production techniques.
-
Participated in industry projects, working with companies like John Lewis and Vitsoe to gain real-world insights.
Publications and Impact
In Woodimber, May shares his insights on timber design processes, materials, and strategies for efficient production. His writing bridges the gap between artisan knowledge and modern industry needs, making it a must-read for both budding designers and seasoned professionals.