 (1)")

A bedroom should be a sanctuary, a place where you can retreat and recharge after a long day. However, many standard bed frames lack personality, leaving the room feeling incomplete or stark. A custom headboard—or backboard—can instantly transform the space, adding warmth, texture, and a focal point that reflects your unique style. While buying a designer piece can be incredibly expensive, creating one yourself is a surprisingly accessible project that offers immense satisfaction.

Learning how to make a backboard for bed allows you to customize every detail, from the height and shape to the fabric and cushioning. Whether you dream of a sleek, modern wood panel or a plush, tufted velvet masterpiece, the process is straightforward enough for a weekend warrior. This guide is designed to demystify the construction process, providing you with a clear roadmap to build a sturdy, stylish addition to your sleeping quarters. By the end, you will have the confidence to pick up your tools and create a piece of furniture that looks high-end but costs a fraction of the retail price. Let’s get started on building the bedroom of your dreams.
Why Building Your Own Backboard Transforms Your Space
The impact of a headboard goes far beyond simple aesthetics. Functionally, it provides essential support for sitting up in bed to read or watch TV, preventing your pillows from slipping into the gap between the mattress and the wall. It also protects your wall from scuffs and oils, keeping your paint job looking fresh.
From a design perspective, a DIY backboard is a game-changer. It anchors the bed visually, giving the room a sense of structure and intention. Because you are building it yourself, you are not limited by the standard sizes or generic fabrics found in big-box stores. You can match the upholstery to your curtains, stain the wood to complement your dresser, or create a statement shape that adds architectural interest to a plain boxy room. This project empowers you to be the designer, ensuring the final product fits your space perfectly, both in dimensions and in vibe.

Step-by-Step Guide on How to Make a Backboard for Bed
Step 1: Measure Your Bed and Determine Dimensions
The first critical task is to establish the exact size of your new headboard. Measure the width of your mattress and decide how much wider you want the backboard to be; typically, extending it two to three inches on either side creates a balanced, framed look. Next, determine the height. Do you want a dramatic, tall statement piece that reaches the ceiling, or a modest, low-profile board just for pillow support? Keep in mind that the legs need to account for the height of your mattress and box spring so the decorative part is fully visible. Sketching your design on paper with these measurements will save you from costly material waste later.
Step 2: Cut the Plywood Base to Size
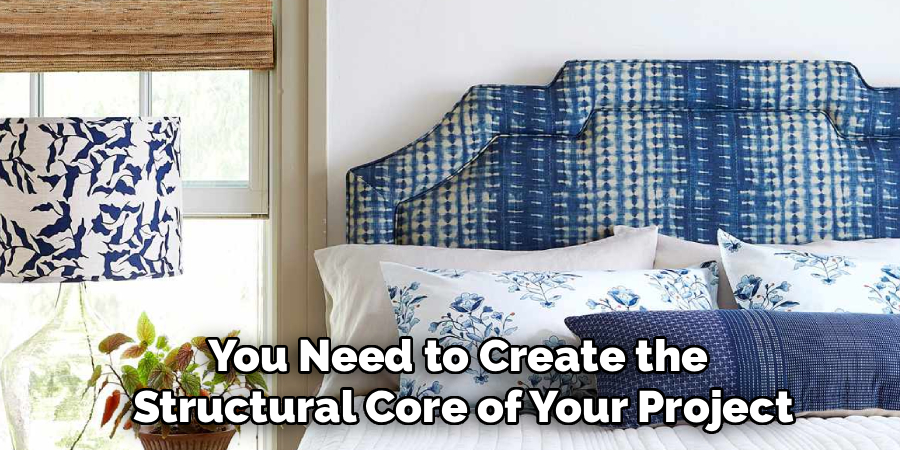
Once you have your dimensions, you need to create the structural core of your project. Purchase a sheet of sturdy plywood, ideally 1/2-inch or 3/4-inch thick, which provides enough rigidity without being impossibly heavy. If you do not own a circular saw, most hardware stores will cut the wood for you if you bring your measurements. Lay the cut plywood on a flat work surface or sawhorses. If you are planning a shaped top—like a curve or an arch—now is the time to draw that outline and carefully cut it out with a jigsaw. Sand any rough edges to prevent splinters from poking through your padding later.
Step 3: Attach the Legs to the Plywood
For a freestanding or frame-mounted headboard, you need sturdy legs to lift the upholstered panel to the correct height. Cut two lengths of 1×4 or 2×4 lumber to serve as these supports. Position them on the back of your plywood panel, ensuring they extend far enough down to bolt onto your bed frame or sit firmly on the floor. Use wood glue and heavy-duty screws to secure the legs to the plywood from the back, making sure they are perfectly vertical and spaced correctly to match your bed frame’s mounting brackets. This structural step is vital when learning how to make a backboard for bed that is stable and safe.
Step 4: Add Foam for Comfort and Shape
A hard wooden board is not comfortable to lean against, so you must add cushioning. Purchase upholstery foam, typically between one and two inches thick depending on how plush you want the final result to be. Lay the foam on top of your plywood front and trace the edges. Cut the foam to the exact size of the wood using an electric carving knife or a sharp utility blade. Use a spray adhesive designed for foam to tack it onto the plywood. This glue prevents the foam from shifting while you work. Ensure the foam is aligned perfectly with the edges of the wood for a crisp, professional silhouette.

Step 5: Wrap the Board with Batting
Batting is the unsung hero of upholstery; it smooths out the sharp edges of the wood and the blunt cut of the foam, creating a soft, rounded look. Lay a sheet of quilt batting on the floor and place your foam-covered board face down on top of it. The batting should be large enough to wrap around to the back of the plywood. Pull the batting taut—but not so tight that it compresses the foam unevenly—and staple it to the back of the wood using a staple gun. Trim away any excess batting, especially around the corners and legs, to reduce bulk. This layer ensures your top fabric lays smoothly.
Step 6: Apply the Upholstery Fabric
This step brings your vision to life. Iron your chosen fabric to remove any creases, then lay it face down on a clean floor. Place the padded board face down on the fabric. Just like with the batting, you want to pull the fabric up and over to the back. Start stapling in the center of each side and work your way out toward the corners, pulling firmly to create tension. Check the front frequently to ensure the grain or pattern of the fabric is straight. Mastering the tension here is key to understanding how to make a backboard for bed that looks professionally made rather than saggy or wrinkled.
Frequently Asked Questions
What Is the Best Fabric to Use for a Headboard?
The best fabric depends on your lifestyle and the look you want to achieve.
- Durability: Heavyweight upholstery fabrics like velvet, chenille, or linen blends are excellent choices because they withstand friction and wear.
- Maintenance: If you enjoy reading in bed or have pets, consider a performance fabric that resists stains and is easy to clean.
- Pattern: Solids are easier for beginners to work with than large patterns, which require precise alignment to look straight.
Do I Need to Use Plywood, or Can I Use Other Materials?
While plywood is the standard, you have other options depending on the weight and style you desire.
- MDF (Medium Density Fiberboard): This is a good, smooth alternative that is often cheaper than plywood, though it is heavier and creates fine dust when cut.
- Cardboard: For a temporary or extremely lightweight solution (like for a dorm room), you can use heavy-duty cardboard, but it won’t offer structural support for leaning.
- Old Doors: Upcycling an old wooden door is a fantastic way to make a rustic backboard without needing sheet lumber.
How Can I Add Tufting to My Backboard?
Tufting adds a classic, elegant look but requires a few extra steps during construction.

- Drill Holes: Before adding foam, drill holes in your plywood where you want the buttons to go.
- Cut Foam: You must also cut small holes in the foam at the same locations so the buttons can sink in deep.
- Thread Buttons: After applying the fabric, use a long upholstery needle and waxed twine to thread covered buttons through the front, pulling them tight and stapling the twine to the back of the wood.
Can I Make a Headboard Without Legs?
Yes, you can absolutely make a “floating” headboard that mounts directly to the wall.
- French Cleats: The most secure method is using a French cleat system. One part of the cleat attaches to the back of the headboard, and the other attaches to the wall studs.
- Flush Mounts: You can also use heavy-duty flush mount brackets.
- Benefit: Wall-mounted headboards are great because they don’t wobble and allow for easy cleaning underneath the bed.
How Much Does It Cost to DIY a Headboard?
The cost varies widely based on the materials you choose, but it is generally much cheaper than buying new.
- Basic Materials: A sheet of plywood, foam, batting, and basic fabric can cost between $50 and $100.
- Luxury Materials: High-end velvet, thick memory foam, and decorative nailhead trim can push the cost closer to $150 or $200.
- Savings: Compare this to retail headboards which often start at $300 and can easily go over $1,000 for custom upholstery.
Conclusion
Creating a custom headboard is one of the most rewarding DIY projects because it combines basic woodworking with simple upholstery techniques to create a massive visual impact. You don’t need to be a master carpenter to build a sturdy, beautiful piece that anchors your bedroom design. By carefully measuring, choosing the right foam density, and taking your time with the fabric corners, you can achieve a result that looks like it came straight from a boutique furniture store.
This project allows you to inject your personality into your space, offering comfort and style that is tailored specifically to you. Whether you opt for a bold color, a soothing neutral, or a unique shape, the effort you put in will pay off every night when you head to sleep. Now that you have mastered the steps on how to make a backboard for bed, you have the skills to tackle even more ambitious upholstery projects around your home. Gather your materials, clear some workspace, and get ready to upgrade your bedroom sanctuary.
About
Mike May is a distinguished figure in the world of woodworking and timber design, with a decade of expertise creating innovative and sustainable indoor solutions. His professional focus lies in merging traditional craftsmanship with modern manufacturing techniques, fostering designs that are both practical and environmentally conscious. As the author of Woodimber, Mike delves into the art and science of timber-craft, inspiring artisans and industry professionals alike.
Education
RMIT University (Melbourne, Australia)
-
Associate Degree in Design (Timber): Focus on sustainable design, industry-driven projects, and practical craftsmanship.
-
Gained hands-on experience with traditional and digital manufacturing tools, such as CAD and CNC software.
Nottingham Trent University (United Kingdom)
-
Bachelor’s in Woodworking and Product Design (Honors): Specialized in product design with a focus on blending creativity with production techniques.
-
Participated in industry projects, working with companies like John Lewis and Vitsoe to gain real-world insights.
Publications and Impact
In Woodimber, May shares his insights on timber design processes, materials, and strategies for efficient production. His writing bridges the gap between artisan knowledge and modern industry needs, making it a must-read for both budding designers and seasoned professionals.