 (1)")

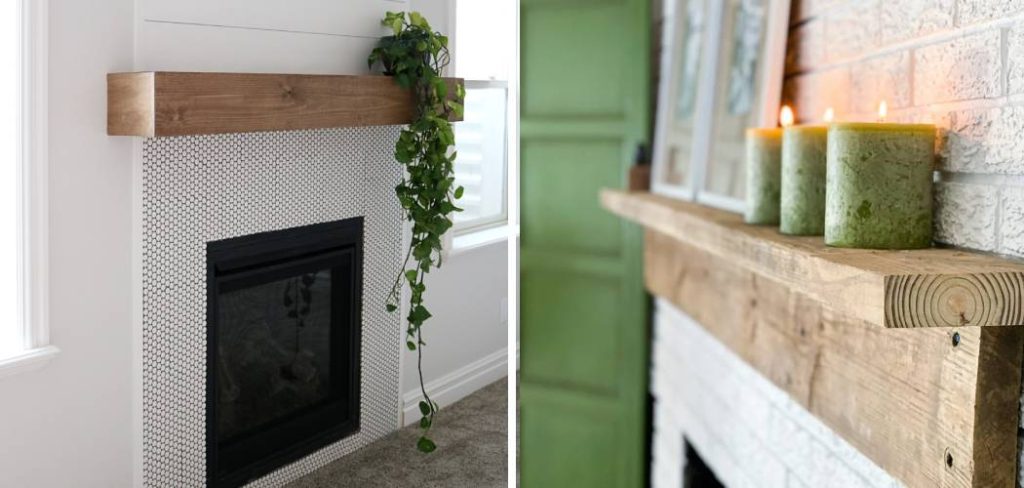
A fireplace often serves as the heart of a home, a gathering place that radiates warmth and comfort. While the fire itself draws the eye, the mantel above it defines the style. A custom wood mantel adds instant character, whether you are aiming for a rustic farmhouse look, a sleek modern aesthetic, or something traditional and timeless.
Building your own mantel might seem like an intimidating carpentry project, but it is surprisingly accessible for beginners. Unlike buying a pre-made beam, which can be heavy, expensive, and difficult to install, building a hollow box beam mantel allows you to customize the dimensions, weight, and finish to perfectly match your space.
This guide on how to make a wood mantel walks you through the entire process, turning a pile of lumber into a stunning focal point for your living room.
What Will You Need?
Before you begin, gather these tools and materials to ensure a smooth workflow.
Materials:
- (1) 1×8 pine board (for the face) – adjust size based on desired height
- (2) 1×6 pine boards (for top and bottom) – adjust size based on desired depth
- (1) 2×4 lumber (for the mounting cleat)
- Wood glue
- 1 ½ inch finish nails or brad nails
- 3-inch wood screws (for mounting)
- Wood stain and polyurethane
- Wood filler
- Sandpaper (120 and 220 grit)
Tools:
- Miter saw, or circular saw
- Table saw (optional, if ripping boards is needed)
- Drill and driver bits
- Hammer or nail gun
- Stud finder
- Level
- Tape measure
- Clamps
- Distressing tools (optional: chain, hammer, wire brush)
10 Easy Steps on How to Make a Wood Mantel
Step 1: Measure and Plan Your Dimensions
The success of your project depends entirely on accurate planning. Start by measuring the width of your fireplace surround. A good rule of thumb is for the mantel to extend at least 3 to 6 inches beyond the fireplace opening on each side, though some prefer it to span the entire width of the chimney breast. Decide on the depth and height (face) of the mantel. A common size for a substantial, robust look is 6 inches deep by 8 inches tall. Sketch your design on paper, noting the exact cuts you will need for the face board, the top board, the bottom board, and the side caps. This sketch will serve as your roadmap, preventing costly errors later in the process.

Step 2: Cut the Boards to Length
Once you have your measurements, it is time to cut your lumber. You are essentially building a three-sided box (top, bottom, and face). Using your miter saw, cut the face board (the 1×8) to your desired total length. Next, cut the top and bottom boards (the 1x6s). Crucially, the top and bottom boards must be cut shorter than the face board if you plan to miter the corners for a seamless “solid beam” look. Alternatively, if you are doing simple butt joints where the end grain shows, you will cut them differently. For this guide, we will assume you are using mitered corners for a professional finish. Cut the main boards slightly longer than the final length to allow for the 45-degree miter cuts in the next step.
Step 3: Miter the Edges for Seamless Joints
To make your hollow box look like a solid timber beam, you need to hide the seams. Set your table saw or circular saw blade to a 45-degree angle. You need to rip (cut lengthwise) the long edges where the face board meets the top and bottom boards. This is a “lock miter” or simple bevel approach. If you lack a table saw, you can use simple butt joints where the face board covers the edge of the top and bottom boards. However, for the ends of the mantel (the short sides), use your miter saw to cut 45-degree angles on the ends of the face board and the corresponding ends of the short side pieces. This creates a “wrap-around” grain effect that mimics a solid block of wood.

Step 4: Assemble the Main Box Structure
Apply a generous bead of high-quality wood glue along the seams where your boards meet. It is helpful to have an extra pair of hands for this step. Place the face board flat on your work surface, then position the top and bottom boards against it. Use clamps to hold the pieces square and tight. Once aligned, secure the boards together using a finish nailer or a hammer and finish nails. Space the nails about every 6 to 8 inches. Wipe away any excess glue immediately with a damp cloth; dried glue will not take stain and will result in unsightly splotches on your finished mantel.
Step 5: Install the End Caps
With the long three-sided box assembled, you now need to close off the ends. Take the small pieces you cut for the sides (end caps). Apply glue to the mitered edges and fit them into place. These small pieces can be tricky, so take your time to ensure the corners are perfectly flush. Secure them with finish nails or brads. If your miters aren’t perfect, don’t panic. You can smooth out minor imperfections in the next steps using wood filler and sanding. The goal is a solid, enclosed look that hides the hollow interior from the side view.
Step 6: Distress the Wood (Optional)
If you want a sleek, modern mantel, skip this step. However, if you desire a rustic, reclaimed barn-wood aesthetic, now is the time to add character. Before staining, physically distress the wood. You can hit the wood with a chain to create random indentations, use a hammer to dent corners, or drag a saw blade across the grain for texture. A wire brush can open up the grain for a weathered feel. Focus on the edges and corners where natural wear would occur over time. This step allows you to turn inexpensive pine into something that looks like century-old oak.

Step 7: Fill Holes and Sand Smooth
Inspect your mantel for nail holes, small gaps in the miters, or cracks. Fill these imperfections with a stainable wood filler. Overfill them slightly, as the filler tends to shrink as it dries. Once the filler is completely dry, sand the entire mantel. Start with 120-grit sandpaper to level out the filler and smooth rough patches. Follow up with 220-grit sandpaper for a furniture-grade finish. Ideally, the transition between boards should be undetectable to the touch. Remove all sanding dust with a tack cloth or vacuum before moving to the finish.
Step 8: Apply Stain and Protective Finish
Choose a wood stain that complements your room’s flooring or furniture. Apply the stain using a rag or foam brush, working in the direction of the wood grain. Let the stain penetrate for a few minutes (longer for a darker color) before wiping off the excess with a clean rag. Once you are happy with the color and it has dried completely, apply a protective clear coat. Polyurethane (water-based or oil-based) works well. A matte or satin finish usually looks best for rustic mantels, while semi-gloss suits modern styles. Apply 2-3 coats, lightly sanding between coats with fine-grit sandpaper for a smooth result.
Step 9: Create and Mount the Cleat System
While your mantel dries, prepare the mounting system. You will use a 2×4 “cleat” or mounting bracket that fits snugly inside the hollow space of your mantel. Cut a 2×4 to the exact length of the inside cavity of your mantel. Locate the studs in your wall above the fireplace using a stud finder. Mark their positions. Hold the 2×4 cleat against the wall at your desired height, ensuring it is perfectly level. Drive 3-inch screws through the 2×4 and firmly into the wall studs. This cleat must be rock-solid as it will support the entire weight of the mantel and anything you place on it.
Step 10: Mount the Mantel to the Wall
The final moment of truth! Slide your finished hollow mantel over the 2×4 cleat mounted on the wall. It should fit snugly. If it is too tight, you may need to sand the inside of the mantel or plane the cleat slightly. Once it is pushed flush against the wall, secure the mantel to the cleat. Drive finish screws or finish nails through the top of the mantel down into the 2×4 cleat. Doing this from the top hides the fasteners from view. For extra security, you can also add a few screws through the bottom. Your mantel is now installed, secure, and ready to be decorated.

5 Things You Should Avoid
- Ignoring Fire Codes: Never install a wood mantel too close to the firebox opening. Check your local building codes and the fireplace manufacturer’s manual for required clearance distances to prevent fire hazards.
- Using Wet or Warped Lumber: Avoid buying lumber that is green (wet) or twisted. As wet wood dries in your heated home, it will shrink and warp, causing your mitered joints to crack and open up.
- Rushing the Sanding Process: Do not skimp on sanding. Stain highlights scratches rather than hiding them. If you leave swirl marks from coarse sanding, they will become painfully obvious once the finish is applied.
- Forgetting to Pre-Drill Holes: Avoid driving screws near the ends of boards without pre-drilling pilot holes. This often causes the wood to split, ruining your piece and forcing you to start over with new material.
- Solely Relying on Drywall Anchors: Never hang a mantel using only drywall anchors. Even a hollow mantel is heavy, and adding decor adds more weight. You must anchor the mounting cleat into structural wall studs.
Conclusion
Building your own wood mantel is a rewarding weekend project that dramatically transforms the look of a room. By constructing a hollow box beam, you achieve the high-end aesthetic of solid timber without the heavy lifting or high price tag.
With careful measuring, precise cuts, and a little patience during the finishing process, you will create a custom piece that serves as the centerpiece of your home for years to come.
Hopefully, this guide on how to make a wood mantel has given you the confidence to build your own wood mantel and inspired you to further explore woodworking projects.
About
Mike May is a distinguished figure in the world of woodworking and timber design, with a decade of expertise creating innovative and sustainable indoor solutions. His professional focus lies in merging traditional craftsmanship with modern manufacturing techniques, fostering designs that are both practical and environmentally conscious. As the author of Woodimber, Mike delves into the art and science of timber-craft, inspiring artisans and industry professionals alike.
Education
RMIT University (Melbourne, Australia)
-
Associate Degree in Design (Timber): Focus on sustainable design, industry-driven projects, and practical craftsmanship.
-
Gained hands-on experience with traditional and digital manufacturing tools, such as CAD and CNC software.
Nottingham Trent University (United Kingdom)
-
Bachelor’s in Woodworking and Product Design (Honors): Specialized in product design with a focus on blending creativity with production techniques.
-
Participated in industry projects, working with companies like John Lewis and Vitsoe to gain real-world insights.
Publications and Impact
In Woodimber, May shares his insights on timber design processes, materials, and strategies for efficient production. His writing bridges the gap between artisan knowledge and modern industry needs, making it a must-read for both budding designers and seasoned professionals.