 (1)")

There is an undeniable allure to the bleached, sun-baked appearance of driftwood found on a sandy beach.

That soft, silvery-gray patina evokes memories of crashing waves and salty air, bringing a sense of calm and coastal charm into any home. Unfortunately, authentic driftwood is often protected by law, difficult to source in large quantities, or incredibly expensive to buy from specialty retailers. The good news is that you do not need to scour the coastline to achieve this aesthetic. With a few common household ingredients and some simple techniques, you can transform ordinary lumber from the hardware store into a weathered masterpiece.
Learning how to make wood look like driftwood is a surprisingly accessible DIY project that allows you to control the exact shade and texture of your finish. Whether you are updating a picture frame, a coffee table, or a set of shelves, this process works beautifully on inexpensive softwoods like pine. This guide is designed for beginners, walking you through every stage of the transformation, from physical distressing to the final protective coat, ensuring you get that authentic beach-house vibe without the high price tag.
Why the Driftwood Aesthetic is Perfect for Modern Homes
The popularity of the driftwood look has surged in recent years, largely due to the rise of modern farmhouse, coastal, and Scandinavian interior design styles. These aesthetics prioritize natural materials, neutral color palettes, and textures that feel organic rather than manufactured. Driftwood fits perfectly into this philosophy. Its muted gray and brown tones act as a sophisticated neutral that pairs well with everything from crisp whites and blues to industrial metals and soft linens. It adds warmth and history to a room without the visual heaviness of dark, polished mahogany or cherry wood.
Beyond its visual appeal, opting for a driftwood finish is a fantastic way to upcycle furniture or use budget-friendly lumber. New pine or spruce boards often look yellow and generic, screaming “construction material.” By applying a driftwood finish, you elevate these humble materials, giving them a high-end, custom appearance. It is a sustainable choice that allows you to breathe new life into thrift store finds or leftover scrap wood, turning potential waste into cherished decor. This technique empowers you to create bespoke pieces that feel personal, grounded, and effortlessly chic.
Step-by-Step Guide on How to Make Wood Look Like Driftwood
Step 1: Select the Best Wood for the Project
The success of your driftwood project depends heavily on the type of wood you choose to work with. Softwoods with distinct grain patterns, such as pine, fir, or spruce, are the ideal candidates for this technique because their open pores absorb the staining solutions unevenly.
This uneven absorption mimics the natural weathering process perfectly. Hardwoods like oak or maple are much denser and often have tighter grains, making it significantly harder to achieve that soft, washed-out look. If you are purchasing new lumber, look for boards that have plenty of knots and imperfections. These flaws will catch the stain and add to the rugged, authentic character you are trying to create.

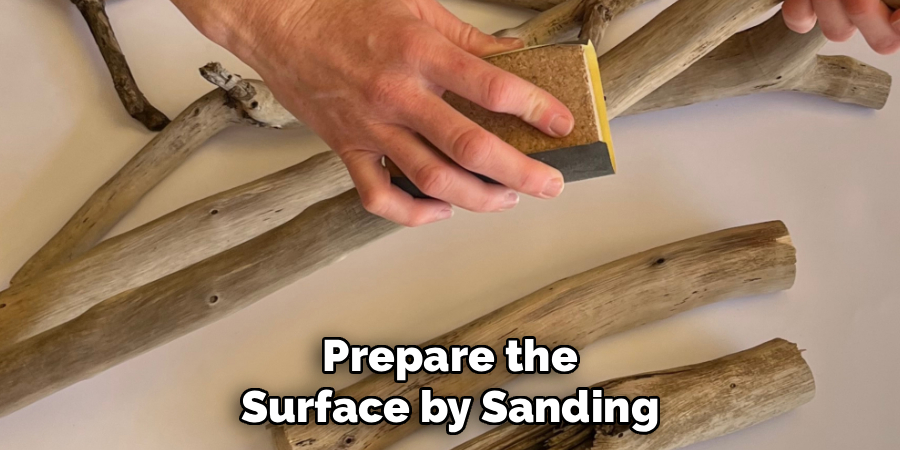
Step 2: Prepare the Surface by Sanding
Even though the goal is a rough, weathered look, you must start with a clean and consistent surface. If you are working with a piece of furniture that already has a finish, you need to sand it down to bare wood completely. Any leftover varnish or sealer will block your driftwood solution from penetrating the fibers.
Use a coarse-grit sandpaper, such as 60 or 80-grit, to strip away old finishes or mill glaze on new lumber. Avoid sanding too smoothly with high-grit paper later on, as you want to leave the wood pores open and receptive. Wipe away all the dust with a tack cloth before moving to the next phase.
Step 3: Physically Distress the Wood for Texture
Real driftwood has been battered by sand, rocks, and waves for years, resulting in a unique texture that is never perfectly smooth. To replicate this, you need to beat up your wood a little bit. Use a wire brush to scrub the surface vigorously in the direction of the grain.
This removes the softer wood fibers between the grain lines, creating ridges and valleys that feel old and worn. You can also use a hammer, a bag of screws, or an awl to create random dents, dings, and wormholes. Focus your efforts on the edges and corners, as these areas naturally see the most wear over time.
Step 4: Mix Your Chemical Aging Solution
The secret to this transformation lies in a simple chemical reaction between iron and vinegar. To create your aging stain, take a pad of fine-grade steel wool (grade #0000 works best) and tear it into pieces. Place the steel wool into a glass jar and fill it with white vinegar.
Let this mixture sit for at least 24 hours. The acid in the vinegar dissolves the steel wool, creating an iron acetate solution. This solution reacts with the tannins in the wood to turn it gray. The longer you let the solution steep, the darker and more intense the gray color will become, so patience is key here.
Step 5: Brew a Strong Tea Pre-Treatment
Most softwoods are naturally low in tannins, which are necessary for the iron acetate solution to work effectively. If you apply the vinegar mixture directly to pine, the color change might be very faint. To fix this, you need to add tannins back into the wood.
Brew a very strong pot of black tea using 4 or 5 tea bags in two cups of boiling water. Let it steep until it is cool and dark. This tea acts as a primer. When you understand how to make wood look like driftwood, you realize that this hidden step is often the difference between a convincing finish and a disappointing one.
Step 6: Apply the Tea and Let It Dry
Using a cheap paintbrush or a foam brush, saturate the wood with your strong black tea. Ensure you cover every inch of the surface, including the ends and any deep gouges you created during the distressing step. The tea will not turn the wood gray immediately; it will likely just look wet or slightly darker brown. This is completely normal. The purpose of this step is strictly to deposit tannins into the fibers. Allow the wood to dry completely before proceeding. If the wood is still wet when you apply the next solution, it can dilute the reaction and lead to splotchy results.
Step 7: Apply the Iron Acetate Solution
This is the magic moment where the transformation happens right before your eyes. Brush the vinegar and steel wool solution onto the tea-stained wood. Almost instantly, you will see the wood begin to darken and turn gray.
It might look very dark or even black at first, but do not panic as the color will lighten significantly as it dries. Apply the solution unevenly or use a rag to wipe some areas back if you want a more varied, natural look.

Frequently Asked Questions
Can I Use Apple Cider Vinegar Instead of White Vinegar?
Yes, you can absolutely use apple cider vinegar for this project.
- Color Difference: White vinegar tends to produce a cooler, more silvery-gray tone. Apple cider vinegar often results in a warmer, browner-gray hue.
- Experimentation: Since wood varies, test both types on a scrap piece of your specific lumber to see which color palette matches your decor best.
How Long Should the Steel Wool Sit in the Vinegar?
The steeping time directly affects the intensity of the color.
- 24 Hours: This typically creates a lighter, subtle gray wash suitable for a gentle weathered look.
- 3 to 4 Days: The solution will become much more potent, resulting in a dark, almost charcoal gray or black reaction.
- Safety Tip: Leave the lid loose to allow gases from the chemical reaction to escape.
Does This Method Work on Laminate or Veneer?
This method is generally not effective on laminate or thin veneers.
- Laminate: This is plastic and will not absorb any liquid solutions. It must be painted instead.
- Veneer: While real wood veneer can be stained, it is often too thin to withstand the heavy sanding and wire brushing required for the texture. You risk sanding right through to the particleboard underneath.
What If My Wood turns Too Dark or Black?
If the reaction is too intense, don’t worry, it is fixable.
- Dilution: You can dilute your iron acetate solution with water before applying it if you want a lighter color.
- Sanding: If it is already applied and dry, use medium-grit sandpaper to sand the surface back. This removes the darkest top layer and reveals the lighter wood underneath, adding to the weathered effect.
Will the Vinegar Smell Stay on the Furniture?
The smell is strong during the application but it is temporary.
- Evaporation: As the vinegar dries and the chemical reaction concludes, the acetic acid smell evaporates completely.
- Sealing: Once you apply your final wax or matte poly sealer, any remaining faint odor will be trapped and neutralized.
- Ventilation: Always work in a well-ventilated area like a garage or outdoors to keep the fumes from bothering you.

Conclusion
Creating a driftwood finish is one of the most satisfying DIY projects because it blends creativity with a bit of science. You are essentially fast-forwarding nature’s weathering process, compressing decades of sun and sea exposure into a single afternoon. By understanding the interaction between tannins and iron acetate, you gain the ability to customize your decor without relying on expensive store-bought items. The resulting pieces carry a story and a unique character that mass-produced furniture simply cannot replicate.
Remember that perfection is not the goal here; the beauty of driftwood lies in its imperfections, knots, and variations. Don’t be afraid to experiment with different distressing tools or whitewash ratios to find the exact look you want. Now that you have mastered how to make wood look like driftwood, you can bring that serene, coastal atmosphere into your home, transforming everyday lumber into timeless treasures.
About
Mike May is a distinguished figure in the world of woodworking and timber design, with a decade of expertise creating innovative and sustainable indoor solutions. His professional focus lies in merging traditional craftsmanship with modern manufacturing techniques, fostering designs that are both practical and environmentally conscious. As the author of Woodimber, Mike delves into the art and science of timber-craft, inspiring artisans and industry professionals alike.
Education
RMIT University (Melbourne, Australia)
-
Associate Degree in Design (Timber): Focus on sustainable design, industry-driven projects, and practical craftsmanship.
-
Gained hands-on experience with traditional and digital manufacturing tools, such as CAD and CNC software.
Nottingham Trent University (United Kingdom)
-
Bachelor’s in Woodworking and Product Design (Honors): Specialized in product design with a focus on blending creativity with production techniques.
-
Participated in industry projects, working with companies like John Lewis and Vitsoe to gain real-world insights.
Publications and Impact
In Woodimber, May shares his insights on timber design processes, materials, and strategies for efficient production. His writing bridges the gap between artisan knowledge and modern industry needs, making it a must-read for both budding designers and seasoned professionals.