 (1)")

There is a unique charm found in weathered barn wood that you just cannot buy at a standard lumber yard. That silver-gray patina, the rough texture, and the sense of history all contribute to a rustic aesthetic that transforms simple furniture into a conversation piece. Unfortunately, sourcing authentic reclaimed timber can be incredibly expensive and difficult to find. The good news is that you do not need to wait decades for nature to do the work.

With a few common household items and some simple techniques, you can achieve that vintage look in just an afternoon. Learning how to make wood look aged allows you to add character and warmth to your home decor without breaking the bank. This guide is designed for complete beginners, walking you through the process of distressing, staining, and finishing new lumber to look like it has weathered storms for a century.
Why Choose the Distressed Wood Look?
The appeal of aged wood goes far beyond simple trends; it taps into a desire for authenticity and comfort in our living spaces. In a world of mass-produced, shiny particleboard furniture, distressed wood offers a tactile, organic element that grounds a room. It fits perfectly with a variety of design styles, from modern farmhouse and coastal chic to industrial and bohemian.
By artificially aging wood, you gain total control over the final appearance. You can decide exactly how much “damage” to inflict and what shade of gray or brown best matches your existing decor. It is also an eco-friendly choice in its own way, as it allows you to use cheaper, sustainable softwoods like pine and elevate them into something beautiful, rather than relying on rare or expensive hardwoods. Ultimately, this technique empowers you to create custom pieces that feel timeless and personal.
Step-by-Step Guide on How to Make Wood Look Aged
Step 1: Select the Right Lumber for the Project
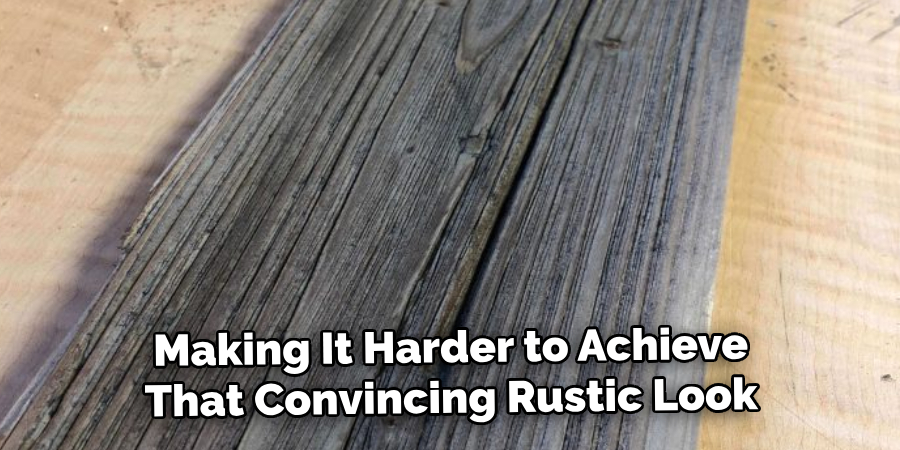
The success of your aging project starts before you even pick up a hammer. Softwoods like pine, spruce, and fir are the absolute best candidates for this process because their grain structure absorbs the aging solutions unevenly, which creates a more natural, weathered appearance. Hardwoods like oak or maple are much denser and resistant to both physical distressing and chemical staining, making it harder to achieve that convincing rustic look.
When you are at the hardware store, look for boards that already have some imperfections. Knots, slight warps, or interesting grain patterns will only enhance the final vintage effect, giving you a head start on the character you want to build.
Step 2: Prepare the Surface by Sanding
Even though you want the wood to look old and rough, you must start with a relatively clean slate to ensure the finish applies correctly. Use a medium-grit sandpaper, such as 120-grit, to remove any factory coatings, stamps, or protective seals that might be on the lumber. You are not trying to make it perfectly smooth like a fine dining table; rather, you are opening up the pores of the wood so it can accept the stain.
Sanding also helps to soften the sharp, crisp edges that are a dead giveaway of new lumber. Rounding over the corners slightly mimics years of wear and handling, which is a subtle but crucial detail in learning how to make wood look aged convincingly.
Step 3: Physically Distress the Wood Surface
Now comes the fun part where you get to beat up your pristine board to simulate decades of use. You can use almost anything heavy or sharp to create these marks. A bag of screws whacked against the surface creates random dents, while a hammer claw can gouge out deeper divots. Dragging a saw blade across the grain creates scratches that look like old mill marks.
The key here is randomness; avoid creating a uniform pattern, as natural wear is never symmetrical. Focus your efforts on the edges and areas that would naturally see the most contact, like corners or handle areas. This physical texture gives the stain somewhere to settle, creating depth and shadow.
Step 4: Create Wormholes and Insect Damage
One of the most distinct characteristics of reclaimed barn wood is the presence of tiny holes left by insects over time. You can replicate this effect easily using an awl, a nail, or even a drill with a very small bit. If you use a drill, be careful not to go too deep or make the holes too uniform. Grouping these holes in small, irregular clusters looks more natural than spreading them evenly across the entire board.
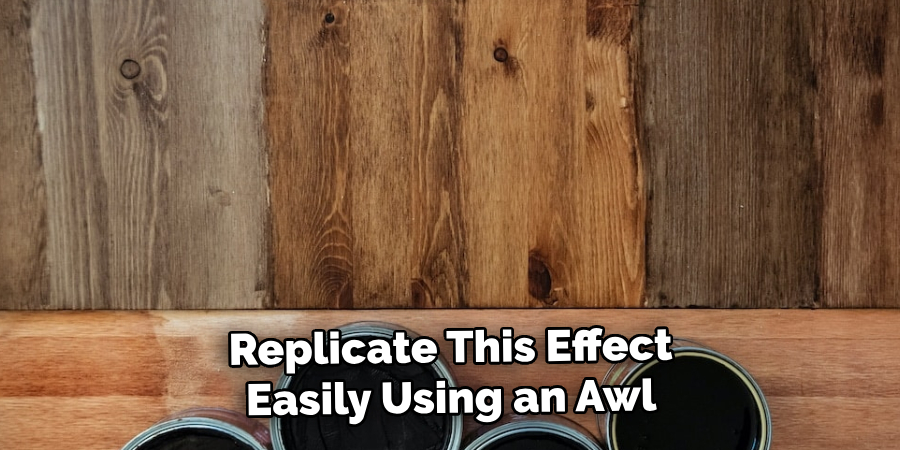
You can also drive a nail in and wiggle it slightly to create an oblong hole, which mimics the look of a nail that has been pulled out. These small details add a layer of realism that distinguishes a good faux-finish from a bad one.
Step 5: Mix Your Chemical Aging Solution
Instead of buying expensive commercial stains, you can create a powerful aging agent using steel wool and vinegar. Tear up a pad of fine grade steel wool and place it into a glass jar, then fill the jar with white vinegar. Let this mixture sit for at least 24 hours, or up to a few days for a darker effect.
The acid in the vinegar reacts with the iron in the steel wool to create an iron acetate solution. When applied to wood, this solution reacts with the natural tannins in the timber, instantly turning it a shade of silver, gray, or brown. It is fascinating science at work and is the secret ingredient for anyone exploring how to make wood look aged authentically.
Step 6: Brew Tea to Enhance Tannins
Since softwoods like pine are naturally low in tannins, the vinegar solution might not turn them very dark on its own. To fix this, you need to boost the tannin content of the wood artificially. Brew a pot of very strong black tea and let it cool down. Using a paintbrush or a rag, saturate the wood with the tea. It will not change the color drastically right away, perhaps adding a slight yellow or brown tint, but that is not the point. The tea primes the wood, providing the necessary chemical fuel for the iron acetate solution to react with. Let the tea dry completely before moving on to the next step to ensure the best reaction.
Step 7: Apply the Iron Acetate Solution
This is the magic moment where the transformation happens before your eyes. Brush your vinegar and steel wool solution onto the tea-stained wood. Within seconds to minutes, you will see the wood begin to darken and change color. It might look gray, black, or even purplish at first, but do not panic as the color will shift as it dries. Apply the solution unevenly for a more natural, weathered look; pooling it in the dents and scratches you created earlier will make those areas darker, enhancing the texture. Allow the wood to dry completely to see the final color. If it is too light, you can apply another coat. If it is too dark, you can sand it back slightly.

Step 8: Seal and Protect Your Masterpiece
Once you are happy with the color and texture, you need to seal the wood to stop the aging process and protect the finish. If you leave it unsealed, the wood can continue to react with moisture in the air or fade over time. A matte, water-based polyurethane is an excellent choice because it provides protection without adding an artificial glossy sheen that would ruin the rustic vibe. Alternatively, furniture wax can be buffed into the surface for a soft, hand-rubbed luster that feels very traditional. Applying the sealer will also deepen the color slightly and make the grain pop, finalizing the transformation from hardware store lumber to vintage treasure.
Frequently Asked Questions
Can I Use Apple Cider Vinegar Instead of White Vinegar?
Yes, you can absolutely use apple cider vinegar.
- Color Difference: While white vinegar tends to produce a silvery-gray hue, apple cider vinegar often results in a warmer, browner tone.
- Experimentation: Since wood varies, it is smart to test both types on a scrap piece of your specific lumber to see which color palette you prefer.
How Long Should I Let the Steel Wool Sit in Vinegar?
The duration depends on the intensity of the color you want.
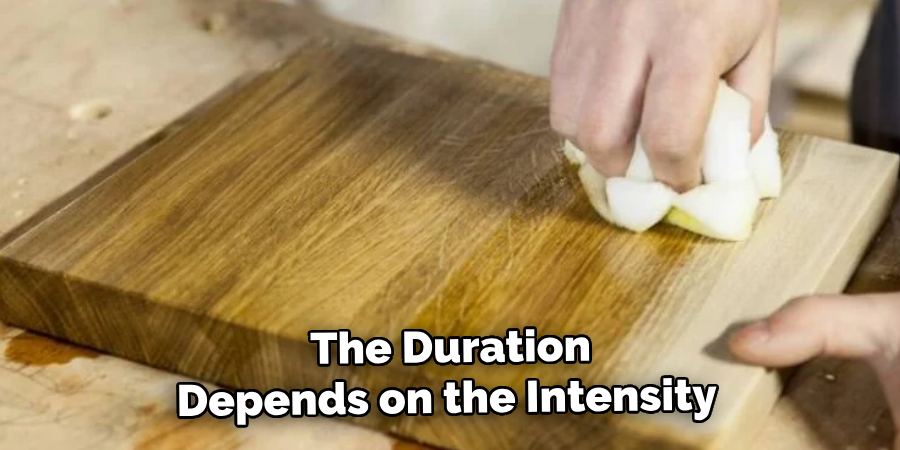
- 24 Hours: This will produce a lighter, more subtle gray wash.
- 3 to 4 Days: This creates a much darker, richer solution.
- Warning: Do not leave the lid on tight while it sits, as the chemical reaction releases gas that can build up pressure in the jar.
Will This Technique Work on Pressure-Treated Wood?
It is generally not recommended for pressure-treated wood.
- Chemical Barrier: The chemicals used to treat the wood can interfere with the iron acetate reaction, leading to unpredictable or blotchy colors (sometimes green).
- Safety: Sanding pressure-treated wood releases toxic dust. It is safer and more effective to stick to untreated pine, spruce, or standard construction lumber.
Can I Add Paint to the Aging Process?
Yes, adding paint layers is a great way to simulate old painted barn wood.
- Dry Brushing: Lightly drag a brush with a small amount of white or gray paint over the surface after staining to highlight the high points.
- Sanding Back: You can also paint the wood first, then sand heavily in wear areas before applying the stain for a “chippy” paint look.
Does the Smell of Vinegar Go Away?
The smell is strong during application but does fade completely.
- Drying Time: Once the wood is fully dry, the vinegar odor will dissipate.
- Sealing: Applying a clear coat or wax seals the surface and eliminates any lingering scent.
- Ventilation: Always work in a well-ventilated area, preferably outdoors or in a garage, to keep the fumes from lingering in your home.
Conclusion
Transforming new, inexpensive lumber into wood that looks like it has a century of stories to tell is one of the most satisfying DIY projects you can undertake. It requires no expensive equipment, just a bit of creativity and some patience. By mastering the art of physical distressing and understanding the chemistry between tannins and iron acetate, you open up a world of design possibilities. You can build picture frames, farm tables, or accent walls that carry a sense of history and warmth.
Don’t be afraid to experiment with different tools for distressing or different steeping times for your solutions. The beauty of this technique lies in its imperfections; no two boards will ever look exactly alike. Now that you know how to make wood look aged, you are ready to head to your workshop and start creating pieces that bring that coveted rustic charm into your home.
About
Mike May is a distinguished figure in the world of woodworking and timber design, with a decade of expertise creating innovative and sustainable indoor solutions. His professional focus lies in merging traditional craftsmanship with modern manufacturing techniques, fostering designs that are both practical and environmentally conscious. As the author of Woodimber, Mike delves into the art and science of timber-craft, inspiring artisans and industry professionals alike.
Education
RMIT University (Melbourne, Australia)
-
Associate Degree in Design (Timber): Focus on sustainable design, industry-driven projects, and practical craftsmanship.
-
Gained hands-on experience with traditional and digital manufacturing tools, such as CAD and CNC software.
Nottingham Trent University (United Kingdom)
-
Bachelor’s in Woodworking and Product Design (Honors): Specialized in product design with a focus on blending creativity with production techniques.
-
Participated in industry projects, working with companies like John Lewis and Vitsoe to gain real-world insights.
Publications and Impact
In Woodimber, May shares his insights on timber design processes, materials, and strategies for efficient production. His writing bridges the gap between artisan knowledge and modern industry needs, making it a must-read for both budding designers and seasoned professionals.