 (1)")

Building your own furniture is one of the most satisfying projects you can undertake as a homeowner. There is a unique sense of pride that comes from looking at a sturdy, beautiful piece of woodwork and knowing you created it with your own hands. For beginners, a simple shelf is the perfect entry point into the world of carpentry. It requires minimal tools, basic materials, and a straightforward design, yet the result is both functional and decorative. Whether you need extra storage for your gardening books, a display for your potted succulents, or just a place to organize your tools, this project is versatile enough to fit any need.

Many people feel intimidated by woodworking, fearing they lack the skills or the expensive machinery seen on television shows. However, the reality is much more accessible. You don’t need a professional workshop to get started. With a little patience and the right guidance, anyone can learn how to make a wooden shelf that looks professional and stands the test of time. This guide is designed to walk you through the process, stripping away the complexity and focusing on the fundamental techniques that will serve you well in this project and many more to come.
Why Learning Woodworking Skills Is Valuable
Mastering the basics of construction does more than just give you a place to put your things. It empowers you to customize your living space exactly to your specifications. Store-bought furniture often comes in standard sizes that might not fit that awkward nook in your hallway or the specific height of your seed-starting trays. When you build it yourself, you control the dimensions, the finish, and the quality of the materials. You are no longer limited by what is available in a catalog or on a showroom floor.
Furthermore, working with wood is a tactile, grounding experience that offers a welcome break from our digital lives. It requires focus and precision, acting as a form of meditation. The skills you acquire—measuring, cutting, sanding, and finishing—are transferable. Once you understand the logic of joining two boards together, you can scale up to building garden beds, potting benches, or even more complex cabinetry. It transforms you from a passive consumer of goods into an active creator, saving you money in the long run while providing a creative outlet that enhances your home environment.
Step-by-Step Guide on How to Make a Wooden Shelf
Step 1: Design Your Shelf and Gather Materials
The first phase of your project happens on paper rather than in the workshop. You need to determine the purpose and location of your new furniture piece. specific dimensions are crucial here. Measure the wall space where the unit will hang or stand to ensure a perfect fit. Decide on the depth, as a bookshelf needs more room than a spice rack. Once your sketch is complete, head to the lumber yard. For a beginner project, pine boards are an excellent choice because they are softwood, easy to cut, and relatively inexpensive. You will also need wood screws, wood glue, and sandpaper.

Step 2: Measure and Mark Your Cuts Accurately
Precision is the most critical element in woodworking. Take your tape measure and transfer the dimensions from your sketch onto your lumber. Use a carpenter’s square to draw straight, crisp lines across the wood grain where you intend to cut. It is a golden rule in the trade to measure twice and cut once. Double-check your numbers before you even pick up a saw. If your measurements are off by even a fraction of an inch, your final assembly might be wobbly or crooked. Mark the waste side of the line with an ‘X’ to remind yourself which side of the line to cut on.
Step 3: Cut the Wood to Size
Now it is time to transform your long boards into the components of your project. If you are using a hand saw, support the wood firmly on a stable surface or sawhorse. Use smooth, steady strokes to follow your marked lines. If you have access to a circular saw or miter saw, the process will be faster, but safety is paramount. Wear your safety glasses and keep your fingers well away from the blade. Cut your top, bottom, and side pieces first. Then, cut the internal shelving pieces. Ensure that all pieces meant to be the same length are exactly identical to ensure the unit is square.
Step 4: Sand the Components Before Assembly
Many beginners make the mistake of waiting until the end to sand, but it is much easier to do it now while the pieces are separate. Use a medium-grit sandpaper, around 120-grit, to smooth out any rough edges from the sawing process. Sand the flat surfaces to remove any mill marks or scratches from the lumber yard. Follow up with a finer grit, like 220, to make the wood feel smooth to the touch. This step is essential for a professional finish. It opens the pores of the wood, preparing it to accept stain or paint later. Wipe away all the sawdust with a clean, tack cloth.

Step 5: Dry Fit the Pieces Together
Before you apply any glue or drive any screws, you should loosely assemble the pieces to see how they fit. This “dry fit” allows you to spot any errors in cutting or measuring without the pressure of drying glue. Arrange your top, bottom, and sides to form the outer frame. Place the inner shelves where you want them. Check the corners with your square tool to ensure everything sits at a perfect ninety-degree angle. If a board is slightly too long, trim it now. This rehearsal ensures that the actual assembly process of learning how to make a wooden shelf goes smoothly and without panic.
Step 6: Assemble the Frame with Glue and Screws
Start the permanent assembly by joining the top and bottom pieces to the side panels. Run a thin bead of wood glue along the edge of the side panel where it will meet the top board. The glue creates a bond stronger than the wood itself. Press the pieces together and secure them. To prevent the wood from splitting, drill pilot holes that are slightly smaller than the diameter of your screws. Drive the screws through the top board into the edge of the side panel. Repeat this for all four corners until you have a sturdy rectangular box frame. Wipe away any excess glue immediately with a damp cloth.

Frequently Asked Questions
What Is the Best Wood for Beginners?
For your first woodworking project, softwoods are generally the best choice.
- Pine: It is inexpensive, readily available at home centers, and easy to cut and sand.
- Poplar: Slightly harder than pine but still easy to work with and takes paint very well.
- Cedar: Great for outdoor projects due to its natural rot resistance, though it can be pricier.
Avoid hardwoods like oak or maple initially, as they are more expensive and harder on your tools.
Do I Need Power Tools to Build This?
No, you do not strictly need power tools, although they speed up the process.
- Hand Saws: A good, sharp hand saw can make all the necessary cuts.
- Screwdriver: A manual screwdriver works fine for assembly, though your wrist might get tired.
- Sandpaper: Hand sanding with a block is perfectly effective.
However, a cordless drill is highly recommended as the one power tool to invest in first, as it makes drilling pilot holes and driving screws significantly easier.
How Do I Keep the Wood From Splitting?
Splitting usually happens when you drive a screw too close to the edge of a board without preparation.
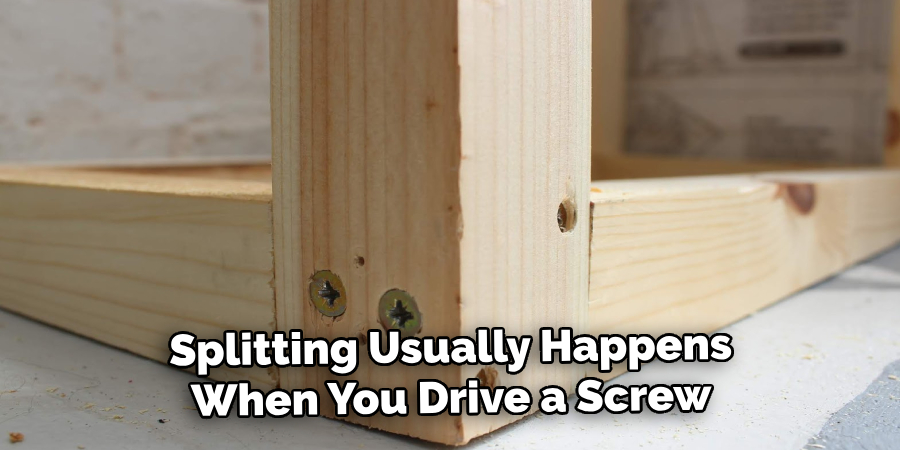
- Pilot Holes: Always drill a pilot hole first. This removes some wood material to make room for the screw shaft.
- Bit Size: Use a drill bit that is the same diameter as the solid shaft of the screw (not including the threads).
- Countersink: Countersinking the hole allows the screw head to sit flush without acting as a wedge that splits the grain.
How Deep Should a Bookshelf Be?
The depth depends on what you plan to store, but there are standards.
- Paperbacks: A depth of 6 to 8 inches is usually sufficient.
- Large Hardcovers/Binders: A depth of 10 to 12 inches is standard.
- General Storage: 12 inches is the most common width for lumber boards (nominal size), making it a convenient choice that requires less ripping (cutting lengthwise).
Why Is My Shelf Wobbling?
Wobbling usually comes from uneven legs or a frame that isn’t “square.”
- Check Square: Measure the diagonals of your frame; if they are equal, the box is square.
- Level Floor: Often the floor is uneven, not the furniture. Use shims under the legs to level it.
- Backing Board: Adding a thin plywood backing to the unit significantly increases structural rigidity and stops side-to-side swaying (racking).
Conclusion
Taking the leap into DIY woodworking opens up a world of possibilities for your home and garden. What starts as a simple storage solution can quickly become a passion for creating custom, durable items that reflect your personal style. By following the steps outlined above, you have moved past the hesitation and gained practical experience in measuring, cutting, and assembling. Remember, mistakes are just part of the learning process—wood putty and sandpaper can fix almost anything.
Now that you have successfully learned how to make a wooden shelf, you have the foundational skills to tackle even bigger projects. perhaps a potting bench for the garden or a rustic coffee table is next on your list. The confidence you’ve built here is the most valuable tool in your kit. So, fill up those shelves, admire your craftsmanship, and start planning your next build.
About
Mike May is a distinguished figure in the world of woodworking and timber design, with a decade of expertise creating innovative and sustainable indoor solutions. His professional focus lies in merging traditional craftsmanship with modern manufacturing techniques, fostering designs that are both practical and environmentally conscious. As the author of Woodimber, Mike delves into the art and science of timber-craft, inspiring artisans and industry professionals alike.
Education
RMIT University (Melbourne, Australia)
-
Associate Degree in Design (Timber): Focus on sustainable design, industry-driven projects, and practical craftsmanship.
-
Gained hands-on experience with traditional and digital manufacturing tools, such as CAD and CNC software.
Nottingham Trent University (United Kingdom)
-
Bachelor’s in Woodworking and Product Design (Honors): Specialized in product design with a focus on blending creativity with production techniques.
-
Participated in industry projects, working with companies like John Lewis and Vitsoe to gain real-world insights.
Publications and Impact
In Woodimber, May shares his insights on timber design processes, materials, and strategies for efficient production. His writing bridges the gap between artisan knowledge and modern industry needs, making it a must-read for both budding designers and seasoned professionals.