 (1)")

Whether you are connecting a deck to your garden, building a multi-level patio, or creating access to a raised entryway, a set of sturdy wood stairs is often a necessary and beautiful addition to your home.

While the project might seem daunting, involving complex angles and precise measurements, it is a surprisingly achievable challenge for a determined DIYer. Building stairs is a masterclass in basic carpentry, combining math with hands-on construction to create something both functional and aesthetically pleasing. This guide is designed to demystify the process for beginners.
We will show you how to build wood stairs safely and correctly, breaking down the project into clear, manageable steps from initial measurements to final assembly. With the right approach, you can create a safe, durable, and professional-looking staircase that enhances your outdoor living space.
Why Building Wood Stairs Matters for Your Home
Building a proper set of wood stairs is more than just a functional task; it is a critical element of home safety and design. A well-built staircase provides secure and comfortable access between different levels of your property, preventing trips and falls. For decks and patios, stairs are the bridge between your indoor and outdoor living areas, and their design can significantly impact the flow and usability of the space. From a structural standpoint, understanding the principles of stair construction—like the proper rise and run—ensures your project complies with building codes and will withstand years of use. It is a project that adds significant value, enhances curb appeal, and provides an immense sense of accomplishment.
A Step-by-Step Guide on How to Build Wood Stairs
Step 1: Measure the Total Rise and Run
Before you can make a single cut, you must determine the dimensions of your staircase. The most critical measurement is the “total rise,” which is the vertical distance from the lower finished surface to the upper finished surface where the stairs will land.

Use a level and a tape measure to get a precise reading. Next, determine the “total run,” which is the horizontal space the staircase will occupy. Local building codes often dictate the maximum rise and minimum run for each step to ensure safety and comfort, so this planning stage is crucial for compliance. These two initial measurements form the foundation for all subsequent calculations.
Step 2: Calculate the Rise and Run of Each Step
With your total rise measured, you can now calculate the dimensions for your individual steps. Divide the total rise by 7.5, which is a common and comfortable riser height in inches. This will give you the approximate number of risers needed. Round this number to the nearest whole number to get your final riser count. Now, divide the total rise again, this time by the exact number of risers you just calculated. This result is your precise riser height for each step. Next, determine the “tread run,” which is the depth of each step. A comfortable tread run is typically between 10 and 11 inches. This careful calculation ensures every step is uniform and safe to walk on.
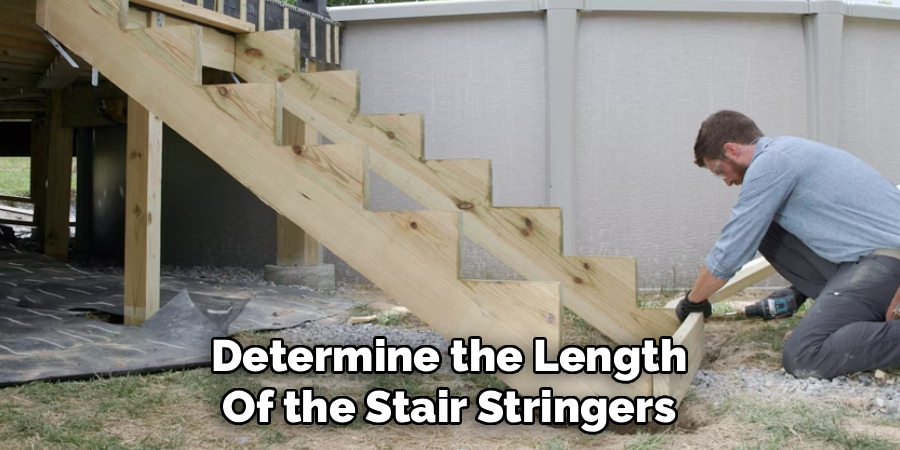
Step 3: Determine the Length of the Stair Stringers
The stair stringers are the diagonal support beams that hold the treads and risers. To find the required length for your stringer boards (usually 2×12 lumber), you will use the Pythagorean theorem. You already have the total rise and have calculated the total run (number of treads multiplied by the tread depth). Square the total rise, square the total run, and add the two results together.
The square root of this sum is the exact diagonal length your stringer needs to be. It is always wise to purchase boards that are slightly longer than this calculated length to give yourself some room for error.
Step 4: Laying Out the Stringers
This is where your calculations come to life. You will need a framing square with stair gauges attached. Set one gauge on the framing square to your calculated riser height and the other to your tread run measurement. Starting at one end of your 2×12 board, align the framing square so the gauges are flush against the edge of the lumber.
Trace the right angle formed by the square to mark your first step. Slide the square down the board, aligning it with the mark you just made, and trace the next step. Continue this process until you have marked out all the steps. This layout is a critical part of knowing how to build wood stairs accurately.
Step 5: Cut the Notches for the Treads and Risers
With your stringers marked, it is time to cut the triangular notches where the steps will sit. Use a circular saw to make the cuts, but be very careful not to cut past your layout lines. Overcutting can create a weak point in the stringer that could fail under load. Stop your circular saw cuts just short of the inside corner of each notch. Then, use a handsaw or a jigsaw to finish the cuts perfectly to the corner. This two-tool approach ensures a clean, strong notch. After cutting the first stringer, use it as a template to trace the layout onto the other stringers, ensuring they are all identical.
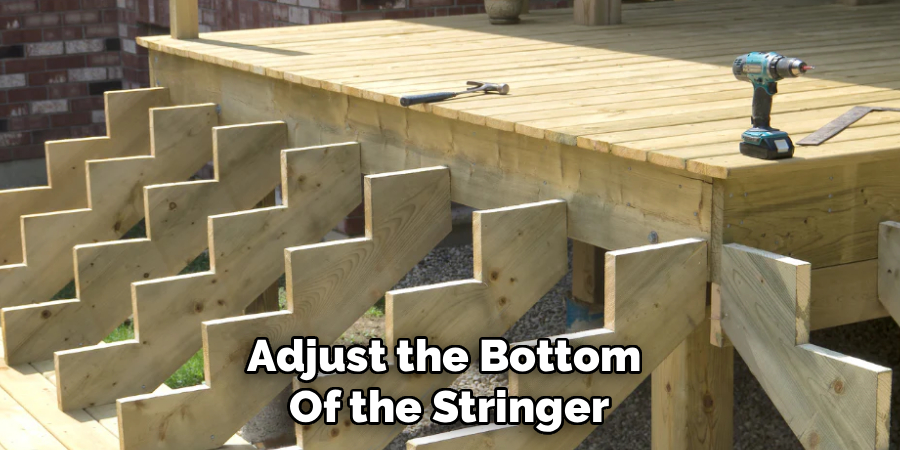
Step 6: Adjust the Bottom of the Stringer
The bottom of the stringer needs a final adjustment to ensure the first step is the correct height. The thickness of your tread material (usually 1 or 1.5 inches) adds height to every step except the bottom one. To compensate for this, you must cut an amount equal to the thickness of one tread off the bottom of the stringer. Use your framing square to draw a line parallel to the bottom tread cut, and then remove this sliver of wood. This crucial adjustment, known as “dropping the stringer,” ensures that when the treads are installed, every single step from the bottom to the top will have an identical rise.
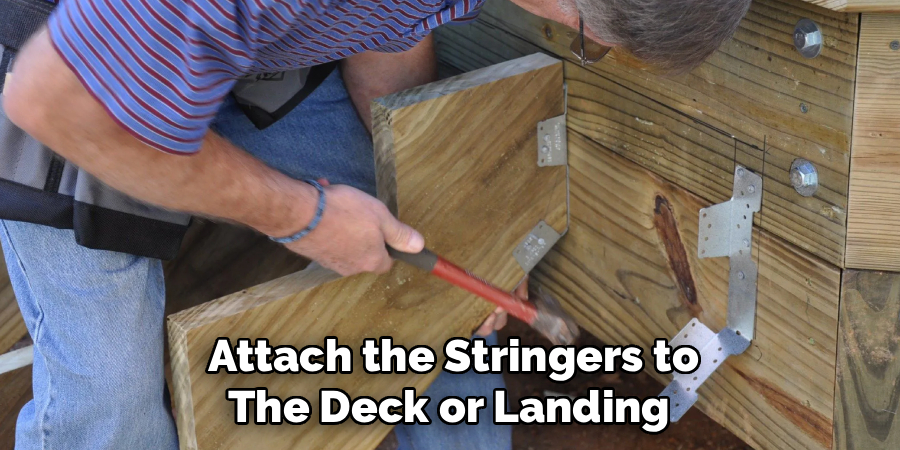
Step 7: Attach the Stringers to the Deck or Landing
Now you can install the structural backbone of your stairs. The stringers are typically attached to the rim joist of the deck or landing using metal hardware like joist hangers or specialized stair stringer connectors.
This hardware provides a strong, secure connection that meets building code requirements. Space the stringers according to your local codes, but a common practice is to place them no more than 16 inches apart on center for adequate tread support. Use a level to ensure the stringers are plumb (perfectly vertical) before permanently fastening them in place.
Frequently Asked Questions
What Is the Best Wood for Outdoor Stairs?
Pressure-treated pine is the most common and cost-effective choice for outdoor stairs.
- Durability: The chemical treatment makes it resistant to rot, decay, and insect damage.
- Alternatives: Cedar and redwood are naturally rot-resistant and beautiful but come at a significantly higher cost. For high-end projects, composite materials offer extreme durability with no maintenance, but they are the most expensive option.
What Is the Rule for Rise and Run in Stairs?
A common guideline is the “7-11 Rule.”
- Dimensions: This rule suggests a riser height of about 7 inches and a tread run of about 11 inches.
- Building Code: Most local building codes mandate a maximum riser height (often 7.75 inches) and a minimum tread depth (often 10 inches). Always check your local codes before starting, as safety is the top priority.
How Far Apart Should Stair Stringers Be?
The spacing of your stringers depends on the thickness of your tread material.
- Standard Spacing: For standard 5/4 decking or 2x lumber treads, stringers should be spaced no more than 16 inches on center.
- Wider Spacing: If you are using thicker wood for your treads, you might be able to space them wider, but 16 inches is a safe and standard practice for residential decks. Closer spacing provides a more solid feel underfoot.
Do Outdoor Stairs Need Risers?
Whether risers are required often depends on your local building codes.
- Open Risers: Many outdoor decks have “open” risers for a more airy look.
- Code Requirement: Some codes require risers if the space between treads is large enough for a small child to fall through (typically a 4-inch sphere rule).
- Structural Benefit: Even if not required, adding riser boards can increase the staircase’s rigidity and strength.
Do I Need a Permit to Build Deck Stairs?
In most jurisdictions, yes, you will likely need a building permit.
- Safety: Stairs are a critical safety feature, and building departments want to ensure they are constructed correctly to prevent accidents.
- When to Check: If you are building a new deck, replacing an entire staircase, or making significant structural changes, you should always check with your local building department first. It is better to be safe than to have to tear down your work later.
Conclusion
Building a set of wood stairs is a project that perfectly blends technical precision with hands-on craftsmanship. From the initial mathematical calculations of rise and run to the final screw in the last tread, each step is critical for ensuring a safe, comfortable, and long-lasting result. The key takeaways are to measure meticulously, use a framing square for accurate layouts, and never compromise on the structural connections. While it demands patience, the process is well within the reach of a beginner who is willing to learn and work carefully.
The satisfaction of creating a functional and beautiful staircase with your own hands is immense. Now that you are armed with a deeper understanding of how to build wood stairs, you can approach this rewarding project with confidence, knowing you have the knowledge to do it right.
About
Mike May is a distinguished figure in the world of woodworking and timber design, with a decade of expertise creating innovative and sustainable indoor solutions. His professional focus lies in merging traditional craftsmanship with modern manufacturing techniques, fostering designs that are both practical and environmentally conscious. As the author of Woodimber, Mike delves into the art and science of timber-craft, inspiring artisans and industry professionals alike.
Education
RMIT University (Melbourne, Australia)
-
Associate Degree in Design (Timber): Focus on sustainable design, industry-driven projects, and practical craftsmanship.
-
Gained hands-on experience with traditional and digital manufacturing tools, such as CAD and CNC software.
Nottingham Trent University (United Kingdom)
-
Bachelor’s in Woodworking and Product Design (Honors): Specialized in product design with a focus on blending creativity with production techniques.
-
Participated in industry projects, working with companies like John Lewis and Vitsoe to gain real-world insights.
Publications and Impact
In Woodimber, May shares his insights on timber design processes, materials, and strategies for efficient production. His writing bridges the gap between artisan knowledge and modern industry needs, making it a must-read for both budding designers and seasoned professionals.