 (1)")

Nothing transforms the exterior of a home quite like a set of custom shutters. They add instant warmth, character, and architectural interest that standard vinyl options simply cannot match.

Whether you want a rustic farmhouse look or a sleek modern aesthetic, crafting your own shutters allows you to control the design, size, and finish perfectly. While many homeowners assume this is a job for a professional carpenter, constructing sturdy, beautiful shutters is actually a very manageable weekend project. Learning how to build wood shutters gives you the power to upgrade your home’s curb appeal dramatically without spending a fortune on custom millwork.
This guide is designed for beginners and home gardeners who want to tackle a rewarding project that blends woodworking with exterior design. We will walk you through everything from selecting the right lumber to hanging the finished pieces, ensuring you have the confidence to create something truly special for your home.
Why Building Your Own Shutters Is Worth It
Taking the DIY route for your shutters offers benefits that go far beyond just saving money. First, you get complete customization. Most store-bought shutters come in standard sizes that might look too narrow or too short for your specific windows. By building them yourself, you ensure a perfect fit that looks proportional and intentional, rather than like an afterthought. You also have total control over the materials. Instead of flimsy plastic that fades in the sun, you can choose durable, rot-resistant woods like cedar or redwood that will age beautifully and last for decades.
Furthermore, building shutters is a fantastic entry point into woodworking. The construction is straightforward—mostly straight cuts and simple joinery—making it an ideal project to build your skills and confidence. There is also a deep sense of satisfaction that comes from pulling into your driveway and seeing the handiwork you created framing your windows. It adds a personal touch to your home’s facade that reflects your care and attention to detail. Whether you are looking to boost your property value before a sale or simply want to fall in love with your home all over again, this project delivers a high return on investment.
Step-by-Step Guide on How to Build Wood Shutters
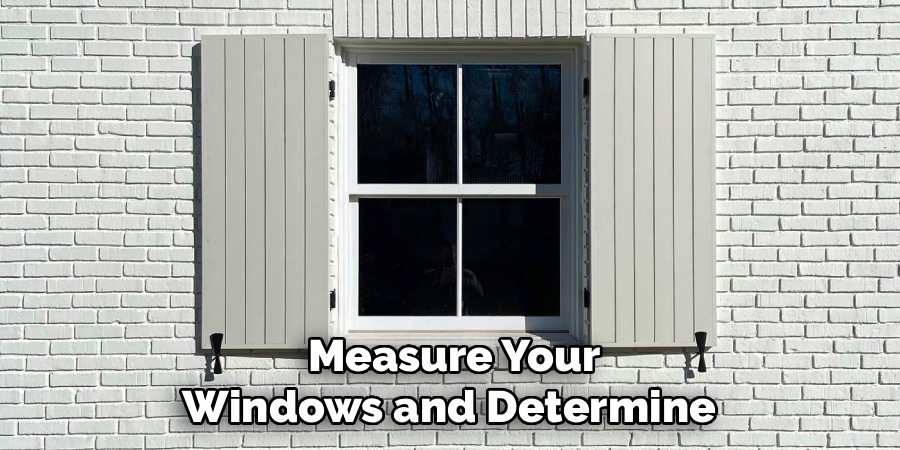
Step 1: Measure Your Windows and Determine Shutter Size
The most critical part of this project happens before you ever touch a saw. You need accurate measurements to ensure your shutters look authentic. Historically, shutters were designed to close over the window, so each shutter should be half the width of the window frame and the exact height of the opening.
Even if you are installing decorative shutters that will never close, sticking to these proportions makes them look realistic rather than fake. Measure the height of your window casing from the top edge to the bottom edge. Then, measure the width and divide by two. Record these numbers carefully, as they will determine your cut list. If you have multiple windows, measure each one individually, as house settling can cause slight variations in size.
Step 2: Select the Best Lumber for Outdoor Use
Choosing the right wood is essential for longevity since these shutters will be exposed to rain, sun, and snow. Softwoods like pine are cheap, but they rot quickly unless meticulously maintained. For a long-lasting project, opt for cedar, redwood, or cypress.
These species contain natural oils that resist decay and insect damage. If you plan to paint the shutters, you can use a less expensive exterior-grade pine, but you must seal it perfectly. For a classic board-and-batten style, you will typically need 1×6 boards for the vertical slats and 1×4 boards for the horizontal battens. Purchase straight, knot-free boards to minimize warping and waste. Buying quality lumber now saves you from rebuilding rotted shutters in a few years.
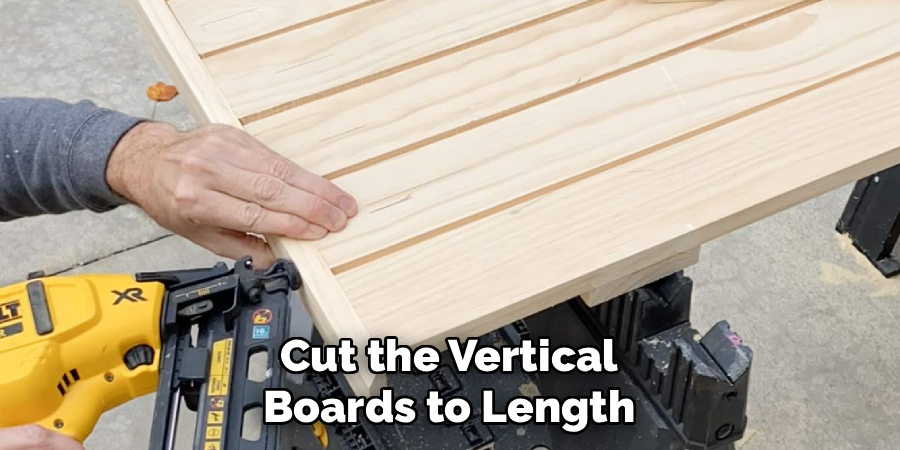
Step 3: Cut the Vertical Boards to Length
Now it is time to start cutting your lumber. Set up your miter saw or circular saw on a stable work surface. Take your 1×6 boards and cut them to the height measurement you determined in step one. For a standard window width, you will likely need three or four boards per shutter.
Lay these vertical boards side-by-side on a flat surface to check the total width. If the combined width of the boards is wider than your measurement, you will need to rip the outer boards down to size using a table saw or circular saw with a guide. Ensure the cuts are square and the ends are smooth. This forms the main body of the shutter, so accuracy here ensures the final product hangs straight.
Step 4: Cut the Horizontal Battens and Decorative Trim
The horizontal boards, known as battens, hold the vertical slats together and provide that classic rustic look. Using your 1×4 lumber, cut the battens to match the total width of your assembled vertical boards. You will generally need two battens per shutter—one near the top and one near the bottom. For taller windows, adding a third batten in the center adds stability and visual interest.
If you want a diagonal cross-brace for a “Z” style shutter, lay a board diagonally across your laid-out battens, mark the angles with a pencil where it meets the horizontal pieces, and cut it to fit snugly. These pieces provide the structural integrity for the shutter, so ensure they are cut precisely to align with the edges of the vertical boards.
Step 5: Sand and Prep the Wood Components
Before assembly, it is crucial to sand all your cut pieces. Use an orbital sander with 120-grit sandpaper to smooth out any rough edges, saw marks, or splinters. Pay special attention to the cut ends, which can be rough and porous. Sanding now is much easier than trying to get into the corners after the shutter is assembled.
This is also the best time to apply a wood preservative or a coat of primer to the back of the boards and the edges that will touch each other. Once assembled, these gaps will be inaccessible, and moisture can get trapped there. Sealing them beforehand is a pro tip on how to build wood shutters that last.
Step 6: Assemble the Shutter Body
Lay your vertical boards face down on your workbench. Use clamps to squeeze them tightly together so there are no gaps between the slats. If you want a small gap for ventilation or style, use spacers (like pennies or tile spacers) between the boards.
Once arranged, measure down from the top and up from the bottom to position your battens. A good rule of thumb is to place them about one-sixth of the total height from each end. Apply a bead of exterior-grade wood glue to the back of the battens and place them across the vertical boards. The glue provides a chemical bond that works with your fasteners to prevent the shutter from sagging over time.
Step 7: Secure the Battens with Screws
With the battens glued in place, you need to fasten them mechanically. Flip the assembly over if you want the screw heads hidden, driving screws through the back of the vertical slats into the battens. However, for a rustic look, driving screws or nails through the front of the battens into the slats is more common.
Use exterior-grade screws (like stainless steel or coated deck screws) to prevent rust streaks. Drill pilot holes first to keep the wood from splitting, especially near the edges. Drive two screws into each vertical board where it intersects with a batten. This creates a rigid connection that locks the boards together. Check for squareness by measuring diagonally from corner to corner; the measurements should be equal.

Frequently Asked Questions (FAQ)
What Type of Wood is Best for Exterior Shutters?
The best wood species are those naturally resistant to rot and insects.
- Cedar: A top choice because it is lightweight, stable, and has natural oils that repel water.
- Redwood: Extremely durable and takes stain beautifully, though it can be more expensive.
- Cypress: Excellent water resistance, making it a favorite in humid climates.
- Pressure-Treated Pine: A budget option, but it must be dried thoroughly and sealed well to prevent warping.
How Wide Should My Shutters Be?
For the most authentic look, shutters should appear as if they could close and cover the window.
- Measurement: Measure the inside width of your window casing.
- Calculation: Divide that number by two. That is the ideal width for each shutter.
- Example: If your window is 30 inches wide, each shutter should be 15 inches wide. Even decorative shutters look best when they follow this rule of proportion.
Do I Need to Use Glue and Screws?
Yes, using both provides the strongest, longest-lasting joint.
- Glue: Creates a continuous bond between the surfaces, preventing the boards from shifting. Use a waterproof wood glue (Type III).
- Screws: Provide mechanical holding power that clamps the joint while the glue dries and resists the wood’s natural tendency to move with humidity changes. Nails can pull out over time; screws stay tight.
Can I Mount Shutters on Vinyl Siding?
Yes, but you need to be careful to allow for expansion.
- Drilling: Drill a hole through the vinyl siding that is slightly larger than the screw shank. This prevents the vinyl from cracking as it expands and contracts with temperature changes.
- Framing: Ensure your screws are long enough to pass through the shutter, the siding, and the sheathing to bite into the solid wood studs underneath. Do not hang heavy shutters just on the thin vinyl layer.
How Often Do Wood Shutters Need Maintenance?
Maintenance depends on your climate and the finish you chose.
- Painted Shutters: Typically need repainting every 5-7 years, or when you notice peeling or cracking.
- Stained Shutters: May need a fresh coat of sealer or stain every 2-3 years, as UV rays break down clear finishes faster than paint.
- Inspection: Check them annually for loose screws or signs of rot, especially at the bottom edges.

Conclusion
Building your own wood shutters is a transformative project that combines creativity with practicality. It allows you to break free from the limitations of mass-produced plastic options and add a layer of genuine craftsmanship to your home’s exterior. By carefully selecting your lumber, measuring accurately, and assembling with durability in mind, you create architectural details that not only look stunning but will stand the test of time.
The beauty of this project lies in its simplicity; it requires only basic tools and materials, yet the impact on your home’s curb appeal is profound. Whether you choose a classic board-and-batten style or something more modern, the pride of knowing you built it yourself adds a special value that money cannot buy. Now that you have mastered how to build wood shutters, you can look at your windows with a fresh perspective and enjoy the timeless charm of your new, handmade addition.
About
Mike May is a distinguished figure in the world of woodworking and timber design, with a decade of expertise creating innovative and sustainable indoor solutions. His professional focus lies in merging traditional craftsmanship with modern manufacturing techniques, fostering designs that are both practical and environmentally conscious. As the author of Woodimber, Mike delves into the art and science of timber-craft, inspiring artisans and industry professionals alike.
Education
RMIT University (Melbourne, Australia)
-
Associate Degree in Design (Timber): Focus on sustainable design, industry-driven projects, and practical craftsmanship.
-
Gained hands-on experience with traditional and digital manufacturing tools, such as CAD and CNC software.
Nottingham Trent University (United Kingdom)
-
Bachelor’s in Woodworking and Product Design (Honors): Specialized in product design with a focus on blending creativity with production techniques.
-
Participated in industry projects, working with companies like John Lewis and Vitsoe to gain real-world insights.
Publications and Impact
In Woodimber, May shares his insights on timber design processes, materials, and strategies for efficient production. His writing bridges the gap between artisan knowledge and modern industry needs, making it a must-read for both budding designers and seasoned professionals.